Are you looking to control your lights from two different spots? Installing a double switch light can make your home more convenient and stylish.
Imagine turning your hallway or living room light on and off from either end, without getting up or walking back. If you think this sounds complicated, don’t worry—you’re in the right place. This guide will walk you through each step in a simple way, so you can do it yourself safely and confidently.
Ready to make your lighting smarter and easier to use? Let’s get started!
Tools And Materials Needed
Installing a double switch light requires specific tools and materials. Having the right items on hand makes the job easier and safer. Prepare everything before starting the work. This saves time and avoids interruptions.
Essential Tools For Installation
Use a screwdriver with both flat and Phillips heads. A voltage tester is important to check power safety. Wire strippers help remove insulation cleanly. Needle-nose pliers assist in bending and holding wires. A drill can be useful for mounting the switch box. Tape measure ensures accurate placement and spacing.
Required Materials For Double Switch Light
Buy a double switch that fits your wall box. Electrical wires must match your home’s wiring gauge. Wire nuts secure wire connections safely. Electrical tape adds extra insulation. A switch box may be needed if none exists. Wall plates cover the switches for a clean look.
Safety Equipment
Wear insulated gloves to protect against electric shocks. Safety goggles keep dust and debris away from eyes. Use a sturdy ladder to reach high switch locations. Make sure the work area is well-lit and dry. Keep a flashlight nearby in case of power outage.

Credit: www.electriciansforums.net
Safety Tips Before Starting
Before starting, turn off the power at the main switch to avoid electric shocks. Double-check with a tester to ensure no current flows. Wear insulated gloves and use proper tools for safety.
Understand The Power Source
Always turn off the main power before starting. This stops electricity from flowing. Use a voltage tester to check wires. Make sure no current is present. Safety begins with cutting the power supply.
Gather The Right Tools
Use insulated tools made for electrical work. Avoid metal tools without covers. Proper tools protect you from shocks. Keep everything ready before you start.
Wear Protective Gear
Wear rubber-soled shoes and gloves. These reduce the risk of electric shocks. Keep your hands dry. Safety gear helps keep you safe.
Work In A Dry Area
Never work with electricity in wet places. Water conducts electricity and causes shocks. Ensure the workspace is dry and clean. Safety is easier when the area is safe.
Know Your Wiring
Learn which wire connects where. Label wires if needed. Understanding wiring prevents mistakes. Clear knowledge avoids accidents.
Turn Off Power Supply
Turning off the power supply is the first and most important step before installing a double switch light. It protects you from electric shocks and prevents damage to the wiring. Always make sure the electricity is completely off before starting any work.
Safety should be your top priority. Never skip this step or work on live wires. Taking a moment to turn off the power can save you from serious injury.
Locate The Main Circuit Breaker
Find your home’s main circuit breaker panel. It is usually in the basement, garage, or utility room. Open the panel door carefully to access the breakers.
Switch Off The Correct Breaker
Identify the breaker that controls the light switch you want to replace. Turn this breaker to the OFF position. If you cannot find the right breaker, turn off the main breaker to cut power to the entire house.
Verify Power Is Off
Use a non-contact voltage tester to check the wires at the switch. The tester will light up or beep if electricity is present. If no power is detected, it is safe to proceed.
Wear Protective Gear
Put on insulated gloves and safety glasses before handling wires. This adds an extra layer of protection against shocks or sparks.
Remove Existing Switch
Removing the existing switch is the first step to install a double switch light. This task requires safety and care. Follow the steps carefully to avoid any problems.
Locate the circuit breaker for the switch. Turn it off to cut power. Test the switch to confirm no electricity flows.
Remove Switch Cover Plate
Use a screwdriver to remove the screws on the cover plate. Gently take off the plate and set it aside.
Unscrew The Old Switch
Remove the screws holding the switch to the electrical box. Pull the switch out slowly to see the wires.
Note Wire Connections
Look carefully at how wires connect to the switch. Take a photo or write down their positions. This helps during installation.
Disconnect Wires
Loosen the screws or release the wires from the switch. Carefully pull the wires free. Keep them from touching each other.
Identify And Prepare Wires
Identifying and preparing wires is the first step in installing a double switch light. This step ensures safety and proper connection. It helps avoid electrical problems later on.
Before handling wires, turn off the power at the circuit breaker. Use a voltage tester to confirm no current flows through the wires. Safety first.
Identify The Live Wire
The live wire carries electricity from the power source. It is often black or red. Use a voltage tester to find this wire. Mark it with tape for easy recognition.
Locate The Neutral Wire
The neutral wire completes the electrical circuit. It is usually white or gray. This wire carries current away from the switch. Make sure to separate it from live wires.
Find The Ground Wire
The ground wire protects against electrical faults. It is green or bare copper. Connect it to the grounding screw on the switch box. Proper grounding prevents shocks.
Prepare The Wires For Connection
Strip about half an inch of insulation from each wire end. Use wire strippers for a clean cut. Twist the wire strands to prevent fraying. This makes a strong connection.
Connect The Double Switch
Connecting the double switch is a key step in installing your new light switch. This process links the wires to the switch, allowing control of two lights or fixtures. Careful connection ensures safety and proper function. Follow each step closely to avoid mistakes.
Attach Ground Wire
Start by attaching the ground wire to the switch. The ground wire is usually green or bare copper. Secure it to the green screw on the switch. This step protects against electrical shocks and shorts.
Connect Live And Load Wires
Identify the live wire, often black or red. Connect it to the common terminal on the double switch. Then, connect the load wires to the other terminals. These wires lead to the lights you want to control. Tighten the screws firmly to hold the wires in place.
Secure Neutral Wire If Needed
Some double switches require a neutral wire connection. The neutral wire is usually white. If your switch has a neutral terminal, connect this wire securely. If not needed, cap the neutral wire safely with a wire nut. Proper handling keeps the circuit complete and safe.
Mount The Switch And Restore Power
Mounting the double switch and restoring power are the final steps of installation. This part ensures the switch works safely and correctly. Careful handling is key to avoid damage or electrical hazards.
Follow each step closely to secure the switch and bring power back. Check all connections before restoring electricity. This keeps your home safe and the switch functional.
Secure The Double Switch To The Wall Box
Align the switch with the wall box holes. Use screws to fasten the switch tightly. Avoid overtightening to prevent cracking the switch plate. Make sure the switch sits flush against the wall.
Attach The Switch Cover Plate
Place the cover plate over the switch. Insert screws into the cover plate holes. Tighten screws until the plate fits snugly. This protects wiring and adds a clean look.
Restore Power At The Circuit Breaker
Go to the main electrical panel. Turn on the circuit breaker that controls the switch. Wait a moment for power to stabilize. Test the switch by toggling it on and off.
Test Both Switches For Proper Operation
Flip each switch to check light operation. Confirm both switches control their lights as expected. If a switch does not work, turn off power and check wiring again. Proper testing avoids future problems.

Credit: www.youtube.com
Test The Switch Functionality
Testing the switch functionality is an important step after installing a double switch light. It ensures that both switches work correctly and control the lights as intended. This step helps avoid any issues before you finish the installation. Follow these simple tests to check each switch’s performance.
Turn On And Off Each Switch
Start by flipping the first switch up to turn on the light. Check if the light turns on. Then, flip the switch down to turn off the light. Repeat this process for the second switch. Both switches should control their lights separately without any problems.
Check For Loose Connections
Watch for any flickering or delays when switching the lights. Flickering may mean a loose wire connection. If you notice flickers, turn off the power and tighten all wire connections. Secure wiring ensures smooth operation and prevents electrical hazards.
Test Both Switches Together
Flip both switches on at the same time to see if both lights work together. Then, turn off one switch and see if the other light remains on. This confirms each switch controls its light independently. Proper function means your double switch is installed correctly.
Troubleshooting Common Issues
Troubleshooting common issues during double switch light installation saves time and frustration. Many problems arise from simple mistakes. Identifying these problems early helps fix them quickly.
Check wiring and connections first. Loose wires or wrong connections cause most issues. Use a tester to ensure power is off before touching wires.
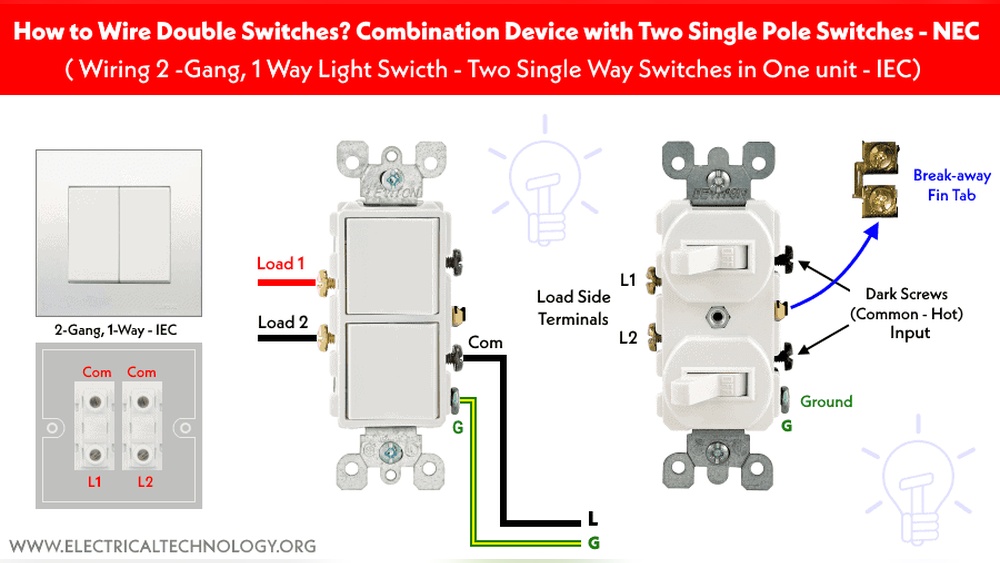
Incorrect Wiring Connections
Double switch lights need precise wiring. Connecting wires to wrong terminals stops switches from working. Follow the wiring diagram carefully. Match each wire color to the correct terminal. Tighten all screw terminals firmly.
Power Supply Problems
No power to switches means no light. Check the circuit breaker to see if it tripped. Reset the breaker if needed. Use a voltage tester to confirm power at the switch box.
Faulty Switch Components
Switches can be defective or worn out. Test switches with a multimeter for continuity. Replace any switch that does not work properly. Cheap switches may fail quickly.
Loose Or Damaged Wiring
Loose wires can cause flickering or no light. Inspect all wiring for damage or loose ends. Strip wire ends neatly and reconnect securely. Replace damaged wires immediately for safety.
Incorrect Bulb Type Or Wattage
Using wrong bulbs can cause flickering or no light. Check the bulb type recommended for the fixture. Use bulbs within the correct wattage limit to avoid damage.

Credit: www.electricaltechnology.org
Frequently Asked Questions
What Tools Are Needed To Install A Double Switch Light?
You need a screwdriver, wire stripper, voltage tester, electrical tape, and wire nuts. These tools ensure safe and proper installation.
How Do I Safely Turn Off Power Before Installation?
Switch off the circuit breaker controlling the light switch. Use a voltage tester to confirm no power is present.
Can I Replace A Single Switch With A Double Switch?
Yes, ensure your wiring supports two switches. Follow proper wiring diagrams for safe and correct installation.
What Wire Colors Are Used In Double Switch Wiring?
Typically, black or red wires are hot wires, white is neutral, and green or bare is ground. Always verify with local codes.
Conclusion
Installing a double switch light is simple with clear steps. Always turn off the power before starting. Follow the wiring instructions carefully to avoid mistakes. Double check all connections for safety. Testing the switch ensures it works properly. This project saves money and adds convenience at home.
With patience and care, anyone can do it right. Enjoy the new control over your lighting today.