Have you ever wished you could control a light from three different spots? Maybe at the top of the stairs, the bottom, and right inside the room?
Adding a third light switch might sound tricky, but it’s easier than you think. Imagine the convenience of turning your lights on or off from multiple places without getting up or walking back. In this guide, you’ll learn step-by-step how to add that third switch safely and effectively.
Stick with me, and you’ll have the power to upgrade your home lighting in no time. Ready to make your space smarter and more convenient? Let’s get started!

Credit: askfilo.com
Tools And Materials Needed
Adding a third light switch requires specific tools and materials. Having everything ready helps the job go smoothly. This section lists what you need before starting. Safety is a key part of the process.
Essential Tools
- Screwdriver set (flathead and Phillips)
- Wire stripper and cutter
- Voltage tester
- Drill with bits
- Measuring tape
- Level
- Needle-nose pliers
Required Materials
- Three-way light switch (third switch)
- Electrical wire (14/3 or 12/3 gauge)
- Wire nuts
- Electrical box for the new switch
- Switch plate cover
- Electrical tape
- Light bulbs compatible with the fixture
Safety Gear
- Insulated gloves
- Safety goggles
- Rubber-soled shoes
- Flashlight or work light
- Dust mask (if drilling into walls)

Credit: diy.stackexchange.com
Preparing For Installation
Preparing for installation is a key step when adding a third light switch. It helps keep the process safe and smooth. Careful preparation reduces risks and saves time. Follow these steps before starting any work.
Turning Off Power
Always switch off the power at the main circuit breaker. This stops electricity from flowing to the switches. Use a voltage tester to confirm the power is off. Never work on live wires. Safety is the top priority.
Locating Existing Switches
Find the two switches controlling the light. Check their positions on the wall. Remove the cover plates to see the wiring inside. Note how wires connect to the switches. This helps plan the new wiring.
Planning The Wiring Route
Decide the best path for the new wires. Look for space inside walls or ceilings. Avoid obstacles like pipes or studs. Measure the distance to estimate wire length. Plan for easy access to all switches.
Removing The Existing Switch
Removing the existing switch is the first step to add a third light switch. You need to be careful and follow safety rules. Always turn off the power at the circuit breaker before starting any work. This prevents electric shock and keeps you safe.
Once the power is off, you can start by taking off the switch cover. Then, disconnect the wires from the switch. Finally, check the wiring to understand how it is connected. This helps you add the new switch correctly.
Unscrewing The Switch Plate
Use a screwdriver to remove the screws holding the switch plate. Keep the screws safe. Gently pull the plate away from the wall. This reveals the switch and wires behind it. Be careful not to damage the wall or the plate.
Disconnecting Wires
Look at the wires connected to the switch. Use a screwdriver or your hands to loosen the screws or clips holding the wires. Carefully pull the wires off the switch terminals. Keep the wires apart to avoid touching each other.
Inspecting Wiring
Check the wires for any damage or wear. Look for loose connections or frayed wires. Make sure the wires are clean and solid. Understanding the wiring helps when you add the third switch. Take note of wire colors and positions for easy reinstallation.
Wiring The Third Switch
Wiring the third switch requires careful planning and attention to detail. This step is crucial to make sure the new switch works well with the existing setup. Understanding how to run new wires, connect to the current circuit, and use the right switches is key. This section explains these points clearly.
Running New Wires
Start by running new wires from the location of the third switch to the existing switch box. Use electrical cables rated for your home’s wiring system. Keep wires neat and avoid sharp bends. Measure the distance carefully to cut wires to the right length. Secure the wires inside walls or along baseboards. Use wire staples to hold cables in place. Always turn off power before handling wires.
Connecting To Existing Circuit
Find the existing circuit that controls your current switches. Identify the common wire, traveler wires, and the ground wire. Connect the new wires to match the existing wiring pattern. Use wire nuts to join wires securely. Connect the ground wire to the switch’s grounding screw. Double-check all connections to avoid loose contacts. Proper connections ensure the third switch works safely and correctly.
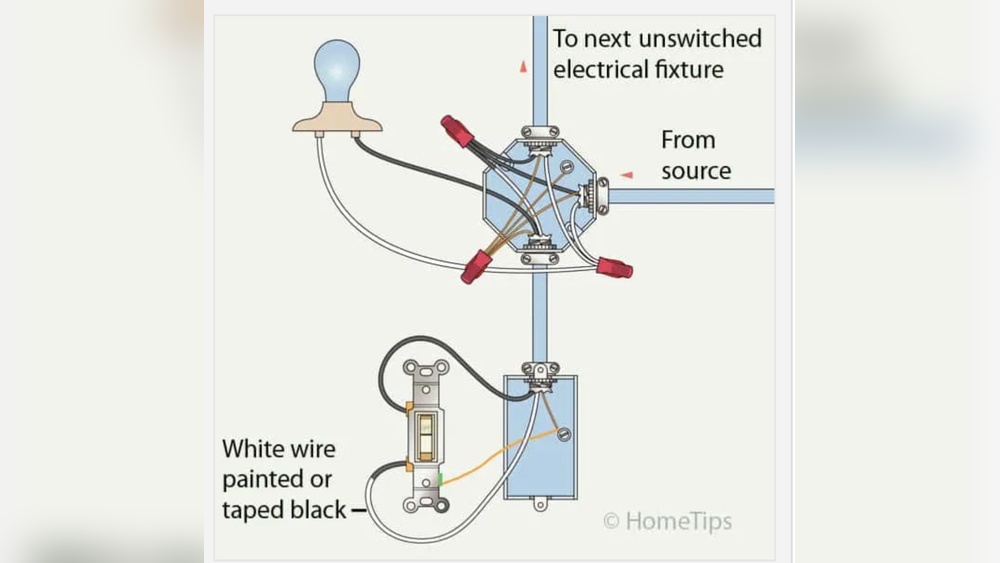
Using A Three-way Or Four-way Switch
A third switch usually needs a four-way switch in the middle. The first and last switches are three-way switches. Three-way switches have three terminals plus a ground. Four-way switches have four terminals plus a ground. Connect traveler wires between the three-way and four-way switches. The four-way switch changes the current path to control the light from three locations. Use switches designed for three-way and four-way setups only.
Installing The Third Switch
Installing the third switch is an important step in controlling your lights from multiple spots. This process requires care to ensure safety and proper function. Follow each step carefully to make the switch work perfectly.
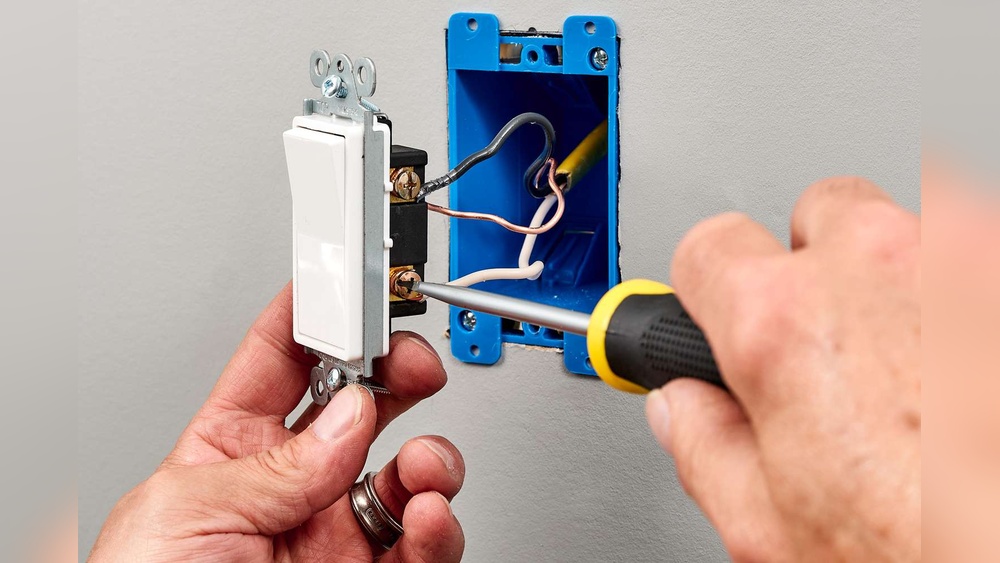
Mounting The Switch
Start by placing the switch into the electrical box. Align it so the screws fit the holes. Push the switch gently but firmly into place. Make sure it sits flat and straight. Use a screwdriver to tighten the screws. Do not overtighten to avoid damage.
Securing The Wiring
Connect the wires to the correct terminals on the switch. Usually, the traveler wires go to the brass screws. The common wire connects to the black screw. Tighten each screw to hold the wire firmly. Check that no wires are loose or exposed. Neat wiring prevents shorts and ensures safety.
Attaching The Switch Plate
Place the switch plate over the mounted switch. Align the screw holes carefully. Insert the screws and tighten them gently. The plate should sit flush against the wall. This step finishes the look and protects the wiring inside.

Credit: www.finehomebuilding.com
Testing The Setup
Testing the setup is a crucial step after installing a third light switch. It confirms the wiring is correct and the switch works properly. This process helps avoid future problems and ensures safety.
Restoring Power
Turn the circuit breaker back on to restore power. Check that the breaker is fully switched to the “on” position. Avoid touching wires during this step to stay safe. Make sure the area is dry and free of hazards.
Checking Switch Functionality
Test each switch individually by turning the light on and off. The third switch should control the light along with the other two. Confirm the light responds correctly from all three switches. This means the wiring is done right.
Troubleshooting Common Issues
If the light does not turn on, check the connections again. Look for loose wires or incorrect terminals. Use a voltage tester to see if power reaches each switch. Tighten screws and fix any loose wires. Repeat testing until the switches work smoothly.
Safety Tips And Best Practices
Adding a third light switch can improve your home’s lighting control. Safety is key during this project. Follow these tips to avoid risks and keep your work safe.
Avoiding Electrical Hazards
Turn off power at the circuit breaker before starting work. Use a voltage tester to confirm no current flows. Wear rubber-soled shoes and use insulated tools. Never touch wires with wet hands. Keep the work area dry and clear of clutter. Label wires carefully to avoid confusion.
When To Call A Professional
Hire an electrician if you feel unsure about wiring. Complex wiring or old circuits need expert handling. Mistakes can cause shocks or fires. A professional ensures code compliance and safe installation. Save money by preventing costly repairs later.
Maintaining Switches Over Time
Check switches regularly for signs of wear or damage. Replace switches that feel hot or make noise. Tighten loose screws and clean dust around switches. Proper maintenance extends switch life and improves safety. Keep switches easy to access for quick checks.
Frequently Asked Questions
How Do I Wire A Third Light Switch?
To wire a third light switch, connect it to the existing two-switch circuit. Use a four-wire cable and follow proper wiring codes. Ensure the traveler wires connect all switches, allowing control from three locations. Always turn off power before starting electrical work.
Can I Add A Third Switch Without Rewiring?
Adding a third switch without rewiring is challenging. You may need special wireless switches or smart switch systems. These allow control without additional wiring. For traditional wiring, some rewiring is necessary to connect all switches properly.
What Tools Are Needed To Add A Third Switch?
You need a screwdriver, wire stripper, voltage tester, electrical tape, and wire nuts. Additionally, a drill may help if you install new switch boxes. Always use tools rated for electrical work and follow safety guidelines.
Is It Safe To Add A Third Switch Myself?
Adding a third switch can be safe if you have electrical knowledge. Always turn off power at the breaker panel before starting. Follow wiring diagrams and local codes. When unsure, consult a licensed electrician to avoid hazards.
Conclusion
Adding a third light switch can improve your room’s lighting control. Follow each step carefully to stay safe. Use the right tools and materials for the job. Double-check your wiring before turning the power back on. Take your time and work with patience.
This simple upgrade makes your space more convenient. Enjoy the new switch and better lighting today.