Are you ready to brighten up your space and take control of your lighting? Installing a light and switch yourself might sound tricky, but with the right steps, you can do it safely and easily.
Imagine turning on your new light with a simple flick, knowing you set it up all by yourself. In this guide, you’ll discover clear, step-by-step instructions that anyone can follow. Keep reading, and you’ll gain the confidence and skills to make your home more inviting—starting right now.
Tools And Materials Needed
Installing a light and switch requires the right tools and materials. Having these ready makes the job easier and safer. This section lists what you need for a smooth installation.
Essential Tools
A screwdriver is a must-have for removing and securing screws. A wire stripper helps remove insulation from wires safely. Use a voltage tester to check if wires carry electricity. Pliers assist in bending and twisting wires. A drill can be needed to make holes for mounting. Tape measure ensures correct placement and alignment. A flashlight helps when working in dark areas.
Required Materials
Choose the right light fixture for the room size and style. Pick a compatible switch, such as a single-pole or dimmer switch. Electrical wire connects the switch to the power source and light. Wire nuts secure wire connections safely. An electrical box holds the switch or light in place. Electrical tape adds extra safety to wire connections. Wall plates cover switches and sockets for a neat finish.

Credit: www.dummies.com
Safety Precautions
Working with electricity can be dangerous. Taking safety precautions is very important before installing a light or switch. These steps protect you from shocks and accidents. Follow them carefully to stay safe and complete your project without problems.
Power Shutoff
Always turn off the power at the circuit breaker. Double-check by testing the switch or light with a voltage tester. Never rely on the wall switch alone. Cutting the power stops electricity flow and reduces shock risk. Make sure no one turns the power back on while you work.
Protective Gear
Wear safety gloves made for electrical work. They stop electric shocks and protect your hands. Use safety glasses to guard your eyes from dust and sparks. Avoid loose clothing or jewelry that can catch on wires. Good gear keeps you safe and comfortable during installation.
Preparing The Installation Site
Preparing the installation site is the first step in installing a light and switch. This step ensures safety and efficiency. Proper preparation prevents mistakes and saves time. You need to check the area carefully before starting the work.
Locating Wiring
Find the existing wiring before you begin any installation. Turn off the power supply to avoid shocks. Use a voltage tester to check wires. Look for wires behind the wall or ceiling. Note the wire colors: black or red is live, white is neutral, green or bare is ground. Knowing wiring locations helps avoid damage during installation.
Marking Positions
Mark the exact spots for the light and switch on the wall. Use a pencil to draw small marks. Check the height for the switch; usually, it is about 48 inches from the floor. For ceiling lights, mark the center of the fixture location. Accurate marks make drilling and cutting easier. This step helps keep everything aligned and neat.
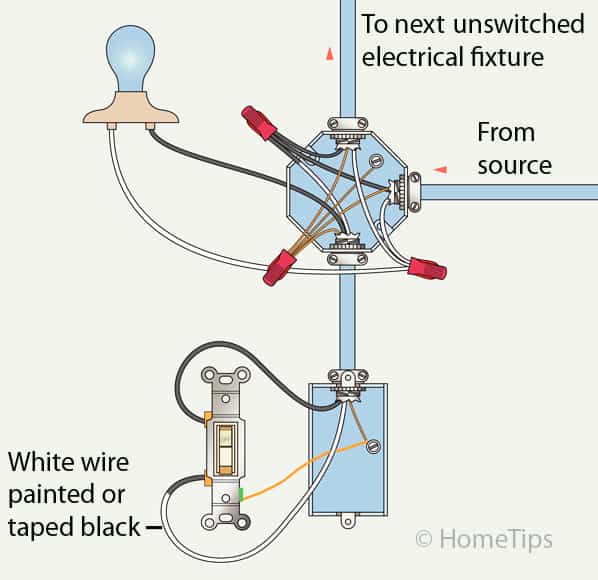
Wiring The Switch
Wiring the switch is an important step in installing a light and switch. It controls the flow of electricity to the light. Correct wiring ensures safety and proper function. This section explains how to identify and connect the wires.
Identifying Wires
First, turn off the power at the circuit breaker. Use a voltage tester to confirm no electricity flows. Look at the wires inside the switch box. Usually, you will see a black (hot) wire, a white (neutral) wire, and a green or bare (ground) wire.
The black wire carries electricity from the power source. The white wire returns electricity back to the panel. The green or bare wire is for safety and grounding. Some switches may have a red wire for three-way switching. Label each wire if needed for clarity.
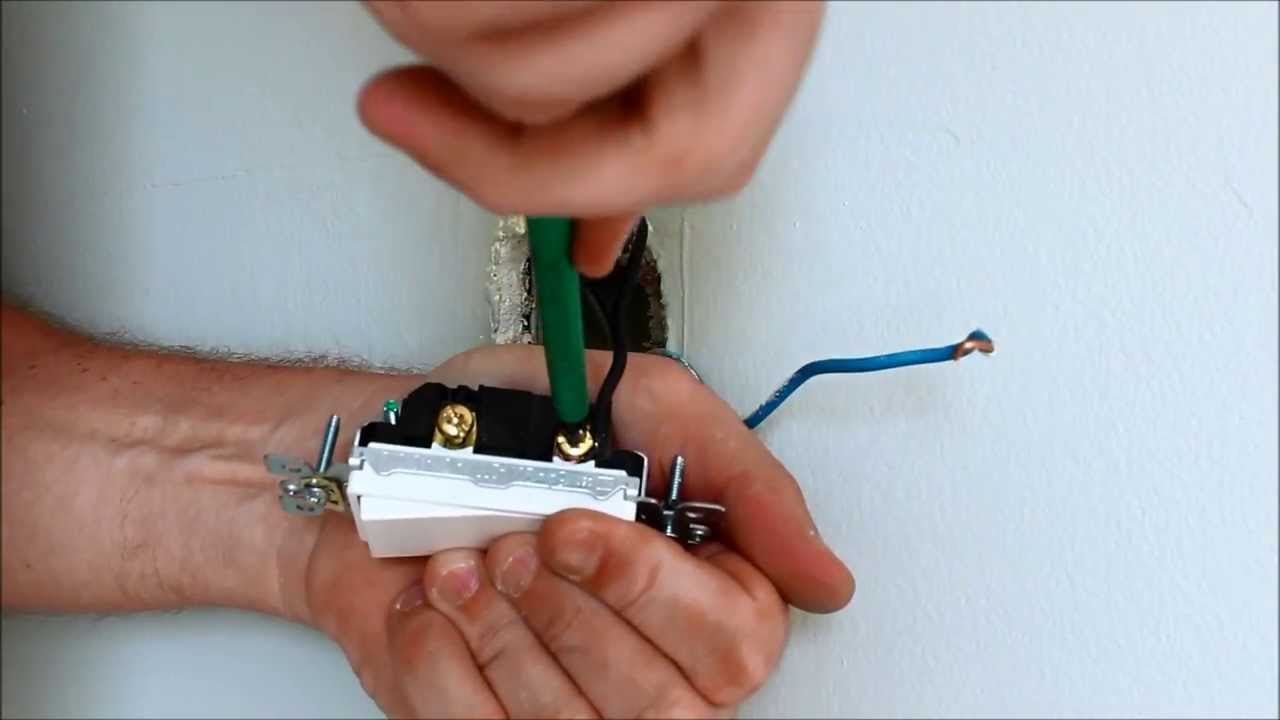
Connecting Wires
Connect the black wire from the power source to the switch’s input terminal. Attach the black or red wire going to the light to the switch’s output terminal. Twist the ends of the wires together and secure them with a wire nut. Connect the white neutral wires together with a wire nut, but do not connect them to the switch.
Attach the ground wire to the switch’s green screw or grounding terminal. Make sure all connections are tight and secure. Push the wires neatly back into the box. Screw the switch into place and restore power to test the light.
Mounting The Switch
Mounting the switch is a key step in installing a light and switch. It holds the switch in place and ensures safety. Follow the steps carefully to secure the switch box and attach the switch plate properly.
Securing The Switch Box
First, place the switch box into the wall opening. Make sure it fits tightly. Use screws to fasten the box to the wall studs. Tighten the screws until the box does not move. Check that the box is straight and even.
Secure wiring inside the box carefully. Push wires gently to avoid damage. Leave enough wire length for connecting the switch.
Attaching The Switch Plate
After wiring and securing the switch, place the switch plate over it. Align the screw holes with the switch box. Insert screws and tighten them slowly. Do not overtighten to avoid cracking the plate.
The switch plate protects wiring and gives a clean look. Ensure it sits flush against the wall for a neat finish.
Installing The Light Fixture
Installing the light fixture is a key step in setting up your lighting. It involves connecting the wires and securing the fixture to the ceiling or wall. This process needs care to ensure safety and proper function. Follow these steps carefully for a smooth installation.
Connecting Light Wires
First, turn off the power at the breaker box. This prevents electric shocks during installation. Next, identify the wires from the ceiling and the fixture. Typically, black or red wires are hot, white wires are neutral, and green or bare wires are ground.
Use wire connectors to join the matching wires. Connect black to black, white to white, and ground to ground. Twist the wires together firmly before securing the connectors. Make sure no bare wire is exposed outside the connector.
After connecting, gently tuck the wires into the junction box. This keeps them safe and ready for mounting the fixture.
Mounting The Fixture
Check the mounting bracket or plate included with your fixture. Attach it securely to the junction box with screws. Align the fixture base with the bracket holes.
Lift the fixture and fasten it using the screws or nuts provided. Tighten them enough to hold the fixture firmly. Avoid overtightening, which can cause damage.
Finally, install any bulbs and covers. Restore power and test the light to confirm it works correctly.
Testing The Installation
Testing the installation is a key step after wiring a light and switch. This step confirms everything is working safely and correctly. It helps catch mistakes before they cause problems. Follow clear steps to make sure the light and switch respond as expected. Take your time and be careful to avoid electric shocks or damage.
Restoring Power
First, turn the power back on at the circuit breaker. Make sure no wires are exposed or loose. Stand clear of the switch and light. Flip the breaker switch to restore electricity to the circuit. Watch for sparks or unusual smells. If you see any, turn off power immediately and check connections again. Safety is the top priority.
Checking Functionality
Next, test the switch by turning it on and off. The light should respond instantly. Test all switch positions if it is a multi-way switch. Confirm the light stays on without flickering. Check other lights or outlets on the same circuit to ensure no issues. If everything works well, the installation is successful. If not, recheck wiring connections carefully.
Credit: www.youtube.com
Troubleshooting Common Issues
Troubleshooting common issues is key to a smooth light and switch installation. Problems can arise even after careful setup. Identifying the cause quickly saves time and effort.
Many issues are simple to fix. Understanding common problems helps you avoid frustration. Let’s explore two frequent problems and their solutions.
Switch Not Working
First, check if the power is on. Confirm the circuit breaker is not tripped. Sometimes the switch wiring may be loose or incorrect. Turn off the power before inspecting the wires.
Look for loose connections at the switch terminals. Tighten any loose screws. Ensure the wires match the switch terminals as per instructions. A faulty switch might need replacement.
Test the switch with a voltage tester for safety. If unsure, call a professional electrician. Safety is the top priority when dealing with electrical parts.
Light Flickering
Flickering lights often mean a loose connection or bad bulb. Start by tightening the bulb in its socket. Replace the bulb with a new one if flickering continues.
Check the wiring at the light fixture. Loose wires can cause flickering. Secure all wire connections tightly. Inspect the switch for any damage or looseness.
Sometimes flickering is due to voltage fluctuations. This may need an electrician’s help. Avoid ignoring flickering as it can lead to bigger issues.
Credit: www.hometips.com
Frequently Asked Questions
How Do I Safely Install A Light Fixture?
Turn off the power at the circuit breaker first. Use a voltage tester to confirm no electricity flows. Connect wires matching colors: black to black, white to white, and ground to ground. Secure the fixture and restore power to test it.
What Tools Are Needed For Installing A Switch?
You’ll need a screwdriver, wire stripper, voltage tester, electrical tape, and pliers. These tools help you safely strip wires, test for power, and secure connections during switch installation.
Can I Install A Light And Switch Myself?
Yes, if you follow safety guidelines and understand basic wiring. Turn off power, use proper tools, and follow instructions. If unsure, consult a professional electrician to avoid hazards and ensure proper installation.
How Do I Identify Wires For Switch Installation?
Black or red wires are usually hot (live). White wires are neutral. Bare or green wires are ground. Use a voltage tester to verify wires before connecting them to the switch.
Conclusion
Installing a light and switch is simple with clear steps. Always turn off the power before starting work. Follow the instructions carefully for safety and success. Use the right tools and check your connections twice. Take your time and don’t rush the process.
You will enjoy the satisfaction of doing it yourself. Brighten your space and control lights with ease. Practice makes perfect, so keep learning and improving. Now, you are ready to light up your home.