Have you ever wanted to control one light from two different switches? Whether it’s for a hallway, staircase, or large room, a 2 way light switch can make your life easier and more convenient.
If you’re wondering how to set it up yourself, you’re in the right place. In this guide, you’ll learn simple steps to install a 2 way light switch safely and effectively. By the end, you’ll have the confidence to upgrade your lighting and add smart control to your home.
Ready to get started? Let’s dive in!

Credit: www.realpars.com
What Is A 2 Way Light Switch
A 2 way light switch controls one light from two different places. This setup is common in hallways, staircases, and large rooms.
You can turn the light on or off from either switch. This adds convenience and improves safety in your home.
How Does A 2 Way Light Switch Work?
A 2 way switch system uses two switches connected by special wires. These switches work together to control the light.
Each switch changes the path of electricity. This lets you turn the light on or off from both switches.
Where Are 2 Way Light Switches Used?
These switches are ideal in places with two entrances. Hallways, staircases, and large rooms often have 2 way switches.
This setup makes it easy to control lighting without walking back to one switch.
Benefits Of A 2 Way Light Switch
2 way switches add comfort and safety at home. You don’t have to move far to turn the light off.
They also save energy by making it easier to switch lights off when not needed.
Tools And Materials Needed
Before installing a 2 way light switch, gather all the necessary tools and materials. This step ensures a smooth and safe process. Having everything ready saves time and avoids interruptions.
Each tool and material has a specific role. Using the right items helps complete the job efficiently. Safety is also a key reason to prepare well.
Tools Needed
- Screwdriver (flathead and Phillips)
- Wire stripper
- Voltage tester
- Needle-nose pliers
- Electric drill (optional)
- Electrical tape
Materials Needed
- Two 2 way light switches
- Electrical wires (14 or 12 gauge)
- Wire connectors (wire nuts)
- Switch box or mounting box
- Wall plate covers
Safety Gear
- Insulated gloves
- Safety goggles
- Non-slip shoes
Safety Precautions Before Starting
Before starting to install or replace a two-way light switch, safety must come first. Electricity can be dangerous. Taking the right precautions can prevent accidents and injuries. Follow these simple safety steps to protect yourself and others.
Turn Off The Power Supply
Locate the main circuit breaker or fuse box. Switch off the power to the area where you will work. Use a tester to confirm no electricity flows to the switch. Never start without turning off the power.
Use Proper Tools And Equipment
Use insulated tools designed for electrical work. Avoid metal tools that can conduct electricity. Wear rubber-soled shoes to reduce the risk of shock. Keep your workspace dry and clean.
Understand The Wiring Setup
Study the existing wiring before disconnecting anything. Take photos or notes to remember wire positions. Identify live, neutral, and ground wires clearly. Wrong connections can cause short circuits or damage.
Work In A Well-lit Area
Good lighting helps you see wires and connections clearly. Use a flashlight or portable lamp if needed. Avoid working in dark or cluttered spaces. Clear visibility reduces mistakes and accidents.
Keep Children And Pets Away
Electric work is not safe for children or pets. Keep them out of the room while working. This prevents distractions and accidents. Safety is easier to maintain in a quiet environment.
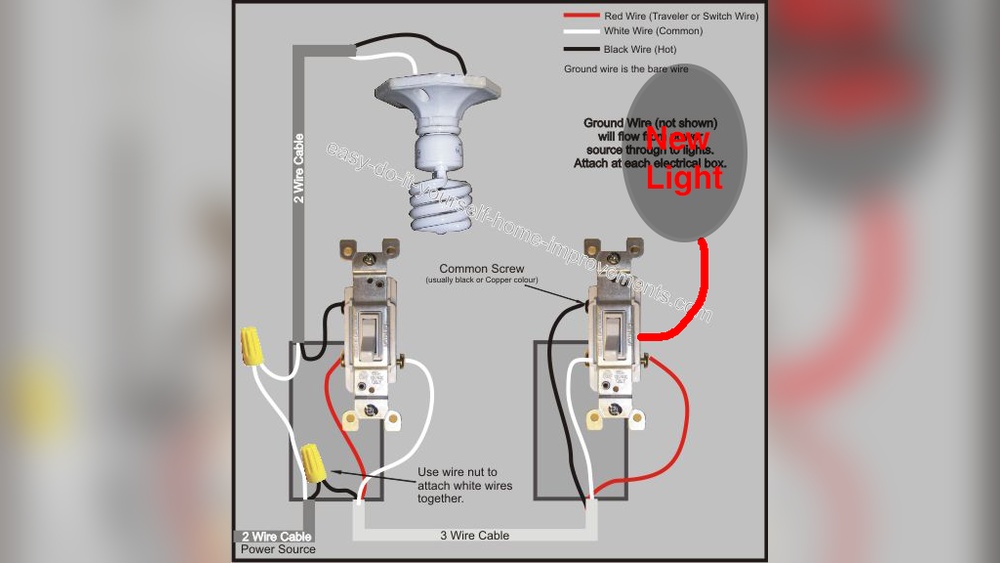
Credit: www.youtube.com
Wiring Basics For 2 Way Switches
Understanding the wiring basics is key to installing a 2 way light switch safely. This switch type lets you control one light from two places. Knowing the role of each wire helps prevent mistakes. Here is a simple guide to the essential wires involved.
Live, Neutral, And Earth Wires
The live wire carries power from the electrical source to the switch. It is usually brown or red. The neutral wire completes the circuit and carries current back. It often appears blue or black. The earth wire is a safety feature. It is green or green with yellow stripes. It protects against electric shock by grounding the circuit.
Traveler Wires Explained
Traveler wires connect the two switches in a 2 way setup. They allow the switches to communicate and control the light. These wires are usually red or brown. Two traveler wires run between the switches. They carry current depending on the switch position. Correctly wiring travelers ensures the switches work together.
Step-by-step Installation Guide
Installing a 2 way light switch allows you to control a light from two different locations. This guide breaks down the process into simple steps. Follow each part carefully for a safe and effective installation.
Turn Off Power Supply
Start by switching off the power at the circuit breaker. This stops electricity from flowing to the switch. Use a voltage tester to ensure no power is present. Safety first.
Remove Existing Switch
Unscrew the faceplate of the current switch. Take out the screws holding the switch in place. Gently pull the switch from the wall box. Note the wire positions before disconnecting them.
Connect The Wires
Identify the common, L1, and L2 wires on your 2 way switch. Connect the wires to the matching terminals on the new switch. Use a screwdriver to tighten each terminal securely. Double-check all wire connections for safety.
Secure The Switch
Push the wired switch back into the wall box. Align the screw holes with the box. Screw the switch firmly but avoid overtightening. Attach the faceplate to finish the look.
Restore Power And Test
Turn the power back on at the breaker. Test the switch by turning the light on and off from both switches. Make sure the light responds correctly each time. If it works, your installation is complete.
Common Mistakes To Avoid
Installing a 2 way light switch can be simple if done right. Avoiding common mistakes saves time and keeps you safe. Many beginners make errors that cause the switch to not work properly. Some mistakes may even cause electrical hazards. Understanding these pitfalls helps ensure a smooth installation.
Incorrect Wiring Connections
Connecting the wires to the wrong terminals is a common issue. Each wire has a specific place on the switch. Mixing up live, neutral, and traveler wires stops the switch from working. Double-check wire colors and terminal labels before connecting.
Using The Wrong Type Of Switch
Not all switches support 2 way control. Using a single-pole switch instead of a 2 way switch causes failure. Always buy switches labeled for 2 way or multi-way use. This ensures proper function and safety.
Failing To Turn Off Power
Working on live wires is dangerous. Many skip turning off the circuit breaker. This mistake risks electric shock or damage. Always switch off the power before starting any electrical work.
Ignoring Wire Insulation Damage
Damaged or stripped insulation can cause short circuits. Check wires for cuts or wear before installation. Replace or repair any damaged wiring to avoid risks.
Not Testing The Switch After Installation
Some stop after connecting wires without testing. Testing ensures the switch works as intended. Flip both switches to confirm light control from each location. Fix any issues before finishing the job.
Troubleshooting Tips
Troubleshooting a 2-way light switch can save time and money. It helps fix common problems fast. Understanding simple checks can make the process easier. This section guides you through basic steps to find and fix issues.
Check The Power Supply
Start by ensuring power reaches the switch. Use a tester to check the voltage. No power means the circuit breaker might be off. Reset the breaker and test again.
Inspect The Wiring Connections
Loose wires cause many problems. Turn off the power before touching anything. Remove the switch cover and look for loose or disconnected wires. Tighten any loose screws and reconnect loose wires carefully.
Test The Switch Functionality
Switches can wear out over time. Use a multimeter to check continuity. Flip the switch on and off during the test. No continuity means the switch is faulty and needs replacement.
Look For Damaged Components
Burn marks or melted parts show damage. Check the switch and wiring for signs of heat or corrosion. Replace damaged parts to prevent hazards and restore function.
Verify The Bulb And Fixture
Sometimes the problem is not the switch. Test the light bulb in another socket. Inspect the fixture for loose connections or damage. Replace bulbs and fix fixtures as needed.
When To Call A Professional
Working with a 2-way light switch can be simple for some. But certain situations need expert help. Knowing when to call a professional saves time and avoids risks. This section explains signs that mean you should hire an electrician.
Electrical work can be dangerous. Mistakes may cause shocks or fire. A professional has the right tools and knowledge. They ensure your home stays safe and your switches work well.
Complex Wiring Or Old Electrical Systems
Old homes have outdated wiring. It may not match new switches. Complex wiring needs careful handling. Professionals understand different wiring types. They connect switches correctly without damage.
Switches That Don’t Work Properly
If your 2-way switch is loose or sparks, call a pro. Flickering lights or switches that feel hot show problems. These issues can be signs of faulty wiring or loose connections. Electricians fix these safely and quickly.
Unfamiliar With Electrical Codes And Safety
Every area has rules for electrical work. These rules keep homes safe and avoid legal trouble. Professionals know these codes well. They make sure your switch installation meets all safety standards.
Need For Additional Electrical Work
Sometimes, installing a 2-way switch requires more changes. Adding new wires or outlets is tricky. Professionals handle extra tasks without harming your home’s wiring. They also prevent overloads and short circuits.
Lack Of Proper Tools Or Experience
Installing a 2-way switch needs special tools. Without them, work can be unsafe or incomplete. Experience helps avoid common mistakes. Hiring a pro gives peace of mind and a job done right.

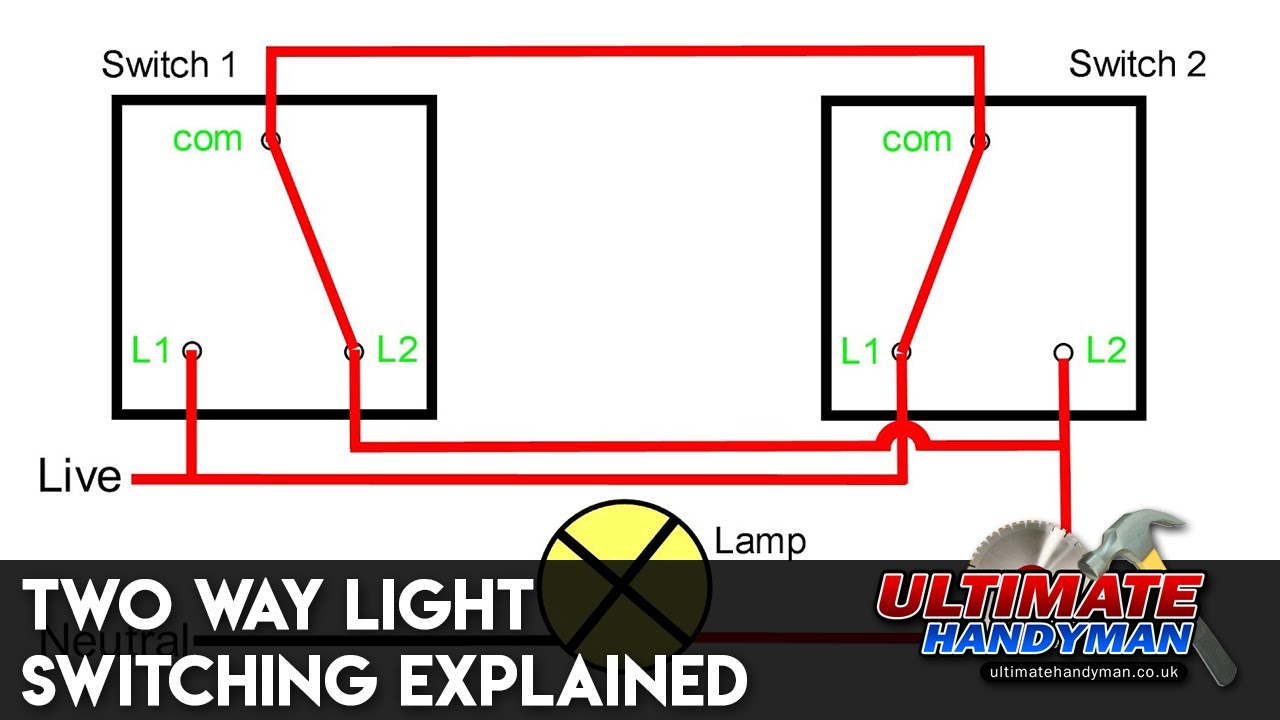
Credit: wiki.diyfaq.org.uk
Frequently Asked Questions
What Is A 2 Way Light Switch?
A 2 way light switch controls one light from two locations. It’s commonly used in hallways or large rooms for convenience.
How Do You Wire A 2 Way Light Switch?
You connect two switches with traveler wires and a common wire to the light. This allows control from both switches.
Can I Replace A Single Switch With A 2 Way Switch?
Yes, but you need to add a second switch and wiring. This setup lets you control the light from two points.
Are 2 Way Switches Safe To Install?
Yes, if installed correctly following electrical codes. Always turn off power and use proper tools to ensure safety.
Conclusion
Controlling lights from two places can save time and effort. Installing a 2 way light switch is simple and practical. Follow safety steps carefully for best results. Double-check your wiring before turning the power back on. This small project can improve your home’s convenience and comfort.
Try it yourself and see how easy it can be. Brighten your space with smart, easy lighting control. Enjoy the comfort and ease this switch brings every day.