If your Larin floor jack isn’t working like it used to, you don’t need to rush out and buy a new one. You can rebuild it yourself and save both time and money.
Imagine having your jack lifting smoothly again, ready whenever you need it. In this guide, you’ll find simple, clear steps that anyone can follow—even if you’ve never done this before. Keep reading, and by the end, you’ll have the confidence and know-how to bring your floor jack back to life.
Your next repair just got a lot easier.

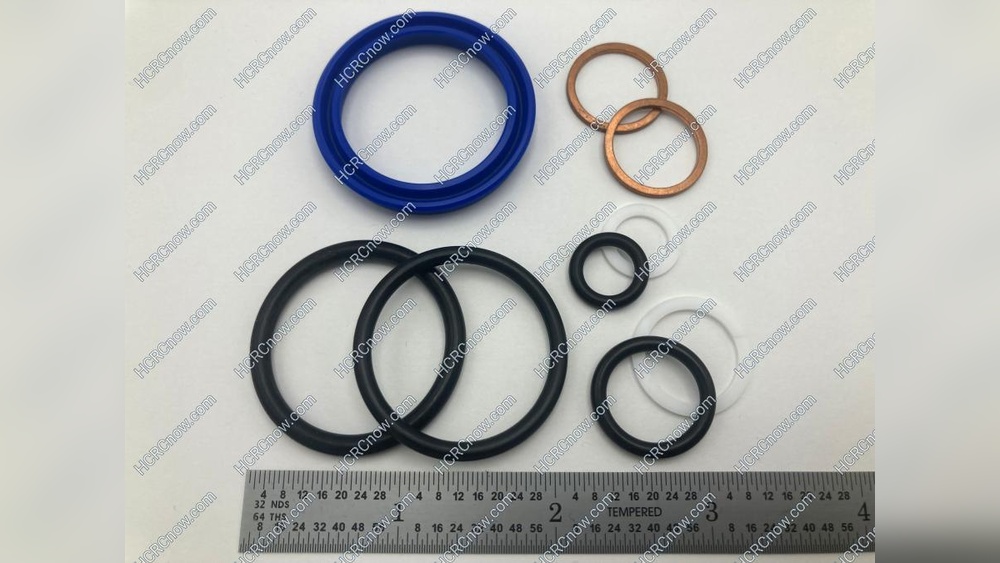
Credit: www.hcrcnow.com
Tools And Materials Needed
Rebuilding a Larin floor jack requires specific tools and materials. Having the right items makes the job easier and safer. Prepare everything before starting the rebuild process.
Basic Hand Tools
You need wrenches, screwdrivers, and pliers. These help to remove and install parts. Choose sizes that fit the jack’s bolts and screws well.
Replacement Parts
Get seals, O-rings, and gaskets designed for Larin jacks. These parts prevent leaks and keep the jack working smoothly. Avoid used or generic parts.
Hydraulic Fluid
Use high-quality hydraulic oil. It lubricates and powers the jack’s lifting system. Check the manufacturer’s guide for the right type and amount.
Cleaning Supplies
Have rags, brushes, and a cleaning solvent ready. Clean old grease and dirt from all parts. Clean surfaces help new seals fit better.
Safety Equipment
Wear gloves and safety glasses. Protect your hands and eyes from oil and sharp edges. Safety is important during every step.
Preparing The Floor Jack
Before you start rebuilding your Larin floor jack, proper preparation is key. This step ensures safety and makes the repair process smooth. Taking time to clean and inspect the jack helps find hidden problems early. A clean jack works better and lasts longer.
Preparation also helps avoid accidents. You will handle tools and parts carefully if your workspace is clean and organized. Let’s look at the main tasks to prepare your floor jack for rebuilding.
Safety Precautions
Always wear gloves and safety glasses before touching the jack. This protects your hands and eyes from dirt and sharp parts. Work in a well-lit area to see every detail clearly. Keep the jack on a flat, stable surface to prevent it from tipping over. Never rush the process. Take your time to avoid mistakes and injuries.
Cleaning The Jack
Start by wiping off dirt and grease using a clean cloth. Use a mild detergent with water for stubborn grime. Avoid harsh chemicals that can damage the metal or paint. Dry the jack fully to prevent rust. Clean joints and moving parts gently to keep them working smoothly. Proper cleaning makes the next steps easier and more effective.
Disassembling The Jack
Disassembling the jack is the first step in rebuilding your Larin floor jack. You need to carefully take it apart to check each part and fix any problems. This process requires patience and attention. Follow the steps below to disassemble the jack safely and correctly.
Removing The Handle
Start by placing the jack on a flat surface. Locate the handle where it connects to the jack body. Use a wrench to loosen the bolt holding the handle in place. Pull the handle out gently once the bolt is removed. Keep the bolt and handle parts safe for later use. This step frees the handle for further disassembly.
Taking Apart The Hydraulic System
Release any pressure from the hydraulic system by opening the release valve. Use a wrench to remove the hydraulic cylinder from the jack frame. Carefully detach the piston rod and seal assembly. Avoid damaging the seals, as they are important for the jack’s function. Inspect each hydraulic part for wear or damage. Lay out the parts in order to make reassembly easier.

Credit: www.rickandanns.com
Inspecting Components
Before rebuilding your Larin floor jack, inspecting its components is essential. This step ensures the jack works safely and smoothly. Careful inspection helps find issues early. It also shows what parts need fixing or replacing. A thorough check saves time and money later.
Checking For Wear And Damage
Start by examining all visible parts. Look for cracks, rust, or bends in the metal. Check the hydraulic cylinder for leaks or dents. Inspect the wheels and casters for smooth movement. Test the handle for any looseness or damage. Worn seals or broken springs can cause problems. Note any parts that look weak or broken.
Identifying Parts To Replace
List all damaged or worn parts found during the check. Common parts to replace include seals, springs, and pins. Hydraulic fluid may need changing if it looks dirty or low. Replace wheels if they do not roll properly. Old or cracked hoses should also be swapped out. Using good parts keeps the jack safe and reliable.
Replacing Seals And O-rings
Replacing seals and O-rings is key to fixing a Larin floor jack. These parts stop oil leaks and keep pressure inside the jack. Over time, seals and O-rings wear out and cause the jack to lose power.
Changing these parts helps the jack work smoothly and safely. The process needs care to avoid damage. Follow the steps below to remove old seals and install new ones properly.
Removing Old Seals
First, clean the jack’s parts to see the seals clearly. Use a cloth to wipe off dirt and oil. Next, use a small flat tool to lift the old seals gently. Avoid using sharp objects that can scratch the metal.
Work slowly and carefully to remove all seals and O-rings. Check the inside of the jack for any remaining pieces. Dispose of the old seals properly to keep your workspace clean.
Installing New Seals
Before putting new seals, clean the groove where they sit. Use a soft cloth to remove dust and oil. Pick the right size seals that match the old ones exactly.
Place the new seals carefully into the groove. Press them down evenly without bending or twisting. Make sure the seals fit snugly to prevent leaks. After installing, test the jack to check for proper pressure and smooth operation.
Refilling Hydraulic Fluid
Refilling the hydraulic fluid is a key step in rebuilding a Larin floor jack. This fluid helps the jack lift heavy loads smoothly. Without the right fluid level, the jack may not work properly. It is important to fill the fluid carefully to avoid damage or leaks.
Choosing The Right Fluid
Pick a hydraulic fluid that matches your jack’s needs. Check the user manual for the recommended type. Usually, clear, non-detergent hydraulic oil works best. Avoid using motor oil or brake fluid. These fluids can harm the seals and parts inside the jack. Using the correct fluid keeps the jack running longer and safer.
Proper Filling Technique
Start by placing the jack on a flat surface. Open the fluid reservoir cap slowly. Use a clean funnel to pour the fluid. Fill it until the level reaches just below the fill hole. Avoid overfilling, which can cause leaks or pressure issues. After filling, close the cap tightly. Pump the jack several times to remove air bubbles. Check the fluid level again and add more if needed. Clean any spilled fluid to keep the jack in good condition.
Reassembling The Jack
Reassembling the Larin floor jack is a key step in bringing it back to life. Careful attention is needed to ensure every part fits perfectly. This process restores the jack’s strength and safety.
Keep your workspace clean and organized. Lay out all parts in the order you will reassemble them. This method saves time and avoids mistakes.
Putting Components Back Together
Start by placing the main cylinder into the jack frame. Fit the piston and pump assembly carefully inside the cylinder. Use clean cloths to wipe parts before fitting.
Next, attach the release valve and spring. Make sure the valve moves freely for proper pressure control. Secure all bolts and screws firmly but avoid overtightening.
Reinstall the handle and connect it to the pump lever. Test the handle movement to confirm smooth operation. Check that the lifting arm moves up and down easily.
Testing For Leaks
Fill the jack with the recommended hydraulic fluid. Close the fill plug tightly to prevent spills. Pump the handle several times to build pressure inside.
Inspect all joints and seals for any fluid leaks. Look closely around the cylinder, release valve, and pump. Tighten any loose fittings and replace damaged seals if needed.
Check the jack’s lifting height and hold time under load. A steady hold means no internal leaks. If the jack lowers slowly, repeat the leak test carefully.
Adjusting The Jack
Adjusting the jack is a key step in rebuilding your Larin floor jack. Proper adjustment ensures smooth lifting and safe operation. This process involves removing trapped air and setting the correct pressure. Both tasks help the jack work reliably every time.
Bleeding Air From System
Air trapped inside the hydraulic system can cause the jack to fail. Start by opening the release valve slowly. Pump the handle several times to push air out. Keep the valve open until no more air bubbles appear. Close the valve tightly after bleeding the air. This step clears the system and improves lifting power.
Setting Pressure Levels
Correct pressure ensures the jack lifts heavy loads safely. Use a pressure gauge to check the current level. Adjust the pressure screw or valve as needed. Turn it slowly to avoid over-tightening. Test the jack by lifting a small load. Repeat adjustments until the jack lifts smoothly and holds pressure well.
Maintenance Tips For Longevity
Taking care of your Larin floor jack helps it last longer and work better. Regular maintenance keeps all parts working smoothly. Simple steps prevent big problems and save money on repairs.
Follow these tips to keep your floor jack in top shape. These easy habits improve safety and performance.
Regular Cleaning
Clean your floor jack after every use. Dirt and grease build-up cause parts to stick or wear out. Use a dry cloth to wipe off dust and grime. Avoid water, which can cause rust. Check the wheels and lift arm for stuck dirt. Remove debris carefully to keep movement smooth.
Scheduled Inspections
Check your floor jack regularly for damage. Look for cracks, leaks, or worn parts. Test the hydraulic system by lifting and lowering the jack. Listen for strange sounds or slow movements. Tighten loose bolts and nuts. Replace any broken or weak parts quickly. Keeping a schedule helps catch problems early.

Credit: www.youtube.com
Frequently Asked Questions
What Tools Are Needed To Rebuild A Larin Floor Jack?
You need basic tools like wrenches, screwdrivers, pliers, and a hammer. Also, have replacement parts and hydraulic oil ready for a smooth rebuild.
How Do I Safely Disassemble A Larin Floor Jack?
Release all pressure and drain the hydraulic fluid first. Then, remove bolts carefully and keep parts organized to avoid damage or loss.
What Are Common Signs My Larin Jack Needs Rebuilding?
Look for slow lifting, leaking hydraulic fluid, or uneven lifting. These signs indicate worn seals or internal damage needing a rebuild.
How Do I Replace The Hydraulic Seal In The Jack?
Drain the oil, remove the old seal carefully, and clean the area. Install the new seal snugly before reassembling and refilling with hydraulic fluid.
Conclusion
Rebuilding a Larin floor jack takes patience and care. Follow each step slowly and carefully. Check all parts for wear or damage. Clean and replace parts as needed. Test the jack often to ensure it works right. This simple process can save money and extend your jack’s life.
Keep tools and instructions close while working. Stay safe and take breaks if tired. With practice, rebuilding becomes easier and more satisfying. Your floor jack will be ready for many uses ahead.