Are you struggling to get your wall anchor flush with the surface? It can be frustrating when your anchors stick out or sit unevenly, making your shelves or fixtures look unprofessional and unstable.
But don’t worry—getting a smooth, flush finish is easier than you think. You’ll learn simple, effective steps to make your wall anchors sit perfectly flush every time. Keep reading, and you’ll discover tips that save you time, improve your home’s look, and give your projects a polished finish you’ll be proud of.
Credit: www.poolweb.com
Choosing The Right Wall Anchor
Choosing the right wall anchor is key to a strong, flush finish. The right anchor holds your item tightly against the wall. It prevents damage and keeps things secure. Knowing the types and uses helps you pick the best anchor for your needs.
Types Of Wall Anchors
There are several common types of wall anchors. Plastic expansion anchors work well in drywall. They expand when you insert the screw. Toggle bolts have wings that open behind the wall. They hold heavy items firmly. Molly bolts create a strong grip inside the wall. Each type suits different uses and weights.
Selecting Based On Wall Material
Wall material affects your anchor choice. Drywall needs different anchors than concrete or brick. Plastic anchors fit drywall and plaster. Concrete requires sleeve or wedge anchors. Hollow walls benefit from toggle bolts or molly bolts. Choose anchors that match your wall type for best hold.
Weight Capacity Considerations
Weight capacity is crucial for safety. Check the anchor’s weight limit before buying. Light anchors hold small pictures and shelves. Heavy anchors support cabinets and large items. Overloading anchors can damage walls and cause falls. Match anchor strength to your item’s weight for a secure hold.
Preparing The Wall Surface
Preparing the wall surface is the first step to get a wall anchor flush. A smooth and clean surface helps the anchor fit tightly. This makes your mounted item stable and secure. Careful preparation avoids damage and keeps your wall strong.
Locating Studs And Marking Spots
Find the studs behind the wall using a stud finder. Studs give strong support for heavy items. Mark the spots with a pencil where you want the anchor. Measure twice to ensure accuracy. Correct placement prevents the anchor from slipping.
Drilling Accurate Pilot Holes
Use a drill bit slightly smaller than the anchor. Drill straight and steady to avoid wall damage. The hole must be deep enough for the anchor to fit fully. A clean, precise hole helps the anchor stay flush and hold tight.
Cleaning The Hole For Better Grip
Remove dust and debris from the drilled hole. Use a small brush or blow air gently. A clean hole improves the anchor’s grip on the wall. This step reduces the risk of the anchor loosening over time.
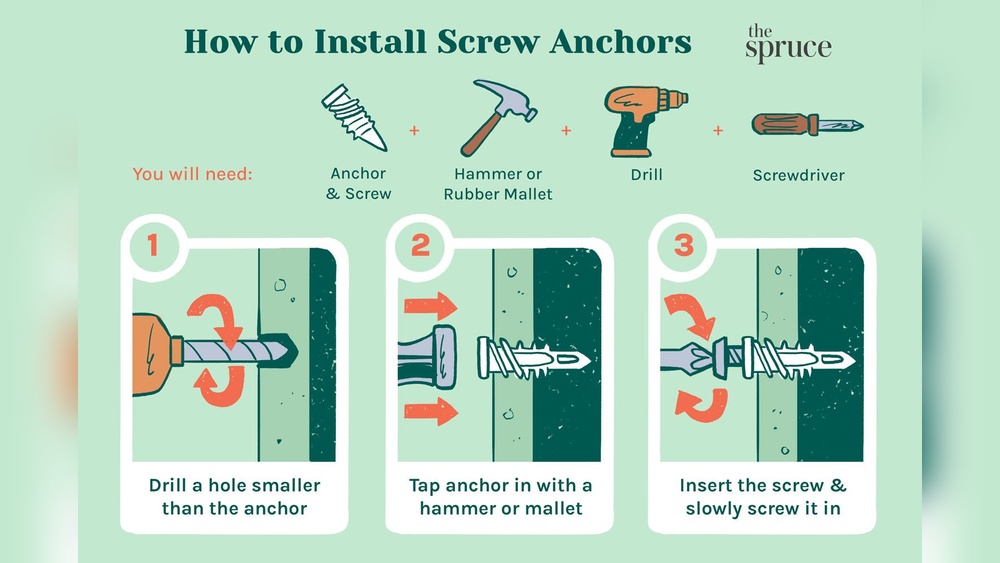
Installing Anchors Flush
Installing anchors flush with the wall ensures a clean and strong hold. This process stops the anchor from sticking out or sinking too deep. Proper installation protects your wall and holds objects securely. Follow these key steps to get the anchor perfectly flush.
Aligning The Anchor Properly
Start by marking the exact spot on the wall. Hold the anchor straight to the surface. Make sure it points directly inward, not at an angle. A crooked anchor can weaken the grip or damage the wall. Keep the anchor aligned as you push it in gently.
Using The Correct Tools
Choose a drill bit that matches the anchor size. Use a screwdriver or drill with adjustable torque. These tools help control the force applied. Avoid tools that are too strong or too weak. Right tools make the anchor fit smoothly and flush.
Techniques To Avoid Over- Or Under-driving
Stop driving the anchor once it is level with the wall. Check frequently during installation. Use slow and steady pressure to prevent damage. Over-driving can break the anchor or ruin the wall. Under-driving leaves the anchor loose and ineffective. Aim for a snug, flush fit every time.

Credit: www.picturehangsolutions.com
Common Installation Mistakes
Installing wall anchors may seem simple, but common mistakes can cause problems. These errors stop anchors from sitting flush with the wall. This affects the strength and appearance of your project. Understanding these mistakes helps you avoid damage and hold your items securely.
Signs Of Improper Anchor Placement
Anchors that stick out or sit too deep show poor placement. You may see gaps around the anchor or notice it wobbles. Sometimes screws don’t tighten properly because the anchor is loose. These signs mean the anchor isn’t flush and needs adjustment.
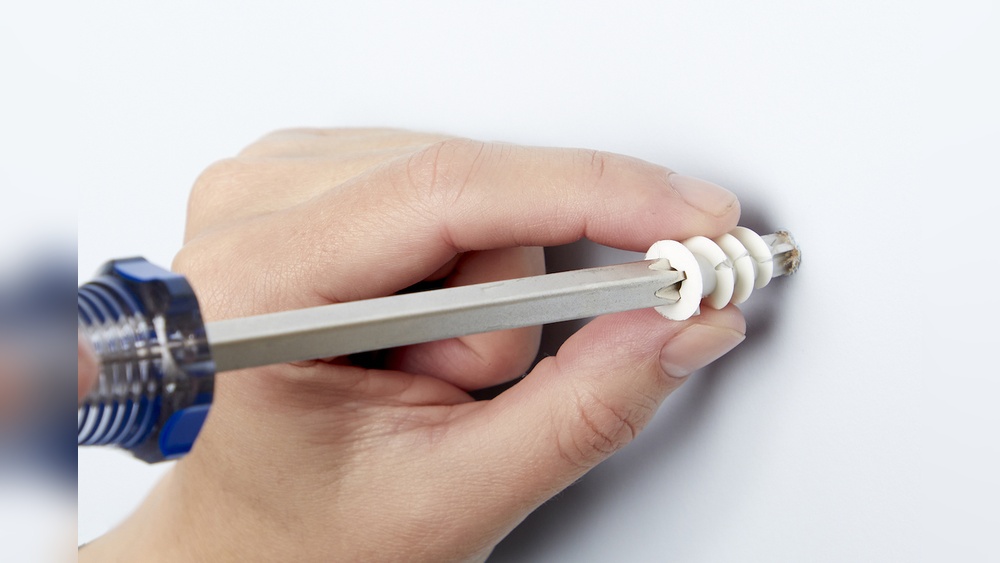
How To Fix Anchors That Are Not Flush
First, remove the screw and pull out the anchor gently. Check the hole size. If it is too big, use a larger anchor or fill the hole with spackle. Insert the anchor carefully until it is level with the wall surface. Tighten the screw slowly to keep the anchor flush.
Preventing Wall Damage
Drill the right size hole for your anchor type. Avoid forcing anchors into small holes. Use anchors designed for your wall material. When removing anchors, pull them out straight to prevent cracks. These steps keep walls safe and anchors strong.
Finishing Touches
Finishing touches make your wall anchor look neat and strong. These small steps help your work last longer and look better. Focus on securing screws, fixing the wall surface, and checking stability. Each step matters for a clean and safe finish.
Securing Screws For A Clean Look
Use a screwdriver to tighten screws firmly. Do not over-tighten to avoid damaging the wall. The screw head should sit flush with the anchor. This creates a smooth, flat surface against the wall. A clean screw fit improves the overall appearance.
Touching Up Wall Surface
Fill any gaps around the anchor with wall putty or spackle. Smooth the surface with a putty knife. Let it dry completely before sanding lightly. Match the paint color to the wall for a seamless look. These steps hide imperfections and blend the repair.
Testing Anchor Stability
Gently pull or push on the anchor to test strength. Ensure it holds firmly without moving or loosening. A stable anchor supports the weight of your item safely. Check stability before hanging anything heavy. This prevents accidents and wall damage later.

Credit: www.amazon.sa
Frequently Asked Questions
What Tools Are Needed To Get A Wall Anchor Flush?
You need a drill, screwdriver, hammer, and a flush-cutting tool. These tools help insert and adjust the anchor to be level with the wall surface.
How Do I Make A Plastic Wall Anchor Flush?
Insert the anchor carefully, tap it gently with a hammer, then tighten the screw. Avoid over-tightening to prevent the anchor from protruding.
Can I Fix A Wall Anchor That Sticks Out?
Yes, remove the screw, push the anchor deeper or replace it. Using a flush-cutting tool can help trim any excess anchor material.
Why Is My Wall Anchor Not Sitting Flush?
The hole might be too large or the anchor too short. Make sure to use the right size anchor and drill hole for a flush fit.
Conclusion
Getting a wall anchor flush makes your work look neat and strong. Use the right tools and take your time. Drill carefully, insert the anchor fully, and tighten screws just right. This keeps your items secure and your walls clean.
Practice a few times to improve your skill. A flush anchor helps your projects last longer and look better. Keep these tips in mind for your next wall project. Simple steps bring great results every time.