Are you ready to upgrade your home security with a Kwikset SmartKey Deadbolt but unsure where to start? Installing this smart lock is easier than you might think, and you don’t need to be a locksmith to do it.
Imagine having the power to control your door’s lock quickly and confidently, all while saving money on professional installation. In this guide, you’ll discover simple, step-by-step instructions that will have your new deadbolt working smoothly in no time. Keep reading to take control of your home’s safety with ease.

Credit: www.youtube.com
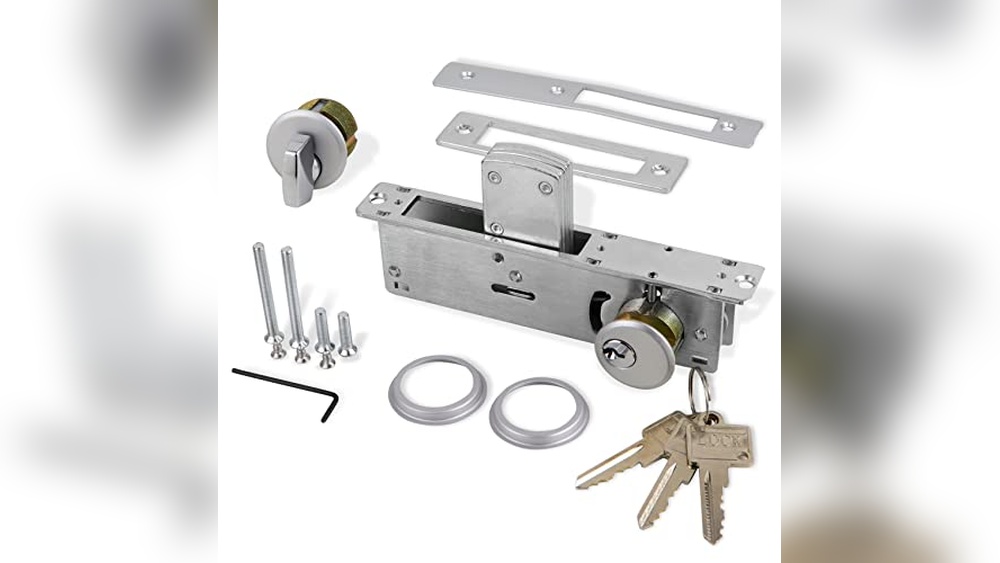
Tools And Materials Needed
Installing a Kwikset SmartKey deadbolt requires a few simple tools and materials. Having the right items ready makes the process faster and easier. This section lists everything needed to complete the installation smoothly.
Kwikset Smartkey Deadbolt Kit
The kit includes the deadbolt, keys, and installation instructions. Check if all parts are in the box before starting.
Screwdriver
A Phillips-head screwdriver is essential for removing and installing screws. A flat-head screwdriver might help with prying if needed.
Drill And Drill Bits
A drill can make new holes or widen existing ones. Use drill bits matching the screw and bolt sizes.
Measuring Tape
Measure door thickness and placement points for accurate installation. Precise measurements avoid mistakes.
Pencil
Mark drill points and alignment spots on the door. Clear marks guide proper fitting.
Chisel (optional)
A chisel helps adjust the door frame or mortise for the deadbolt. Use it if the space is tight.
Safety Glasses
Protect your eyes during drilling or chiseling. Safety first for a smooth job.
Credit: www.homedepot.com
Prepare The Door
Preparing the door is the first important step before installing the Kwikset SmartKey deadbolt. Proper preparation ensures the new lock fits well and works smoothly. Take time to get the door ready for an easy installation.
Remove Old Deadbolt
Start by removing the old deadbolt from your door. Use a screwdriver to take out the screws on the interior side of the lock. Pull the lock parts out gently from both sides of the door. Keep the screws and parts aside, in case you need them later.
Next, remove the latch from the edge of the door. Unscrew it and pull it out carefully. Make sure the hole is clean and free of dust or debris. A clean hole helps the new deadbolt fit perfectly.
Check Door Alignment
Check the door alignment before installing the new lock. Close the door slowly and watch how the door fits into the frame. The door should close without sticking or gaps.
Look at the strike plate on the door frame. It should line up with the deadbolt latch. If the door does not close well, adjust the hinges or strike plate. Proper alignment ensures the deadbolt locks securely and works properly.
Install The Deadbolt Mechanism
Installing the deadbolt mechanism is a key step in setting up your Kwikset SmartKey deadbolt. This part controls the lock’s movement, securing your door firmly. Follow these simple steps carefully for a smooth installation. Take your time to ensure everything fits well and works properly.
Insert Latch Assembly
Start by placing the latch assembly into the door edge. Make sure the curved side faces the door jamb. Push the latch all the way in until it sits flush with the door. Check that the latch bolt moves freely by sliding it in and out. This ensures the mechanism will operate smoothly.
Secure Latch With Screws
Use the screws provided to fasten the latch assembly. Insert the screws into the pre-drilled holes on the latch plate. Tighten them with a screwdriver, but avoid over-tightening. The latch should stay firmly in place without warping the door edge. This step keeps the latch stable for proper locking action.
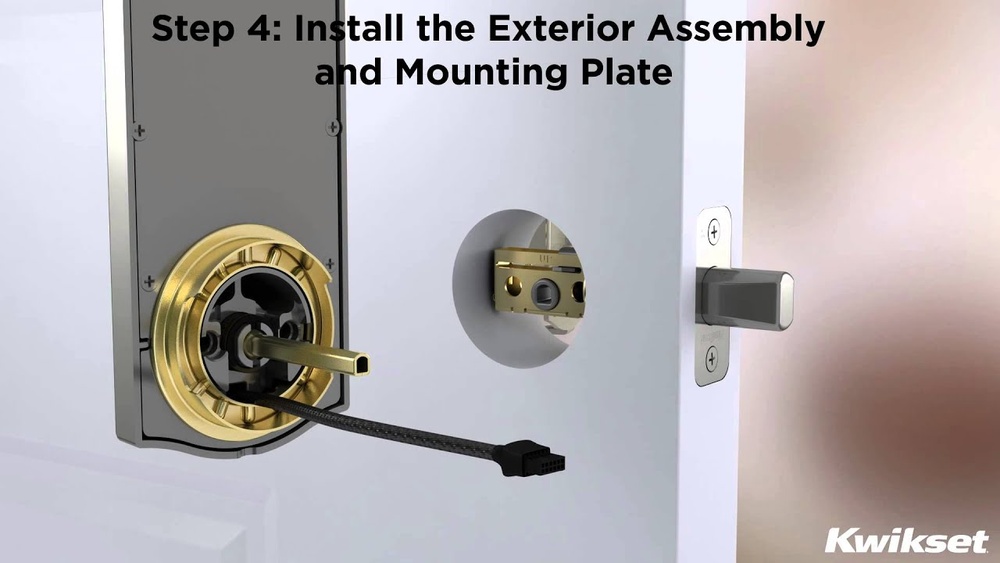
Attach Exterior Keypad
Attaching the exterior keypad is a key step in installing your Kwikset SmartKey deadbolt. This part controls the lock from outside your door. Proper installation ensures smooth operation and security.
Follow each step carefully. Align the keypad correctly and connect it to the lock mechanism. A good fit prevents damage and keeps the lock working well.
Align Keypad On Door
Start by placing the keypad on the outside of your door. Match the holes in the keypad with the holes in the door. The keypad should sit flat and straight. Check that the buttons face upward and are easy to press.
Hold the keypad steady. Avoid tilting it. Proper alignment stops the lock from jamming later.
Connect Tailpiece
The tailpiece links the keypad to the lock inside. Insert the tailpiece through the center hole of the door. It should fit snugly into the lock mechanism.
Make sure the tailpiece is in the correct position. Turn it slightly to fit if needed. Secure it firmly to keep the keypad connected to the lock.
Mount Interior Assembly
Mounting the interior assembly is a key step in installing your Kwikset SmartKey deadbolt. This part holds the lock mechanism on the inside of your door. Proper mounting ensures smooth lock operation and security.
Follow the steps carefully to position and secure the interior plate. Take your time to align everything correctly. A well-mounted interior assembly will make your lock work better and last longer.
Position Interior Plate
Place the interior plate over the hole on the inside of the door. Make sure the tailpiece fits into the latch mechanism. The plate should sit flat against the door surface. Check that the screw holes line up with the holes in the door.
Hold the plate steady to avoid slipping. Correct positioning is important for the lock to function properly.
Attach With Screws
Insert the screws into the holes on the interior plate. Use a screwdriver to tighten them evenly. Do not overtighten to avoid damaging the door or lock parts.
Check that the plate is secure and does not move. Test the lock by turning the thumb turn inside. It should move smoothly without resistance.
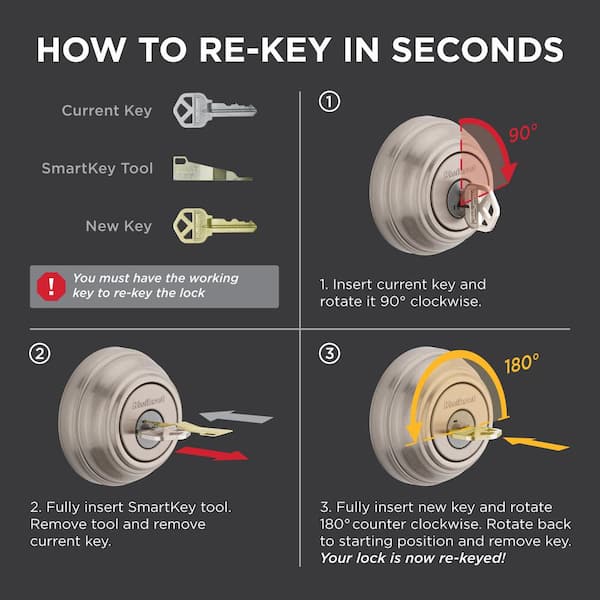
Program The Smartkey
Programming the Kwikset SmartKey deadbolt is a simple process. It allows you to control which keys work with your lock. You can reset the factory code or add new keys easily. This makes your home more secure and flexible.
Resetting Factory Code
Start by removing the lock from the door. Find the SmartKey tool included in your package. Insert it into the hole on the side of the lock. Press the tool firmly and hold it. While holding the tool, insert the original key and turn it 90 degrees clockwise. Remove the key and the tool. Your factory code is now reset.
Adding New Keys
Insert the original key into the lock. Turn it 90 degrees clockwise and hold it. Insert the new key you want to add. Turn the new key back to the original position. Remove both keys. The new key is now programmed and ready to use.
Test The Lock
Testing the Kwikset SmartKey deadbolt is a key step after installation. It ensures the lock works correctly and keeps your home secure. Take time to check every part carefully.
Check Key Operation
Insert the key into the lock cylinder. Turn it slowly to see if it moves smoothly. The key should turn without sticking or jamming. Try this with both the original key and any copies you have made. This confirms that the SmartKey rekey feature is set up properly.
Verify Deadbolt Movement
Turn the thumb turn inside your door. Watch the deadbolt extend and retract fully. It should slide easily without resistance. Test locking and unlocking from both sides of the door. This step confirms the deadbolt aligns well with the door frame and locks securely.
Troubleshooting Tips
Troubleshooting your Kwikset SmartKey deadbolt can save time and frustration. Some common issues occur during installation or first use. Identifying these problems early helps keep your lock working smoothly. Below are simple tips to fix common issues like misalignment and stiff locks.
Fixing Misalignment
Misalignment happens when the deadbolt and strike plate do not line up. This causes the lock to stick or not turn properly. Check if the bolt hits the strike plate or door frame.
Adjust the strike plate by loosening its screws. Move it slightly up, down, or sideways. Tighten the screws again and test the lock. If needed, enlarge the hole in the door frame with a chisel or file. This helps the bolt slide in smoothly.
Addressing Stiff Lock
A stiff lock is hard to turn or feels tight. This can result from dirt, lack of lubrication, or improper installation. Use a graphite powder or silicone spray to lubricate the keyway and bolt. Avoid oil-based lubricants, as they attract dust.
Check the lock cylinder and bolt movement. Make sure all parts fit well and are not forced. If the lock stays stiff, remove and reinstall it carefully. Confirm all screws are snug but not too tight.
Credit: www.kwikset.com
Frequently Asked Questions
How Do I Install A Kwikset Smartkey Deadbolt?
Start by removing the old deadbolt. Align the new deadbolt with the door hole. Secure with screws, then test the lock’s function.
What Tools Are Needed For Kwikset Smartkey Installation?
You need a Phillips screwdriver, tape measure, and a pencil. A drill may be required if holes are missing or need resizing.
How Long Does Kwikset Smartkey Installation Take?
It usually takes 15 to 30 minutes. Time depends on door type and your experience level with locks.
Can I Rekey The Kwikset Smartkey Deadbolt Myself?
Yes, the Smartkey allows easy rekeying without removing the lock. Use the included Smartkey tool to reset the lock in seconds.
Conclusion
Installing the Kwikset SmartKey deadbolt is simple and quick. Follow each step carefully for best results. This lock adds extra security to your home. No special tools or skills are needed. Take your time and double-check your work. Enjoy the peace of mind a smart lock provides.
Keep the instructions handy for future reference. Now, your door is safer with your new deadbolt.