Are you ready to hang that picture, shelf, or mirror but unsure how to securely fasten it to your wall? Knowing how to screw an anchor into a wall is a simple skill that can save you from nails falling out and damaged walls.
In this guide, you’ll discover easy steps to get the job done right the first time. By the end, you’ll feel confident tackling your next DIY project with strong, reliable support behind every screw. Let’s dive in and make your walls work for you!

Credit: www.tjlituo.com
Types Of Wall Anchors
Wall anchors hold screws tightly in walls that cannot support weight alone. Different anchors suit different wall types and weights. Choosing the right anchor ensures your items stay secure. Below are common types of wall anchors and how they work.
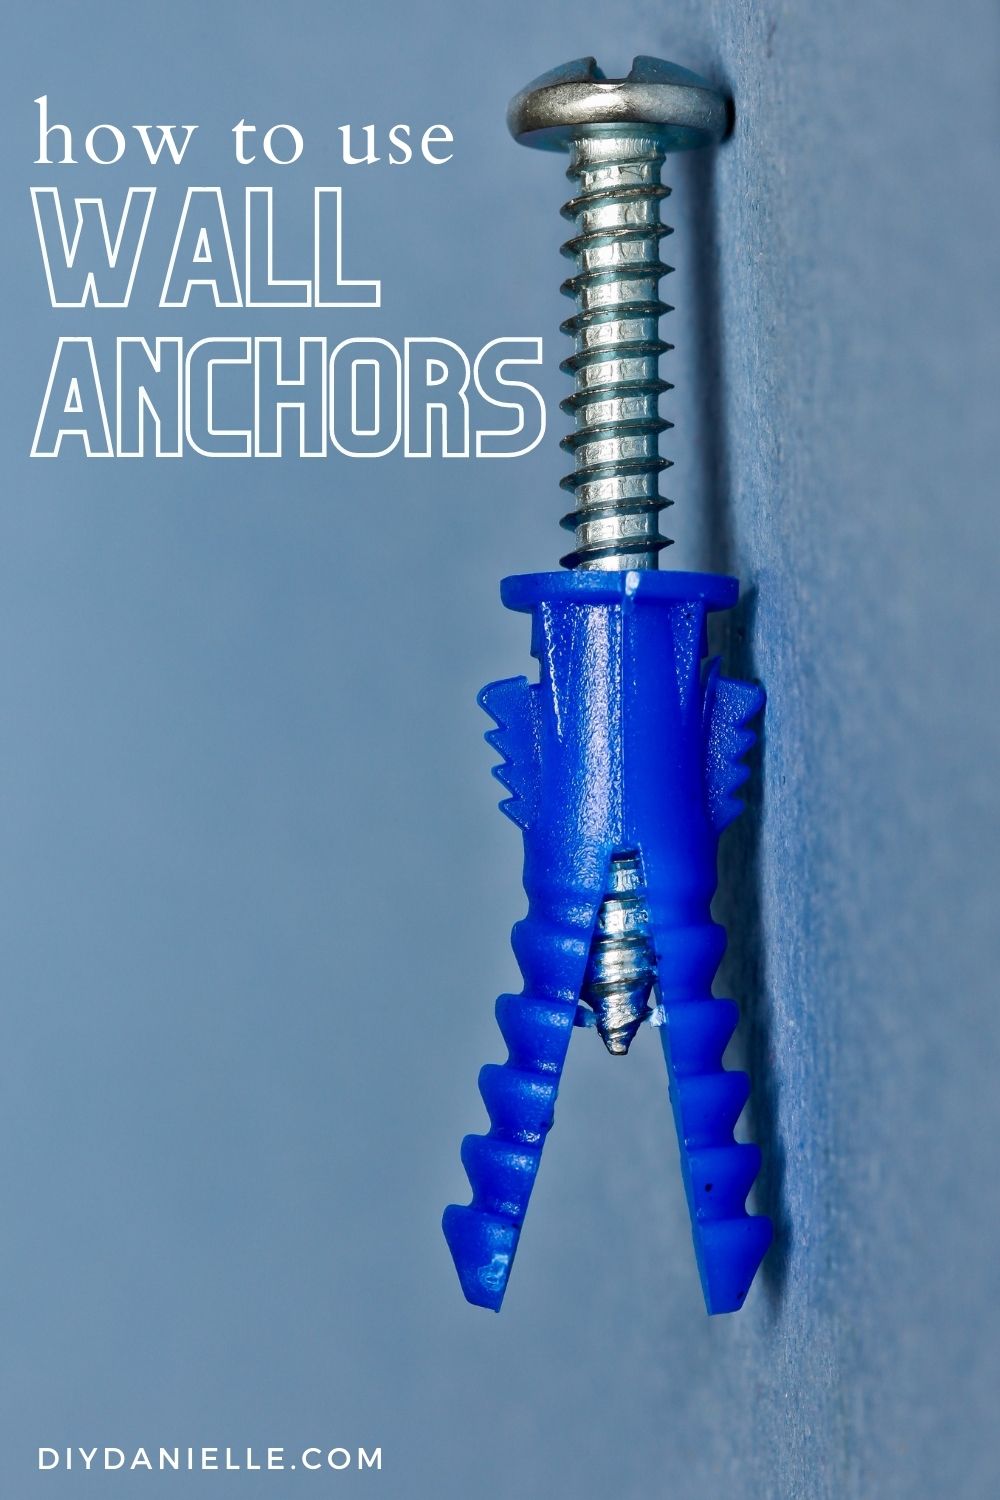
Plastic Expansion Anchors
These anchors are made of plastic. They expand when the screw enters. This creates a tight grip inside the wall. Best for light to medium loads. Work well with drywall and plaster.
Molly Bolts
Molly bolts are metal anchors with a sleeve. The sleeve expands behind the wall when tightened. They hold firmly in hollow walls. Good for medium to heavy loads. Great for hanging shelves or mirrors.
Toggle Bolts
Toggle bolts have metal wings that open behind the wall. The wings spread the load over a larger area. Ideal for very heavy items. Used in hollow walls and ceilings. Provide strong support where other anchors fail.
Self-drilling Anchors
Self-drilling anchors screw directly into drywall without a pilot hole. Made of metal or plastic. Easy to install and save time. Suitable for light to medium weights. A good choice for quick fixes.
Credit: bona-store.com
Tools Needed
Before starting to screw an anchor into a wall, gather the right tools. Having the proper tools makes the job easier and safer. It ensures the anchor holds well and the wall stays intact.
Drill And Drill Bits
A drill is essential for making holes in the wall. Choose a drill bit that matches the size of the anchor. This helps the anchor fit snugly and stay firm. A cordless drill is handy for easy movement.
Screwdriver
A screwdriver is needed to drive the screw into the anchor. Use the correct type, either flathead or Phillips, based on your screw. This prevents stripping the screw head and keeps the process smooth.
Hammer
A hammer helps to tap the anchor gently into the drilled hole. This step is important to set the anchor properly before screwing. Use light taps to avoid damaging the wall or anchor.
Measuring Tape And Pencil
Measure the exact spot for the anchor using measuring tape. Mark the spot clearly with a pencil. Accurate marking ensures the anchor goes in the right place and the item hangs straight.
Preparing The Wall
Preparing the wall is the first step to screw an anchor properly. It helps ensure the anchor holds tight and stays safe. Taking time here saves effort later.
Follow these simple steps to get your wall ready for the anchor.
Locate The Spot
Find the exact place where you want the anchor. Look carefully and choose a spot that suits your needs. Make sure it is flat and free of damage.
Mark The Drill Point
Use a pencil to mark the spot for drilling. A small dot is enough. This mark guides your drill and keeps the hole straight.
Check For Wires And Pipes
Before drilling, check inside the wall for wires or pipes. Use a stud finder or a special tool to detect them. Avoid these areas to prevent damage or accidents.
Drilling The Hole
Drilling the hole correctly is the first step to secure an anchor properly. A well-made hole ensures the anchor fits tightly and holds strong. Take your time to prepare and drill the hole carefully.
Choose The Right Drill Bit Size
Pick a drill bit that matches the anchor size exactly. Too small a bit makes the hole tight and can crack the wall. Too large a bit causes the anchor to fit loosely. Check the anchor package for the recommended drill bit size.
Drill At The Correct Angle
Hold the drill straight and steady. Aim to drill perpendicular to the wall surface. Drilling at an angle weakens the anchor hold. Keep your hand firm and drill slowly to avoid slipping.
Clean Out The Hole
Remove dust and debris after drilling. Use a small brush or blow air into the hole. A clean hole helps the anchor grip better. Dust can stop the anchor from sitting fully inside.
Inserting The Anchor
Inserting the anchor correctly is key to a strong hold in the wall. This step ensures the anchor stays secure and supports the weight. Follow simple actions to place the anchor properly without damage.
Tap Anchor Gently
Hold the anchor near the wall hole. Use a small hammer or the back of a screwdriver. Tap the anchor lightly into the hole. Avoid strong hits that can break the anchor or wall. Tap until the anchor is mostly inside the wall.
Ensure Flush Fit
The anchor should sit flush with the wall surface. Check if the anchor head is even with the wall. If it sticks out, tap it gently more. A flush fit keeps screws straight and secure. It also gives a neat finish to your work.
Screwing The Anchor
Screwing the anchor into the wall is a key step for strong support. This process secures the anchor so it holds weight safely. Doing this right stops the anchor from loosening or falling out. Use care and the right tools. Follow simple steps to make the screw fit perfectly and keep the anchor steady.
Select The Correct Screw
Choose a screw that fits the anchor size exactly. Too small, and it won’t hold well. Too large, it can break the anchor or wall. Match the screw length to the anchor and wall thickness. Use screws made for anchors, usually metal with sharp threads.
Drive Screw Slowly
Turn the screw into the anchor at a slow pace. Slow driving helps the screw catch the anchor threads firmly. It reduces the risk of slipping or stripping the anchor. Use a screwdriver or drill with low speed for control. Stop if the screw feels stuck and check alignment.
Avoid Over-tightening
Stop tightening once the screw feels snug inside the anchor. Over-tightening can crack the anchor or damage the wall. It also weakens the hold and may cause the anchor to spin. Tighten just enough to hold the fixture firmly without forcing the screw further.
Testing The Fixing
Testing the fixing is a crucial step after screwing an anchor into a wall. It helps ensure the anchor holds firmly and supports the weight. This step prevents damage to the wall or falling objects. Take time to test the fixing carefully.
Check Stability
Start by gently pulling or pushing the anchor. The anchor should not move or wiggle. Test with light force first. If it feels loose, the anchor may not be secure. Try to notice any cracks or damage around the anchor hole. These signs mean the fixing needs attention.
Make Adjustments If Needed
If the anchor moves, tighten the screw slightly. Avoid over-tightening as this can damage the wall. Remove the screw and anchor if necessary. Use a bigger anchor or a different type for better hold. Fill the hole and drill a new one if the wall is weak. Repeat the test after adjustments to confirm stability.
Tips For Different Wall Types
Different walls need different anchors and tools. Knowing the right method makes your work easier and safer. Use the right tips for your wall type to hold items firmly.
Drywall
Drywall is soft and fragile. Use plastic or metal anchors for better grip. Drill a small hole first. Gently screw the anchor until flush with the wall. Avoid overtightening to stop damage.
Concrete
Concrete is hard and dense. Use a hammer drill to make a pilot hole. Insert a concrete anchor or sleeve. Tap it with a hammer if needed. Screw the anchor in slowly for a tight fit.
Brick
Brick walls need special anchors. Drill into the brick, not the mortar. Use masonry anchors or sleeve anchors. Clean out dust from the hole before inserting. Tighten the screw steadily to avoid cracking.

Credit: www.picturehangsolutions.com
Frequently Asked Questions
What Tools Do I Need To Screw An Anchor Into A Wall?
You need a drill, screwdriver, wall anchors, and screws. A drill creates the hole. The screwdriver inserts the anchor and screw securely.
How Do I Choose The Right Wall Anchor Type?
Select anchors based on wall material and weight load. Plastic anchors work for drywall. Metal anchors suit heavy loads or masonry walls.
Can I Screw An Anchor Without Drilling A Hole?
No, drilling a pilot hole is necessary. It ensures the anchor fits snugly and holds firmly. Skipping this step may weaken the support.
How Deep Should I Drill For A Wall Anchor?
Drill a hole slightly longer than the anchor length. This allows the anchor to fit fully and expand properly for strong grip.
Conclusion
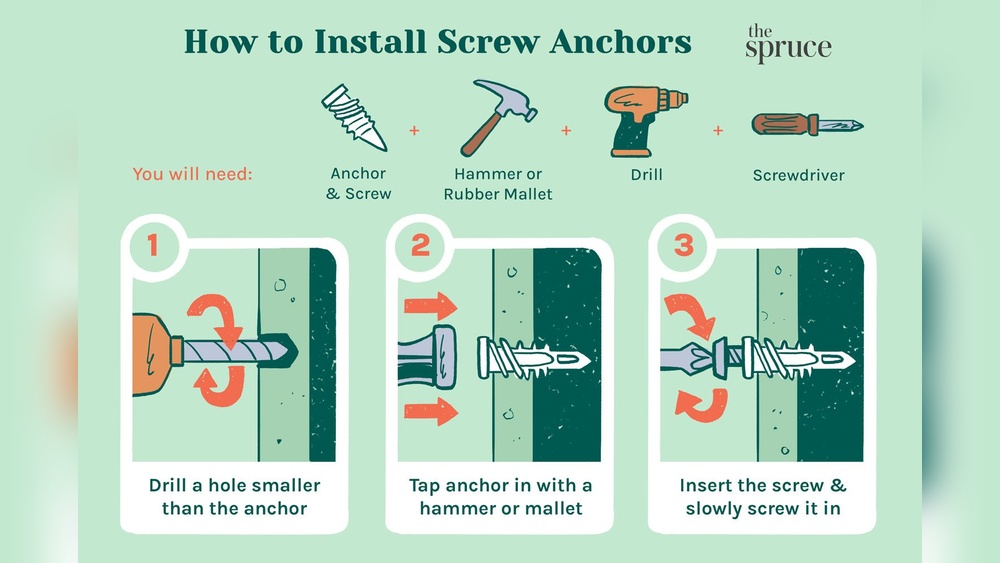
Screwing an anchor into a wall is simple with the right steps. Start by choosing the correct anchor type for your wall. Drill a hole that fits the anchor size perfectly. Insert the anchor carefully and then screw it in slowly.
This method keeps your items safe and secure. Practice makes this task easier and quicker. Take your time, and you will get good results. Now, you can hang shelves, pictures, or decorations with confidence. A few simple tools and some patience go a long way.