If your floor hydraulic jack isn’t working right, it can stop your work dead in its tracks. You rely on it to lift heavy loads safely and smoothly, so when it breaks down, frustration sets in fast.
But before you think about buying a new one, there’s good news—you can often fix it yourself. You’ll discover simple, step-by-step ways to repair your floor hydraulic jack, save money, and get back to work quickly. Keep reading, and you’ll learn exactly what to do, even if you’ve never handled tools before.
Your jack won’t stay broken for long!

Credit: www.sviinternational.com
Common Hydraulic Jack Issues
Hydraulic jacks are useful tools for lifting heavy objects safely. They can have problems from regular use or lack of care. Knowing common issues helps you fix the jack quickly. This saves time and keeps the jack working longer.
Leaks And Fluid Loss
Hydraulic jacks need fluid to work properly. Leaks cause the fluid to drop. The jack may stop lifting or become weak. Check seals and hoses for cracks or holes. Replace damaged parts to stop leaks. Keep the fluid level full for the best performance.
Jack Not Lifting
The jack might not lift due to air inside the system. Air blocks the fluid flow. Bleed the jack by opening the release valve. Pump the handle a few times to remove air. Also, check the fluid level. Low fluid means less lifting power.
Slow Or Uneven Lifting
Slow lifting usually means dirty or old fluid. Dirt clogs the valves inside the jack. Drain the old fluid and refill with clean hydraulic fluid. Uneven lifting can be from worn seals or damaged pistons. Inspect parts and replace if needed for smooth lifting.
Handle Problems
The handle may become hard to pump or loose. Dirt or rust can cause this problem. Clean and lubricate the handle joints. Tighten any loose bolts or screws. Replace the handle if it is bent or broken. A good handle makes lifting easier and safer.
Tools And Materials Needed
Repairing a floor hydraulic jack requires the right tools and materials. Using the correct items makes the job easier and safer. Gather everything before starting the repair.
Essential Tools
You need a set of wrenches to loosen and tighten bolts. A screwdriver will help remove covers and small screws. Pliers are useful for gripping and pulling parts. A hammer can help with stuck components. A clean cloth is needed to wipe dirt and oil. A small container will hold hydraulic fluid during refill.
Replacement Parts
Common parts to replace include seals and O-rings. These stop leaks and keep pressure in the jack. You may also need a new release valve. Check the jack manual for exact part numbers. Buying quality parts ensures the jack works well again. Keep parts organized to avoid confusion during repair.
Safety Equipment
Wear safety gloves to protect your hands from sharp edges. Safety glasses shield your eyes from oil splashes. Use work clothes that cover your skin. Keep a fire extinguisher nearby, just in case. Work in a well-ventilated area to avoid breathing fumes. Safety first prevents accidents and injuries.
Preparing The Jack For Repair
Preparing your floor hydraulic jack for repair is the first step to ensure a safe and effective fix. Proper preparation helps you spot problems early and avoid further damage. Taking your time now saves effort later.
Cleaning The Jack
Start by removing dirt and grease from the jack’s surface. Use a cloth and mild detergent. Clean all parts, especially moving ones. This makes inspection easier and prevents dirt from entering the hydraulic system.
Draining Hydraulic Fluid
Next, drain the old hydraulic fluid. Place a container under the drain plug. Open the plug carefully to let the fluid flow out. This step stops dirty fluid from harming internal parts during repair.
Inspecting For Damage
Look closely at all jack parts for cracks, dents, or leaks. Check seals and hoses for wear. Note any damage before starting repairs. This helps you plan what needs fixing or replacing.

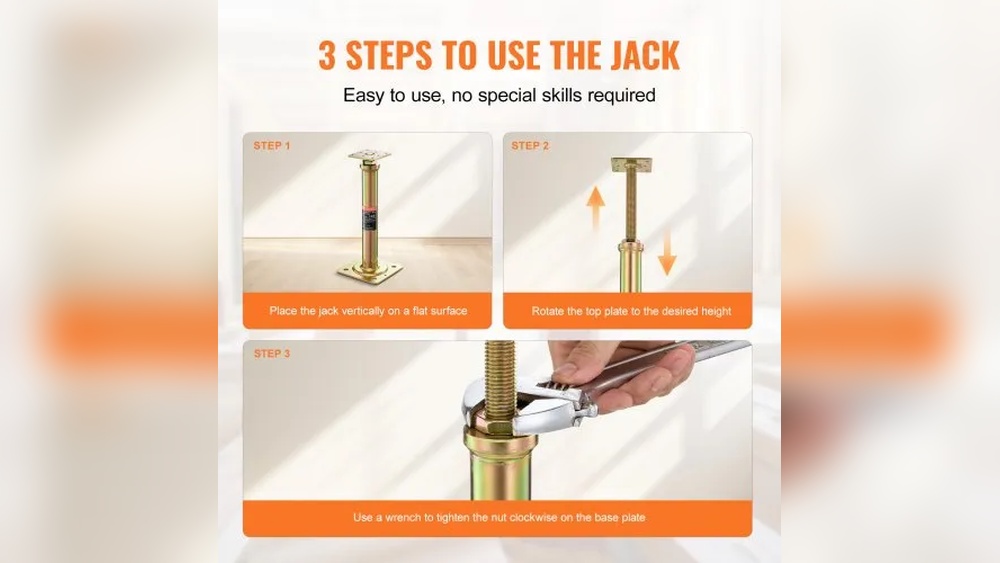
Credit: www.amazon.com
Fixing Hydraulic Fluid Leaks
Fixing hydraulic fluid leaks in a floor jack is important to keep it working safely. Leaks lower the jack’s power. They also make the floor slippery and unsafe. You can fix leaks by checking seals, replacing bad parts, and refilling the fluid.
Checking Seals And O-rings
Seals and O-rings stop the hydraulic fluid from leaking. Look closely at these parts. Check for cracks, tears, or hard spots. Old seals often break or shrink. Use a bright light to spot small leaks. Clean the area before inspection. Dirt can hide damage and cause leaks.
Replacing Damaged Seals
Damaged seals must be replaced to stop leaks. Remove the old seals carefully. Use the correct size and type for your jack. Apply a little oil to new seals for a good fit. Press them in place gently. Avoid stretching or tearing the new seals. Reassemble the jack slowly, checking each step.
Refilling Hydraulic Fluid
Low fluid levels cause poor jack performance. Find the fluid fill port on your jack. Use the recommended hydraulic oil type. Pour slowly to avoid air bubbles. Fill until the fluid reaches the proper level. Close the fill port tightly. Test the jack to ensure smooth lifting action.
Repairing Pump And Release Valve
Repairing the pump and release valve is key to fixing a floor hydraulic jack. These parts control the jack’s lifting and lowering actions. Faulty components cause leaks or poor pressure. Repairing these parts restores smooth and safe operation.
This section explains how to adjust the release valve, fix the pump piston, and test valve operation. Follow these steps carefully to bring your jack back to working order.
Adjusting The Release Valve
The release valve controls the jack’s lowering speed. Locate the valve near the pump handle. Use a wrench to turn the valve slowly. Turn it clockwise to close and raise the jack. Turn it counterclockwise to open and lower the jack.
Adjust the valve until the jack lowers smoothly without dropping fast. Avoid overtightening to prevent damage. Small adjustments make a big difference.
Fixing The Pump Piston
The pump piston moves hydraulic fluid to lift the jack. Dirt or damage can cause it to leak or stick. Remove the piston by unscrewing the pump housing. Clean the piston and cylinder with a cloth.
Check the piston seal for cracks or wear. Replace the seal if needed. Apply a small amount of hydraulic oil to the piston before reassembling. Ensure all parts fit tightly to stop leaks.
Testing Valve Operation
After repairs, test the valves for proper function. Pump the handle and watch the jack lift. Open the release valve slowly to lower the jack. The jack should move smoothly without jerks or drops.
If the jack fails to hold pressure or leaks fluid, recheck the seals and valve adjustments. Repeat testing until the jack operates safely and smoothly.

Credit: www.youtube.com
Addressing Handle Issues
The handle is a vital part of a floor hydraulic jack. It controls the lifting and lowering actions. Problems with the handle can stop the jack from working properly. Addressing handle issues quickly keeps the jack safe and efficient.
Tightening Loose Handles
Loose handles cause poor control and can be unsafe. Check the handle connection first. Use a wrench to tighten any loose bolts or nuts. Turn clockwise until the handle feels firm. Avoid over-tightening to prevent damage. Test the handle by moving it up and down. It should feel stable and smooth. Tight handles improve performance and safety.
Replacing Broken Handles
Broken handles need full replacement for safety. Remove the damaged handle by loosening bolts or pins. Keep these parts safe for reassembly. Buy a new handle that fits your jack model. Insert the new handle into the slot carefully. Tighten bolts or pins to secure it. Check the handle movement after installation. A new handle restores full control and function.
Testing The Repaired Jack
Testing the repaired floor hydraulic jack ensures it works safely and correctly. This step confirms the fix was successful. It helps avoid accidents and damage during use. Follow careful checks and tests before using the jack again.
Safety Checks
Start with a full safety inspection. Look for leaks in the hydraulic system. Check if the handle moves smoothly. Make sure all bolts and parts are tight. Confirm the jack’s base is stable and not damaged. Safety first to prevent any failure.
Load Testing
Place the jack under a small, controlled load. Use a weight less than the jack’s maximum limit. Pump the handle to lift the load slowly. Watch for any drops or strange noises. Hold the load up for a few minutes. This test shows if the jack can hold weight safely.
Final Adjustments
After load testing, adjust any parts if needed. Tighten loose bolts or fix leaks found during testing. Check the release valve for smooth operation. Make sure the jack lowers the load steadily. Repeat safety checks once adjustments are done. The jack should work perfectly before regular use.
Maintenance Tips For Longevity
Maintaining a floor hydraulic jack helps it last longer and work safely. Proper care keeps the jack in good shape and prevents costly repairs. Follow simple steps regularly to protect your tool.
Regular Cleaning
Clean the jack after each use. Remove dirt, grease, and dust from all parts. Use a cloth with mild soap and water. Avoid harsh chemicals that can damage seals. Dry the jack completely to stop rust.
Proper Storage
Store the jack in a dry, cool place. Keep it away from moisture and direct sunlight. Lower the jack fully before storing to reduce pressure on parts. Cover the jack to protect it from dust and dirt.
Routine Inspections
Check the jack for leaks and cracks often. Look at the hydraulic fluid level and top it up if low. Inspect seals and hoses for wear. Test the jack’s lifting ability before each use.
Frequently Asked Questions
How Do I Fix A Leaking Floor Hydraulic Jack?
To fix leaks, first identify the leak source. Replace worn seals or gaskets. Clean all parts before reassembly. Use hydraulic fluid recommended by the manufacturer to refill the jack.
Why Won’t My Hydraulic Jack Lift Properly?
Low hydraulic fluid or air trapped inside can cause lifting issues. Check fluid levels and bleed the jack to remove air. Inspect for damaged seals or worn parts and replace if needed.
How Often Should I Maintain A Floor Hydraulic Jack?
Regular maintenance every 6 months ensures safety and efficiency. Check fluid levels, clean the jack, and inspect for leaks or damage. Proper maintenance extends the jack’s lifespan and improves performance.
Can I Repair A Damaged Hydraulic Jack Pump?
Yes, you can repair a damaged pump by replacing worn or broken seals and valves. Clean all components thoroughly before reassembly. If the damage is severe, consider professional repair or replacement.
Conclusion
Repairing a floor hydraulic jack is easier than it seems. Follow each step carefully and take your time. Check for leaks, replace worn parts, and test the jack often. This keeps it safe and working well. Regular care helps the jack last longer and saves money.
Keep tools handy and stay patient during repair. You can handle this task with simple instructions. Stay safe and lift with confidence.