Are you tired of struggling to hang pictures, shelves, or decorations that just won’t stay put? Knowing how to put anchors in the wall can make all the difference between a secure hold and frustrating damage.
In this guide, you’ll learn simple, step-by-step tips to confidently install wall anchors that keep your items safe and steady. Whether you’re a DIY beginner or just want to improve your skills, this article will help you avoid common mistakes and get the job done right the first time.
Keep reading, and discover how easy it is to give your walls the support they need!
Choosing The Right Anchor
Choosing the right anchor is important for a strong hold. Using the wrong type can cause damage or make the item fall. This section helps you pick the best anchor for your wall and project.
Types Of Wall Anchors
There are many wall anchors. Plastic expansion anchors work well for light loads. They expand when you screw into them. Metal anchors are stronger and good for medium weights. Toggle bolts spread out inside the wall for heavy items. Molly bolts have a sleeve that opens behind the wall for a firm grip.
Matching Anchors To Wall Material
Walls differ. Drywall needs different anchors than brick or concrete. Plastic anchors suit drywall but not solid walls. For brick or concrete, use masonry anchors or sleeve anchors. Hollow walls require toggle bolts or molly bolts. Match the anchor to the wall type for safety and durability.
Weight Considerations
Know the weight of your item before choosing an anchor. Light items need simple anchors. Heavy objects need strong anchors like toggle bolts. Check the anchor’s weight limit on the package. Always pick an anchor with a higher weight rating than your item.
Tools You’ll Need
To put anchors in the wall, you need the right tools. Using proper tools makes the job easier and safer. It helps you place anchors correctly and hold items securely. Here are the basic tools you will need for this task.
Drill And Drill Bits
A drill is essential for making holes in the wall. Choose a drill bit that matches the anchor size. Use a masonry bit for concrete or brick walls. A standard bit works for drywall or wood. Drilling the right hole size ensures a snug fit for the anchor.
Screwdrivers And Screws
Use screwdrivers to insert screws into the anchors. A Phillips or flat-head screwdriver fits most screws. Match the screwdriver type with the screw head. Screws hold your item firmly once placed in the anchor. Keep screws handy in the right size for your anchors.
Measuring And Marking Tools
Measure carefully before drilling. Use a tape measure to find the correct spot. Mark the spot with a pencil or marker. Accurate marking prevents mistakes and keeps your anchors level. A level tool helps ensure straight placement on the wall.
Preparing The Wall
Preparing the wall is the first step to putting anchors in it. It helps ensure the anchors hold well and the wall stays safe. Careful preparation avoids damage and makes the job easier.
Follow these simple steps to get your wall ready for anchors.
Locating Studs And Avoiding Hazards
Studs are the wooden or metal beams behind the drywall. Anchors work best near studs for strong support. Use a stud finder to locate them.
Avoid drilling near electrical wires and pipes. They can cause injury or damage if hit. Scan the wall carefully before starting.
Marking Anchor Positions
Mark the exact spots where you want to place anchors. Use a pencil to make light marks. Measure twice to keep spacing even and correct.
Clear markings help guide your drilling. They reduce mistakes and keep your work neat.
Drilling Pilot Holes
Drill small pilot holes first. They make it easier to insert anchors. Choose a drill bit size that matches the anchor diameter.
Drill slowly and straight. This prevents cracks and keeps holes clean. Remove dust from holes before adding anchors.
Installing Different Anchors
Installing wall anchors is a simple way to hang items securely. Different anchors suit different wall types and weights. Knowing how to install each type helps keep your items safe.
Here are four common anchors and how to install them properly.
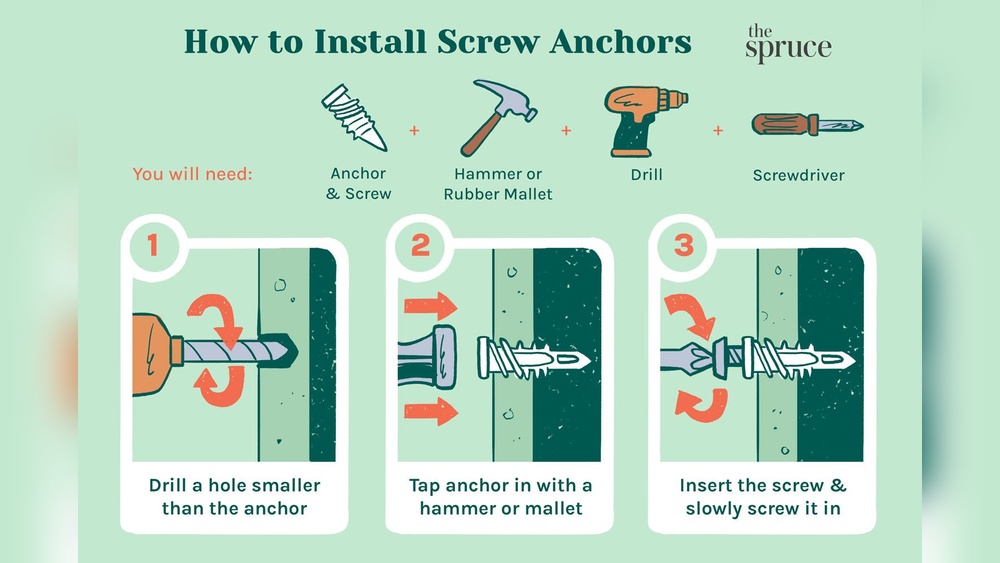
Plastic Expansion Anchors
Start by drilling a hole that matches the anchor size. Push the plastic anchor into the hole until it is flush with the wall. Insert the screw slowly, causing the anchor to expand. This expansion holds the anchor tightly inside the wall.
Toggle Bolts
Drill a hole large enough for the folded toggle. Thread the bolt through your item, then screw the toggle onto the bolt. Push the toggle through the hole. Once inside, it will open up. Tighten the bolt, pulling the toggle against the wall.
Molly Bolts
Drill a hole that fits the molly bolt sleeve. Insert the bolt and tap it lightly until flush. Tighten the bolt, causing the sleeve to expand behind the wall. This creates a strong grip. Remove the bolt to hang your item, then replace it.
Self-drilling Anchors
Place the anchor on the wall surface where you want it. Use a screwdriver to twist the anchor into the drywall. It cuts its own path without drilling. Insert the screw into the anchor to hold your item securely.
Securing Screws For Strong Support
Securing screws firmly in wall anchors ensures strong support for shelves, frames, and other items. Proper screw placement keeps the anchor stable and the object safe. This process requires attention to detail and careful handling.
Follow these steps to insert screws correctly, achieve a tight fit, and avoid damage to the wall.
Inserting Screws Correctly
Start by choosing the right screw size for your anchor. The screw should match the anchor’s diameter and length. Insert the screw slowly into the anchor, turning it clockwise. Stop once the screw feels snug but do not overtighten. Tightening too much can break the anchor or strip the wall.
Ensuring Tight Fit
The screw must fit tightly inside the anchor. A loose screw will cause the anchor to wobble. Tighten the screw until the anchor expands and grips the wall firmly. Check by gently pulling on the object to see if it moves. If it does, tighten the screw a little more.
Avoiding Wall Damage
Over-tightening screws can crack drywall or damage plaster. Use a screwdriver with a good grip for better control. Stop turning the screw as soon as resistance increases. Avoid forcing screws into anchors that seem stuck. This careful approach protects your wall and keeps anchors strong.

Credit: www.picturehangsolutions.com
Testing Anchor Strength
Testing anchor strength is an important step after installing anchors in the wall. It helps ensure the anchor holds the weight safely. This process prevents accidents and damage to walls. Simple tests can show if the anchor is secure or needs adjustment.
Applying Gradual Pressure
Start by pulling or pushing the anchor gently. Increase the force slowly. This helps check if the anchor stays firm. Sudden strong force might damage the wall. Gradual pressure reveals the true holding power of the anchor.
Signs Of Weak Anchors
Look for movement in the anchor or wall. Any wobbling means the anchor is loose. Cracks or crumbling around the hole are warning signs. If the anchor slips, it cannot hold weight safely. Weak anchors need to be fixed before use.
Fixing Common Issues
Tighten loose anchors by pushing them deeper. Use larger or different types of anchors for weak spots. Fill damaged holes with wall filler and let dry. Re-drill the hole if necessary and insert a new anchor. These steps improve anchor strength and safety.
Safety Tips And Best Practices
Safety is key when putting anchors in the wall. Taking the right steps protects you and your home. Follow these tips to work safely and avoid damage.
Protective Gear
Wear safety glasses to protect your eyes from dust and debris. Use gloves to keep your hands safe while drilling. A dust mask helps avoid breathing in particles. Dress in clothes that cover your skin well.
Avoiding Electrical Wiring
Check for electrical wires behind the wall before drilling. Use a stud finder with a wire detection feature. Avoid drilling near outlets or switches. Turn off power to the area if unsure. Stay clear of any hidden cables to prevent shocks.
Maintaining Wall Integrity
Do not overload the anchor with too much weight. Choose the right type of anchor for your wall material. Drill holes that match the anchor size exactly. Avoid making too many holes close together. This keeps the wall strong and damage-free.

Credit: www.wikihow.com

Credit: www.do-it-yourself-help.com
Frequently Asked Questions
What Tools Are Needed To Put Anchors In The Wall?
You need a drill, appropriate drill bit, wall anchors, and a screwdriver. These tools help create holes and secure anchors safely. Using the right tools ensures a strong hold and prevents wall damage.
How Do You Choose The Right Wall Anchor?
Select anchors based on wall type and weight load. Plastic anchors suit light loads on drywall. Metal anchors work better for heavier items and masonry walls. Correct anchor choice ensures stability and safety.
Can I Install Wall Anchors Without A Drill?
While possible, using a drill is recommended for precise holes. For small anchors, you might gently tap them in with a hammer. However, drilling provides cleaner, more secure anchor placement.
How Deep Should I Drill For Wall Anchors?
Drill a hole slightly deeper than the anchor length. This allows the anchor to fit fully and expand properly. Proper depth ensures the anchor grips the wall firmly.
Conclusion
Putting anchors in the wall is simple with the right steps. Choose the correct anchor for your wall type. Drill a hole that fits the anchor size. Push or tap the anchor into the hole firmly. Screw your item into the anchor carefully.
This method holds items securely and prevents damage. Practice makes the process easier and more precise. Now, you can hang shelves, pictures, or mirrors safely. Give it a try and see the difference yourself.


