If you’ve ever struggled to hang a heavy picture or shelf, you know how frustrating it can be when screws just won’t hold. That’s where screw wall anchors come in.
They give your screws the extra grip they need to stay secure in drywall, plaster, or hollow walls. But how do you choose the right anchor? And how do you install it correctly so your items don’t fall down? In this guide, you’ll learn simple steps to use screw wall anchors like a pro.
By the end, you’ll have the confidence to hang anything safely and securely, without worrying about damage or accidents. Keep reading—you’re about to make your walls work for you.

Credit: www.picturehangsolutions.com
Types Of Screw Wall Anchors
Screw wall anchors come in different types. Each type fits specific wall materials and weight needs. Choosing the right anchor is key for strong, secure mounts.
Understanding the main types helps in picking the best one for your project. Here are the most common screw wall anchors and their uses.
Plastic Anchors
Plastic anchors are simple and affordable. They work well with drywall and light materials. Insert the anchor into a drilled hole, then screw into it. They expand inside the wall for a firm hold. Ideal for small pictures and light shelves.
Metal Anchors
Metal anchors offer more strength than plastic. They are good for medium-weight items. Made of steel or zinc, they resist bending and breaking. Metal anchors expand tightly inside the wall cavity. Use them for heavier pictures and curtain rods.
Toggle Bolts
Toggle bolts have wings that open behind the wall. This spreads the weight over a large area. Great for hanging heavy items on hollow walls. Drill a hole, push the closed toggle through, then tighten the screw. The wings hold firmly on the wall’s back.
Molly Bolts
Molly bolts are metal anchors with expandable sleeves. Inserted into a drilled hole, the sleeve expands when the screw tightens. This creates a strong grip in drywall or plaster. Molly bolts support medium to heavy items securely. Perfect for shelves, mirrors, and cabinets.
Choosing The Right Anchor
Choosing the right screw wall anchor is important for a strong hold. Picking the correct anchor keeps your items secure and protects your walls. Different walls and weights need different anchors. Understanding these factors helps you make the best choice.
Assessing Wall Material
First, check the wall material. Drywall, plaster, concrete, and brick all need different anchors. Some anchors work well in soft walls like drywall. Others fit better in hard materials like concrete. Knowing your wall type guides your choice.
Considering Weight Limits
Think about the weight of the item you want to hang. Light objects need small anchors. Heavy items require stronger, larger anchors. Each anchor has a weight limit. Choose one that can hold your item safely.
Matching Anchor Size
Match the anchor size to the screw and hole. A small anchor won’t hold a big screw well. A large anchor may damage thin walls. Pick the right size for a tight fit. This keeps the anchor and screw secure.
Preparing The Wall
Preparing the wall is the first step for a secure installation. It helps ensure the wall anchor holds firmly. Taking time now prevents damage later.
Locating Studs
Studs are the wooden frames behind drywall. Anchors work best away from studs. Use a stud finder or tap the wall. A hollow sound shows no stud. A solid sound means a stud is there. Mark stud edges lightly with a pencil.
Marking Drill Points
Decide where to place the anchor. Mark the exact spot with a pencil. Use a level to keep marks straight. Double-check spacing between marks. Clear marks help drill accurately. Avoid placing anchors too close together.
Selecting Drill Bits
Choose a drill bit that matches the anchor size. Check the anchor package for drill size advice. Use a bit slightly smaller than the anchor body. Too large a hole makes the anchor loose. Too small can crack the wall.
Installing Screw Wall Anchors
Installing screw wall anchors is an easy way to hang objects securely. These anchors hold screws tightly in drywall or other hollow walls. Correct installation ensures strong support and prevents damage to the wall.
The process involves three main steps: drilling the hole, inserting the anchor, and securing it. Each step requires simple tools and care to get the best results.
Drilling The Hole
Start by choosing the right drill bit size for the anchor. The hole should be slightly smaller than the anchor’s width. Drill straight into the wall at the marked spot. Avoid making the hole too big or too deep.
Inserting The Anchor
Push the anchor gently into the drilled hole. Use your fingers or a hammer for light taps. The anchor must fit snugly and sit flush with the wall surface. Do not force it too hard to avoid wall damage.
Securing The Anchor
Place the screw into the anchor’s center. Turn it slowly with a screwdriver or drill. Tighten until the anchor expands inside the wall. This expansion locks the anchor firmly in place. Stop tightening once the screw feels secure.
Driving Screws For Support
Driving screws into wall anchors gives strong support for hanging items. Proper screw driving ensures the anchor holds tightly inside the wall. This step is key for safety and stability.
Using the right screw and driving it carefully prevents damage. Let’s explore how to choose screws and drive them correctly. Avoiding mistakes helps your wall anchors work well.
Choosing The Right Screw
Select screws that fit the wall anchor size. Too long screws can damage the wall. Too short screws won’t hold the anchor properly. Use screws made for drywall anchors or plastic anchors. Match the screw diameter to the anchor’s hole. Check the package for recommended screw sizes.
Driving Screws Properly
Start screwing slowly by hand or with a drill on low speed. Keep the screw straight to avoid bending or breaking the anchor. Stop turning when the screw head is flush with the anchor. Do not over-tighten. Over-tightening may strip the anchor’s grip or break it inside the wall.
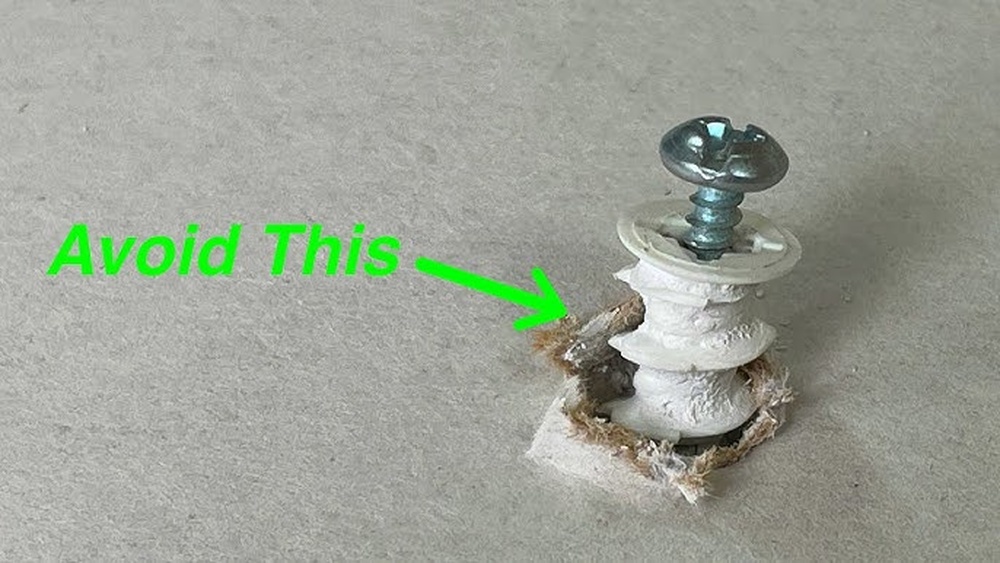
Avoiding Common Mistakes
Do not force screws that do not fit. Avoid using screws that are too big or too small. Do not drive screws at an angle. Avoid over-tightening which can ruin the anchor’s hold. Make sure the anchor is fully inserted before screwing. These tips help keep your wall strong and secure.
Credit: www.bobvila.com
Testing Anchor Strength
Testing anchor strength is an important step after installing screw wall anchors. It helps ensure the anchor holds firmly in the wall. This prevents damage or accidents later.
Check the anchor’s grip before hanging heavy items. This simple test saves time and trouble. It also confirms the wall and anchor can handle the load safely.
Applying Load Gradually
Start by adding weight slowly. Do not put full pressure at once. Apply a small load first, then increase it bit by bit. Watch how the anchor reacts to the load.
Gradual loading helps find the limit of the anchor. It also avoids sudden failures that could cause damage. Stop adding weight if you see any movement or cracks.
Checking For Stability
After loading, check if the anchor stays firm. Gently wiggle the screw or hook. Look for any signs of loosening or shifting. The anchor should not move or feel loose.
Stable anchors hold tight and keep items safe. If you notice instability, remove the anchor and try a different type or size. Testing stability ensures your wall mount is secure.
Removing And Replacing Anchors
Removing and replacing screw wall anchors is a common task during home repairs or redecorating. It helps keep walls clean and ready for new fixtures. Doing this carefully prevents extra damage to the wall surface. This guide explains how to remove anchors safely, fix any wall damage, and install new anchors correctly.
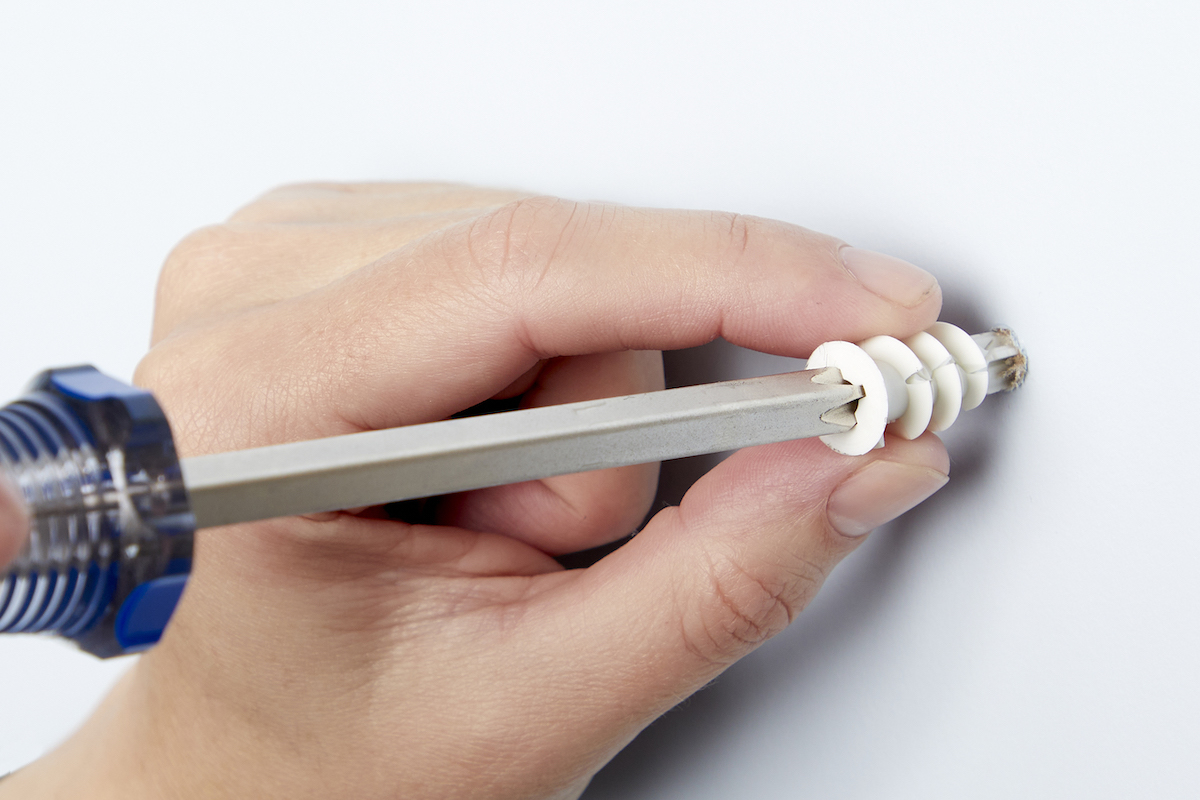
Safe Removal Techniques
Start by loosening the screw inside the anchor. Use a screwdriver that fits well to avoid stripping the screw head. Pull the screw out gently. For plastic anchors, try to pull them out with pliers. If they do not come out easily, push them inside the wall cavity carefully. Avoid forcing the anchor too hard to prevent wall damage.
Repairing Wall Damage
Small holes left by anchors need filling. Use spackle or wall filler to cover these holes. Apply the filler with a putty knife and smooth it out. Let it dry completely. Sand the area lightly to make it even with the wall. This creates a smooth surface for painting or new anchors.
Installing New Anchors
Choose the right anchor for your wall type and weight needs. Drill a hole slightly smaller than the anchor size. Insert the anchor into the hole until flush with the wall. Screw in the fastener slowly to ensure a tight fit. Check that the anchor is secure before mounting anything.

Credit: www.youtube.com
Frequently Asked Questions
What Are Screw Wall Anchors Used For?
Screw wall anchors provide extra support in drywall or masonry. They prevent screws from loosening or pulling out under weight. Anchors help hang heavy items securely on walls.
How Do I Choose The Right Screw Wall Anchor?
Select anchors based on wall material and load weight. Plastic anchors suit light loads; metal anchors handle heavier items. Always check packaging for weight limits and compatibility.
Can I Reuse Screw Wall Anchors?
No, reusing screw wall anchors is not recommended. Removing them damages their grip and integrity. Always use new anchors for each installation for safety.
How Do I Install Screw Wall Anchors Properly?
Drill a hole matching the anchor size. Insert the anchor flush with the wall. Then, screw into the anchor slowly for a secure fit.
Conclusion
Using screw wall anchors can make hanging items secure and easy. Choose the right anchor for your wall type and weight needs. Drill the hole carefully, insert the anchor, then screw in tightly. This simple process helps hold shelves, pictures, and more.
Practice a few times to gain confidence. Small steps lead to strong results. Now you can hang items safely without worry. Give it a try and see the difference yourself.