Are you ready to hang that new shelf or picture frame but unsure how to drill into a wall anchor without causing damage? You’re not alone.
Many people struggle with this simple yet crucial step. Getting it right means your items stay secure and your walls stay intact. In this guide, you’ll learn the exact steps to drill into a wall anchor safely and effectively—no guesswork, no mistakes.
Keep reading, and you’ll gain the confidence to tackle this task like a pro.
Credit: www.protoolreviews.com
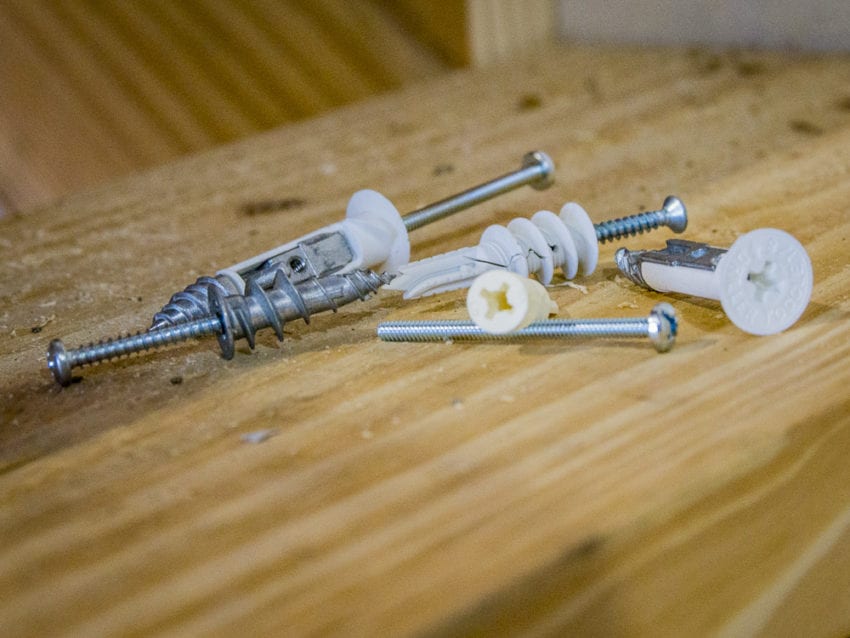
Choosing The Right Wall Anchor
Choosing the right wall anchor is key for a strong hold. The right anchor stops your items from falling. It also protects your wall from damage. Picking the proper type helps your project last longer.
Types Of Wall Anchors
There are many types of wall anchors. Plastic expansion anchors work well for light items. They expand inside the wall to hold tight. Metal anchors are stronger and fit heavy loads. Toggle bolts spread the load across a wider area. Molly bolts open behind the wall for a firm grip.
Matching Anchors To Wall Material
Different walls need different anchors. Drywall requires special anchors like plastic or toggle bolts. Concrete walls need heavy-duty anchors like sleeve or wedge types. For brick walls, use anchors made for masonry. Using the wrong anchor can cause damage or weak holds.
Weight Capacity Considerations
Always check the weight the anchor can hold. Light anchors hold small items like pictures. Medium anchors support shelves and mirrors. Heavy anchors fit for large items like TVs or cabinets. Choose an anchor with a weight limit higher than your item’s weight. Safety comes first for all wall mounts.
Tools Needed For Drilling
Drilling into a wall anchor requires the right tools to ensure a clean and secure hole. Having the proper equipment makes your work easier and safer. Each tool plays a key role in the drilling process. This section covers the essential tools you need before starting.
Selecting The Correct Drill Bit
Choose a drill bit that matches the size of the wall anchor. A bit too small will make the hole tight and hard to use. A bit too large will cause the anchor to be loose. Use a masonry bit for concrete or brick walls. For drywall, a standard twist bit works well. Check the package of your wall anchor for recommended drill bit size.
Using A Drill Guide Or Level
A drill guide helps keep the drill steady and straight. It prevents the bit from slipping or making uneven holes. Using a level ensures the anchor is drilled exactly where you want. This tool helps in placing shelves or pictures evenly. A steady drill and proper alignment improve the strength of the anchor.
Safety Equipment Essentials
Wear safety glasses to protect your eyes from dust and debris. Use ear protection if your drill is loud. Gloves can protect your hands from sharp edges and vibration. Dust masks are helpful if drilling creates fine dust particles. Always check your tools for damage before use to avoid accidents.
Preparing The Wall For Drilling
Preparing the wall for drilling is a key step to ensure a strong hold for your wall anchor. It helps avoid damage to the wall and keeps your installation secure. Taking time to prepare also makes the drilling process smoother and safer.
Locating Studs And Avoiding Obstacles
Use a stud finder to locate the wall studs behind the drywall. Studs offer extra support for heavy items. Avoid drilling into electrical wires or plumbing pipes. These can cause serious damage or injury. Check the area carefully before you start drilling.
Marking Drill Points Accurately
Measure the exact spot for your anchor. Use a pencil to mark the drill points clearly. Double-check the measurements to ensure accuracy. Proper marking helps prevent mistakes and keeps your project neat.
Cleaning The Surface
Remove dust, dirt, and debris from the wall surface. Use a dry cloth or a soft brush to clean the area. A clean surface improves drill bit grip and prevents slipping. It also helps the anchor fit securely in the hole.
Credit: www.homedepot.com
Drilling Techniques For Clean Holes
Drilling clean holes is important for strong wall anchor installation. Proper techniques help keep holes neat and prevent damage. These tips improve accuracy and save time. Follow simple steps for the best results.
Drill Speed And Pressure Tips
Use medium drill speed for steady control. Too fast can overheat the drill bit. Too slow may cause rough holes. Apply gentle pressure. Press hard only if the drill stalls. Let the drill bit do the work. Keep the drill straight to avoid angled holes.
Preventing Wall Damage
Mark the drilling spot clearly before starting. Use painter’s tape over the spot to reduce cracking. Start with a small pilot hole for better guidance. Avoid pushing too hard to stop wall chips. Clean dust from the hole often for clear visibility. Use a vacuum or brush after drilling.
Handling Different Wall Materials
Drill carefully on drywall to avoid large holes. Use a masonry bit for concrete or brick walls. Wood walls need a sharp wood bit and slower speed. For plaster walls, drill slowly to prevent cracking. Match drill bits to wall types for cleaner holes and stronger anchors.
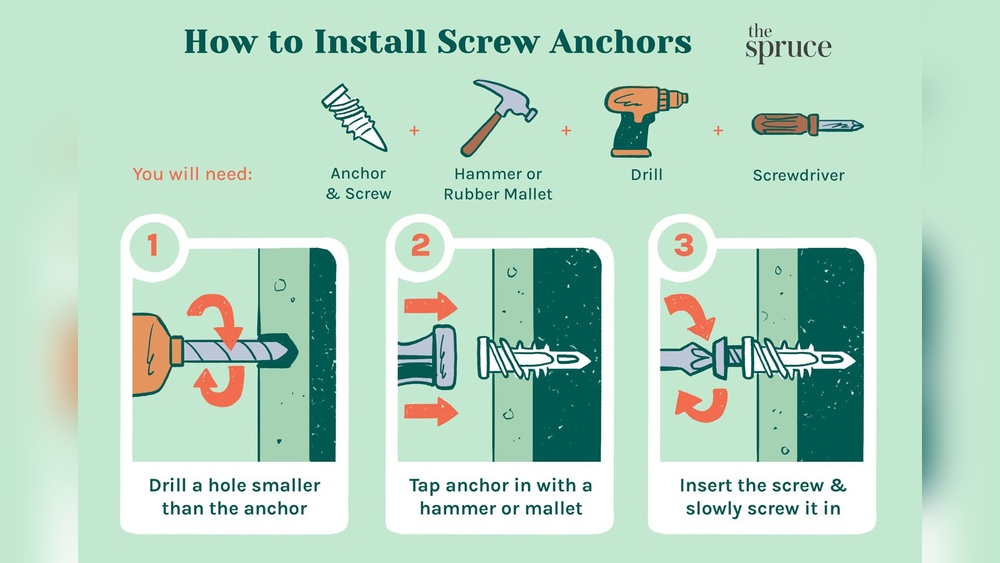
Installing The Wall Anchor
Installing a wall anchor is a key step for hanging heavy items safely. It helps hold screws firmly in the wall. This process ensures your items stay secure and do not fall. Follow these steps to install the anchor properly.
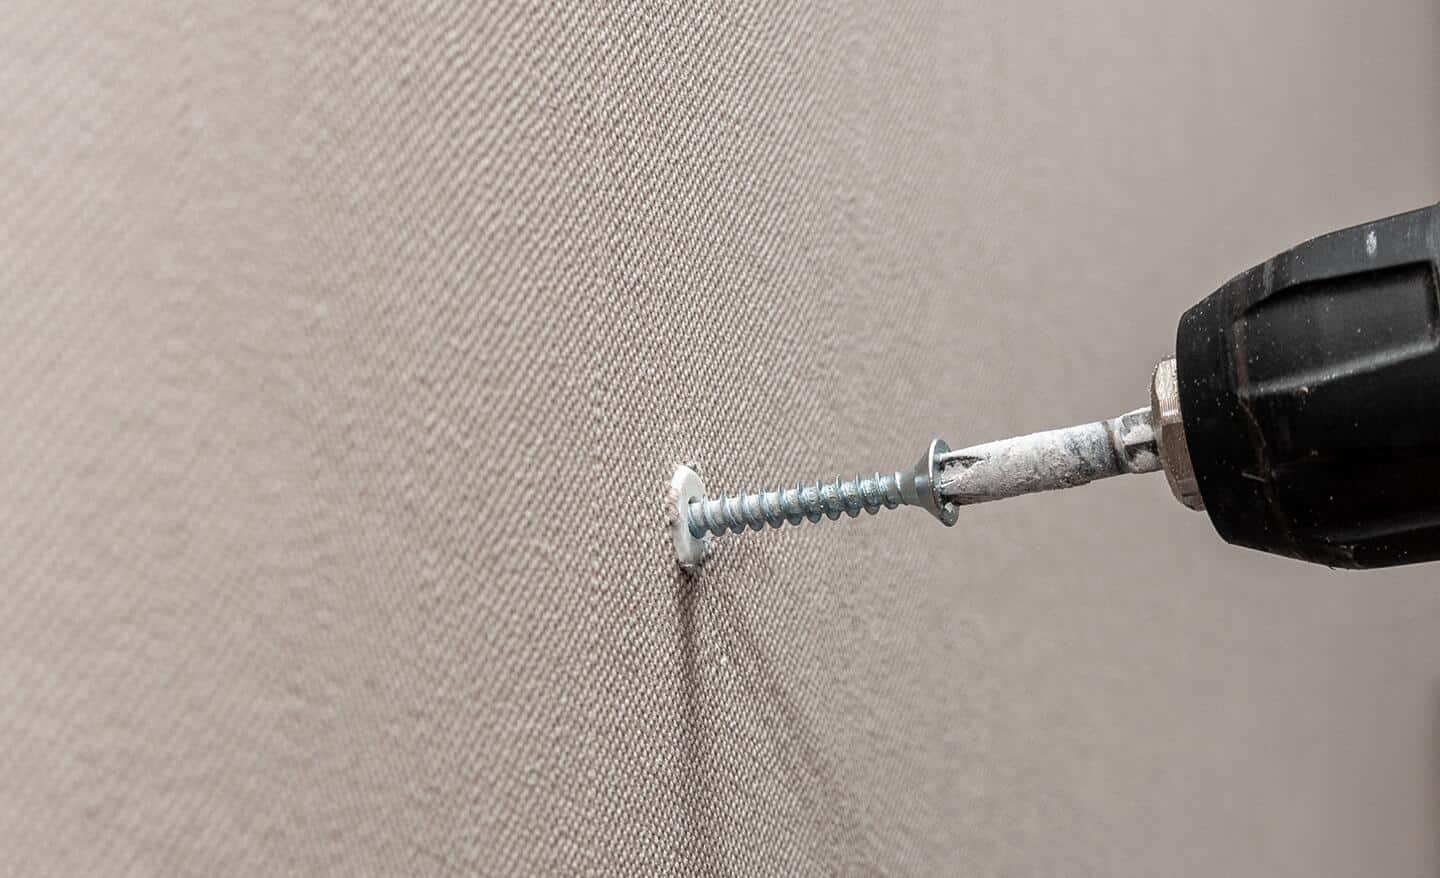
Inserting Anchors Correctly
Start by choosing the right anchor for your wall type. Insert the anchor gently into the drilled hole. Push it in until it is flush with the wall surface. Avoid forcing it too hard to prevent damage. Use a hammer lightly if needed to tap it in.
Ensuring A Secure Fit
Check that the anchor fits tightly in the hole. It should not wiggle or move. A loose anchor will not hold weight well. If it is loose, try a larger anchor size. The goal is a snug, firm fit inside the wall.
Testing Anchor Stability
After inserting the anchor, test its strength. Pull lightly on the anchor or screw to check hold. It should feel firm and not shift. If it moves, remove and try a different anchor or hole. Testing ensures safety and prevents future accidents.
Common Mistakes To Avoid
Drilling into wall anchors is simple but easy to mess up. Avoiding common mistakes saves time and prevents damage. Many people do not realize how small errors affect the strength of the anchor. Understanding these mistakes helps to get a secure hold every time.
Overdrilling Or Underdrilling
Drilling too deep weakens the wall and makes the anchor loose. Too shallow, and the anchor won’t fit properly. Both cause poor support for the object you hang. Use a drill stop or mark the drill bit to control depth. Measure the anchor length before drilling.
Using The Wrong Anchor Size
Choosing an anchor too big or too small reduces holding power. A small anchor in a large hole will fall out. A large anchor in a small hole can crack the wall. Match the anchor size to the drill bit and wall weight. Check package instructions for size recommendations.
Ignoring Wall Material Differences
Different walls need different anchors and drill bits. Drywall, concrete, and brick require specific types. Using the wrong anchor can cause damage or failure. Identify your wall material before starting. Use anchors designed for that surface only.
Maintaining And Removing Wall Anchors
Maintaining and removing wall anchors is important for safety and wall care. Proper checks and removal help keep your walls strong. Avoid damage and keep your space clean by handling anchors carefully.
Checking For Wear And Tear
Look at the wall anchor regularly. Check for cracks, rust, or looseness. A loose anchor may not hold weight well. Replace any anchor that looks old or damaged. This prevents accidents and keeps your items secure.
Safe Removal Techniques
Use the right tools to remove anchors safely. Start by unscrewing any attached screws. Pull the anchor gently with pliers. Avoid forcing it to prevent wall damage. For plastic anchors, push them inside the wall carefully. For metal anchors, twisting can help loosen them.
Repairing Holes After Removal
Fill holes with spackling paste or wall filler. Smooth the surface with a putty knife. Let it dry fully before sanding it flat. Paint over the patch to match the wall. This keeps your walls neat and ready for new anchors.
:max_bytes(150000):strip_icc()/how-to-use-and-discard-anchor-screws-1822671_04_3225-fb61b874b829410e8ef26f3453ef35f0.jpg)
Credit: www.thespruce.com
Frequently Asked Questions
What Tools Do I Need To Drill Into A Wall Anchor?
You need a drill, drill bit matching the anchor size, screwdriver, and a hammer. These tools ensure precise and secure drilling into the wall anchor.
How Do I Choose The Right Drill Bit Size?
Select a drill bit slightly smaller than the anchor diameter. This ensures a tight fit and strong hold in the wall.
Can I Drill Directly Into A Plastic Wall Anchor?
Yes, drill carefully into the plastic anchor to avoid cracking. Use a slow speed and steady pressure for best results.
How Deep Should I Drill For A Wall Anchor?
Drill to the length of the anchor plus an extra 1/4 inch. This allows the anchor to fit fully and secure properly.
Conclusion
Drilling into wall anchors is simple with the right steps. Always use the correct drill bit size to avoid damage. Take your time and drill straight for the best hold. Check the anchor type before you start to match your drill.
This helps keep the wall strong and the item secure. Practice on scrap material if you feel unsure. With care and patience, your project will hold firm and look great. Keep these tips in mind for safe and easy drilling every time.