Have you ever tried to remove a hollow wall anchor and ended up with a bigger mess than you started with? If so, you’re not alone.
Taking out these anchors can be tricky, especially if you want to avoid damaging your walls. But don’t worry—this guide will show you simple, effective steps to safely remove hollow wall anchors. By the end, you’ll feel confident tackling this task yourself and leaving your walls looking as good as new.
Ready to get started? Let’s dive in!
Credit: www.jcyscrews.com
Types Of Hollow Wall Anchors
Hollow wall anchors are essential for securing objects to drywall or hollow walls. They come in different types, each designed for specific uses. Knowing these types helps you remove them safely and correctly.
Toggle Bolts
Toggle bolts have metal wings that open inside the wall. They spread the load over a large area. This makes them strong for heavy objects. Removing toggle bolts requires pressing the wings together. Then, pull the bolt out carefully to avoid wall damage.
Molly Bolts
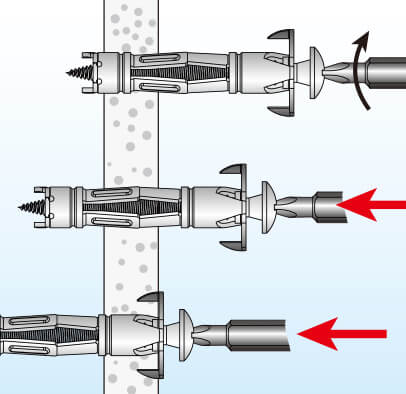
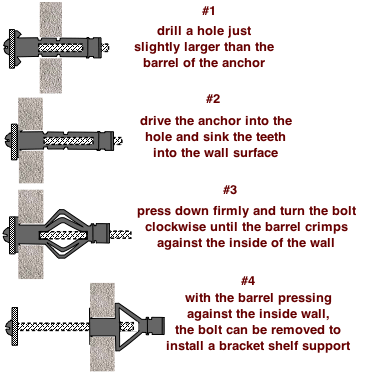
Molly bolts are metal anchors with expandable sleeves. When tightened, the sleeve expands behind the wall. This creates a tight hold for medium-weight items. To remove molly bolts, unscrew the bolt first. Then, push or pull the anchor out gently.
Plastic Anchors
Plastic anchors are simple and common. They expand slightly as a screw goes in. These anchors hold light to medium objects well. Removal involves unscrewing the screw. After that, pull the plastic anchor out or push it inside the wall.
Tools Needed For Removal
Removing hollow wall anchors needs the right tools. Choosing the correct tools makes the job easier and safer. Each tool plays a specific role in the removal process.
Screwdriver Options
A screwdriver is the most common tool for anchor removal. Flathead and Phillips screwdrivers work well. Match the screwdriver size to the anchor screw. A good fit prevents damage to the wall and screw.
Pliers And Wrenches
Pliers help grab and pull the anchor out of the wall. Needle-nose pliers are ideal for tight spaces. Adjustable wrenches can turn stubborn anchors. Use gentle force to avoid breaking the wall.
Drill And Bits
A drill with the right bit can remove anchors stuck inside the wall. Use a drill bit slightly smaller than the anchor. Drill slowly to avoid wall damage. This method works best for metal or plastic anchors.
Preparing The Wall
Preparing the wall is the first step to remove hollow wall anchors safely. It helps avoid damage and makes the process easier. Taking time to prepare will protect your wall and tools.
Clearing The Area
Remove any furniture or objects near the wall. This creates space to work freely. Keep the floor clear to avoid tripping over tools or debris. A clean area helps you focus on the task.
Protecting The Wall Surface
Cover the wall around the anchor with painter’s tape. It prevents paint or drywall from peeling. Use a soft cloth or plastic sheet to shield the surface. This step keeps your wall smooth and neat during anchor removal.
Removing Toggle Bolts
Removing toggle bolts from hollow walls can be tricky. These anchors hold tightly, making removal a bit challenging. Knowing the right steps helps avoid wall damage. Follow clear methods to take out toggle bolts safely and easily.
Unscrewing The Bolt
Start by turning the bolt counterclockwise. Use a screwdriver that fits well. Keep turning until the bolt loosens completely. Do not force it, or the wall may break. If the bolt turns but does not come out, proceed carefully.
Retrieving The Toggle
The toggle is the metal part behind the wall. After removing the bolt, it may stay inside. Try pulling it gently with pliers. If it falls inside the cavity, it might be lost. Sometimes, the toggle stays stuck on the inside surface.
Handling Difficult Cases
If the toggle will not come out, try pushing it further into the wall. This hides it and lets you patch the hole later. Use a thin rod or screwdriver for this. For large holes, patch with drywall repair kits. Take your time to avoid extra damage.
Taking Out Molly Bolts
Removing molly bolts from hollow walls can seem tricky. These anchors hold tightly by expanding inside the wall. You need to follow clear steps to take them out safely. This guide explains how to remove molly bolts without damaging your wall.
Unscrewing The Center Screw
Start by turning the center screw counterclockwise. Use a screwdriver that fits the screw head well. Keep turning until the screw comes out completely. The screw holds the anchor in place. Removing it frees the anchor’s metal sleeve.
Collapsing The Sleeve
After the screw is out, the sleeve stays inside the wall. The sleeve is the part that spreads open behind the drywall. Push the sleeve gently inward. This will collapse the spread sections. Press until the sleeve is narrow enough to pull out.
Pulling Out The Anchor
Grab the collapsed sleeve with pliers. Pull it straight out of the wall hole. Use steady pressure to avoid tearing the wall. If it feels stuck, wiggle it slightly. Once out, the wall is ready for patching or new anchors.
Extracting Plastic Anchors
Removing plastic hollow wall anchors can seem tricky. These anchors hold tightly in drywall. Extracting them carefully prevents wall damage. Follow simple steps for safe removal.
Loosening The Anchor
Start by wiggling the anchor gently. Use pliers to grip the edge. Twist slightly to break the hold inside the wall. This loosens the anchor for easier pulling.
Pulling It Out Gently
Once loose, pull the anchor straight out. Use steady, slow pressure. Avoid yanking hard to prevent tearing the drywall. If it moves, keep pulling gently until it comes free.
Using A Drill If Needed
If the anchor is stuck, use a drill carefully. Choose a drill bit slightly smaller than the anchor’s diameter. Drill slowly to break the anchor apart. This helps remove it without harming the wall.
Dealing With Stubborn Anchors
Stubborn hollow wall anchors can be tough to remove. They often resist simple pulling or twisting. This section covers methods to deal with these difficult anchors. It offers practical tips for safe and clean removal. These steps help protect your walls and save time.
Drilling Around The Anchor
Drilling around the anchor helps loosen it from the wall. Use a drill bit slightly larger than the anchor’s edge. Drill carefully around the anchor’s base without going too deep. This breaks the grip between the anchor and the drywall. After drilling, try pulling the anchor out gently.
Using Specialized Tools
Special tools make anchor removal easier. Needle-nose pliers can grip the anchor firmly. A screw extractor helps if the anchor is stuck inside. Insert the extractor and turn slowly to remove the anchor. These tools reduce damage to the wall and save effort.
When To Patch And Repair
Some anchors leave holes after removal. Patch these holes with spackling or wall filler. Apply the filler smoothly and let it dry. Sand the area lightly for a smooth finish. Finally, paint over the patch to match the wall color. This restores the wall’s clean look quickly.
Credit: www.do-it-yourself-help.com
Repairing The Wall After Removal
Removing hollow wall anchors leaves holes and rough patches on your wall. Repairing these areas is important to keep your wall looking smooth and neat. This process involves filling, sanding, and repainting to restore the wall’s original look.
Filling Holes
Start by cleaning the hole from dust and loose debris. Use a putty knife to apply wall filler or spackle. Press the filler firmly into the hole until it is level with the wall surface. Let the filler dry completely before moving on. For bigger holes, apply filler in layers and let each layer dry.
Sanding And Smoothing
Once the filler is dry, use fine-grit sandpaper to smooth the surface. Sand gently to avoid removing too much filler. The goal is a flat, even surface that blends with the rest of the wall. Wipe away dust with a dry cloth after sanding to prepare for painting.
Repainting Tips
Choose paint that matches your wall color for the best results. Use a small brush or roller to apply paint over the repaired area. Apply thin coats and let each coat dry fully before adding another. Blending the paint edges helps hide the repair. Paint the entire wall if the patch still shows after drying.

Credit: www.youtube.com
Frequently Asked Questions
How Do You Remove Hollow Wall Anchors Safely?
To remove hollow wall anchors, first unscrew any attached screws. Then, gently pull the anchor out using pliers. If it resists, push it through the wall cavity carefully. Avoid damaging the drywall for easy patching later.
What Tools Are Needed To Take Out Wall Anchors?
You need a screwdriver, needle-nose pliers, and sometimes a drill. A putty knife helps to smooth the wall afterward. These tools ensure safe and efficient removal of hollow wall anchors without damaging the wall.
Can Hollow Wall Anchors Be Reused After Removal?
Generally, hollow wall anchors cannot be reused. Removing them often damages their structure. It’s better to replace them with new anchors for a secure hold and safety.
Will Removing Wall Anchors Damage My Drywall?
If done carefully, removing wall anchors won’t damage drywall. Use gentle pulling and avoid excessive force. Minor holes left can be easily patched and painted for a clean finish.
Conclusion
Removing hollow wall anchors can be simple with the right steps. Take your time and work carefully. Use the correct tools to avoid damage. Small mistakes can cause big problems. Practice patience and stay focused. Soon, you will remove anchors cleanly and safely.
This skill helps keep your walls neat and ready for new fixtures. Try it yourself and see how easy it can be.