Have you ever faced the challenge of lifting a floor to fix a problem underneath or to level it out? Using a bottle jack can make this tough job much easier, but only if you know how to do it safely and correctly.
In this guide, you’ll discover simple, step-by-step instructions that will help you use a bottle jack with confidence. By the time you finish reading, you’ll have the know-how to raise your floor without stress or mistakes. Ready to take control of your project and get the job done right?
Keep reading to learn how.

Credit: twoflatremade.com
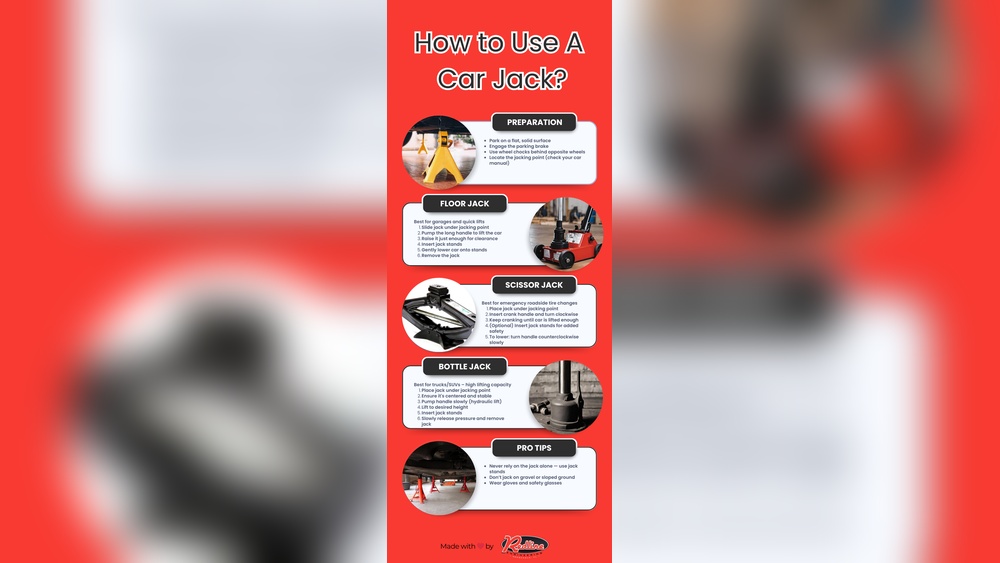
Choosing The Right Bottle Jack
Choosing the right bottle jack is key to safely raising a floor. The right jack can handle the weight and fit the space. Using the wrong jack can cause accidents or damage. Understanding the capacity, size, and types helps in making a good choice.
Capacity And Size Considerations
Check the weight of the floor or object to lift. The bottle jack must have a capacity higher than this weight. Overloading a jack is unsafe and can cause failure. Size matters for tight spaces under the floor. A compact jack fits better where space is limited. Also, consider the lift height needed. The jack must reach the floor and lift it enough for repairs.
Types Of Bottle Jacks
There are two main types: hydraulic and mechanical bottle jacks. Hydraulic jacks use fluid pressure for smooth lifting. They work well for heavy loads and offer steady control. Mechanical jacks rely on a screw mechanism. They are simpler but need more effort to operate. Pick the type that matches your lifting needs and comfort. Hydraulic jacks suit most floor-raising tasks.
Preparing The Work Area
Preparing the work area is the first step in using a bottle jack to raise a floor. This step ensures your safety and makes the task easier. A clean and organized space helps you work smoothly. It also prevents accidents and damage to your tools or floor.
Clearing The Space
Remove all furniture and objects from the floor. Clear the area around the spot you will raise. This gives you enough room to place the jack and move freely. Sweep or vacuum the floor to remove dust and dirt. A clean surface helps the jack stay stable. Avoid clutter to prevent tripping or falling.
Safety Precautions
Wear safety gloves and eye protection before starting. Check the bottle jack for any damage or leaks. Use sturdy blocks to support the floor after lifting. Never rely on the jack alone to hold the floor up. Keep children and pets away from the work area. Follow the jack’s instructions carefully for safe use.
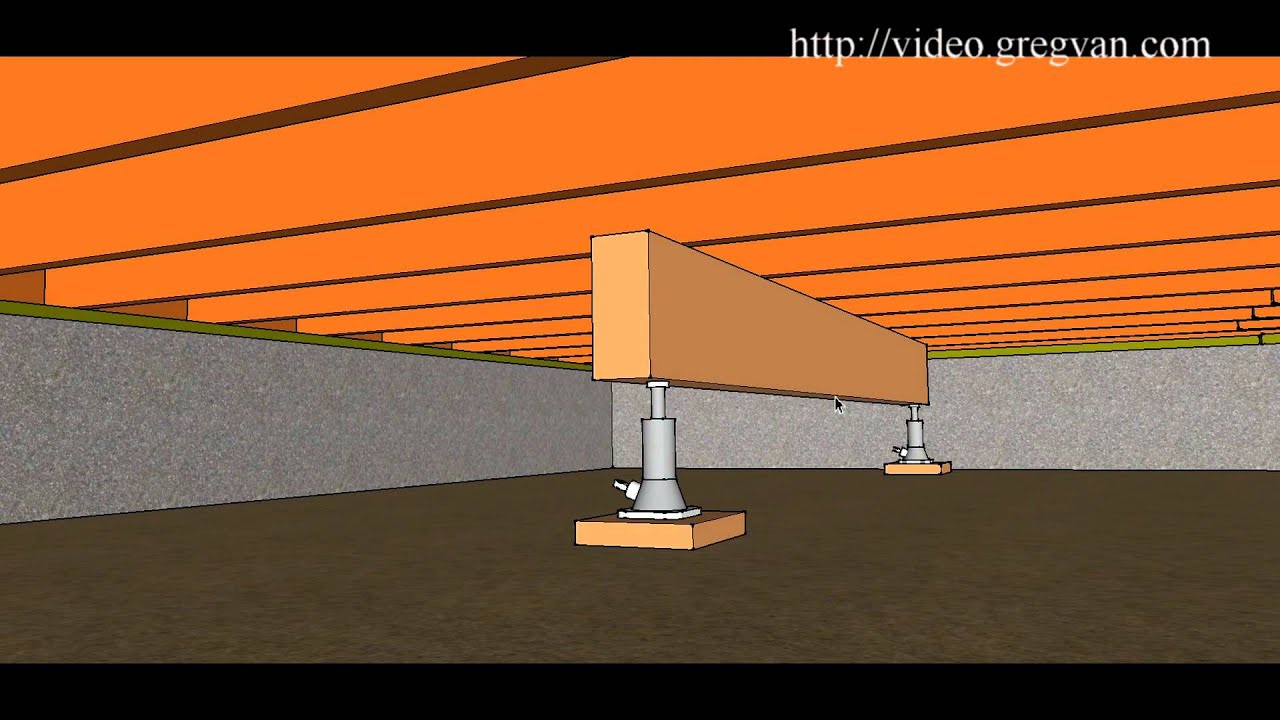
Locating The Floor Joists
Locating the floor joists is the first step to safely raise a floor with a bottle jack. Floor joists are the wooden beams that support the floor. Finding these beams helps you place the jack in the right spot. This prevents damage and ensures the floor lifts evenly.
Identifying Support Points
Support points are where the floor joists run under the floor. You can find them by tapping the floor with your knuckles. A hollow sound means no joist underneath. A solid sound means a joist is there. Mark these spots lightly with chalk or tape. These marks guide where to place the bottle jack.
Using A Stud Finder
A stud finder helps locate floor joists quickly and accurately. Turn it on and move it across the floor surface. The device beeps or lights up when it detects wood. Mark each detected joist location. Double-check to ensure the marks line up in a straight path. This confirms the joists’ position for safe jack placement.
Setting Up The Bottle Jack
Setting up the bottle jack correctly is key to safely raising a floor. Start by preparing your tools and clearing the work area. A stable setup helps avoid accidents and damage. Follow these steps to position the jack and use a support base for best results.
Positioning The Jack
Place the bottle jack under the floor beam or joist you need to lift. Make sure the jack’s lifting arm touches a strong, flat surface. Avoid soft or uneven spots. Check the jack is straight and not tilted. This keeps the lift steady and safe.
Using A Support Base
Put a solid base under the bottle jack to spread the weight. Use a thick wooden board or metal plate. This stops the jack from sinking into soft ground or flooring. The base should be larger than the jack’s foot. A good base improves balance and prevents slips.
Raising The Floor
Raising a floor using a bottle jack needs care and precision. It helps fix sagging floors or level uneven areas. The process requires steady control of the jack and close attention to the lift.
Start by setting the bottle jack under the floor joist or beam. Ensure it sits on a solid base for safety. Slowly raise the floor in small steps to avoid damage.
Operating The Jack Handle
Insert the handle into the jack’s pump. Push the handle down smoothly to lift the floor. Avoid quick or jerky movements.
Keep pumping the handle gently. The jack will raise the floor slowly. Stop if you feel resistance or hear strange noises.
Monitoring The Lift
Watch the floor closely as it rises. Use a level to check for evenness. Make sure the floor moves steadily without tilting.
Check the jack’s position often. It must remain stable and not slip. Pause lifting if the jack shifts or the floor feels unstable.
Securing The Raised Floor
After raising a floor with a bottle jack, securing it properly is vital. This step keeps the floor safe and stable while you work on it. Without proper support, the floor might shift or fall. Taking time to secure the raised floor ensures safety and prevents damage.
Installing Temporary Supports
Place strong supports under the raised floor quickly. Use sturdy wooden beams or metal jacks as temporary supports. Position them close to the floor’s raised edges. Make sure the supports stand straight and steady. Tighten any bolts or screws to hold the supports firm. These supports carry the floor’s weight, so choose strong materials.
Checking Stability
Test the floor’s stability before continuing work. Gently push on the floor to see if it moves. Listen for creaks or unusual sounds. Check all supports for any signs of slipping or bending. Adjust supports if you notice any weakness. A stable floor protects you and your property from harm.
Lowering And Removing The Jack
Lowering and removing the bottle jack is a key step after raising a floor. It requires care to keep the floor stable. Doing this safely avoids damage or injury. Follow the right steps to lower the jack smoothly and check the floor afterward.
Controlled Release Techniques
Start by slowly turning the release valve. Turn it just a little at first. The floor will begin to lower gently. Keep your hands steady on the jack. Avoid opening the valve too fast. Sudden drops can cause harm or damage. Watch the floor carefully as it moves down. Stop if you see any unusual shifts or noises. Let the jack lower the floor fully before removing it.
Post-lift Inspection
After removing the jack, check the floor thoroughly. Look for cracks or new gaps. Check if the floor feels steady underfoot. Inspect the support areas for any changes. Fix any small problems before using the floor again. This step helps ensure the floor stays safe and strong. Regular checks after lifting protect your home from future issues.
Credit: www.youtube.com
Common Mistakes To Avoid
Using a bottle jack to raise a floor can be very effective. Still, many make simple mistakes that cause problems. Knowing what to avoid helps you work safely and efficiently. Here are some common errors that you should watch out for.
Overloading The Jack
One major mistake is putting too much weight on the jack. Every bottle jack has a weight limit. Exceeding this limit can damage the jack or cause it to fail suddenly. This puts you at risk of injury and can harm the floor structure. Always check the jack’s capacity before starting. Use a jack that matches the weight you need to lift.
Ignoring Safety Measures
Ignoring safety rules leads to accidents. Never skip wearing gloves and safety glasses. Place the jack on a strong, flat surface to keep it steady. Avoid working alone; have someone nearby in case of emergency. Use wooden blocks or supports to hold the floor once raised. Never rely on the jack alone to hold the weight for long periods.

Credit: oldhousecrazy.com
Frequently Asked Questions
What Is A Bottle Jack Used For In Floor Raising?
A bottle jack lifts heavy loads vertically, ideal for raising floors safely. It provides strong, stable lifting power for home repairs and renovations.
How Do You Position A Bottle Jack Under A Floor?
Place the bottle jack on a solid, level surface beneath the floor joist. Ensure the jack’s saddle contacts a sturdy beam for balanced lifting.
What Safety Precautions Are Needed When Using A Bottle Jack?
Always wear protective gear and check the jack for damage. Use wooden blocks to support the floor and never go under a lifted floor without proper supports.
Can A Bottle Jack Raise Uneven Or Damaged Floors?
Yes, a bottle jack can lift uneven floors, but gradual, controlled lifting is essential. Inspect and reinforce the floor before raising to prevent further damage.
Conclusion
Using a bottle jack to raise a floor is simple and safe. Always check the jack and floor for stability before lifting. Lift slowly and steady to avoid accidents. Support the floor well after raising it. This tool helps fix floors without heavy equipment.
Practice patience and follow safety steps carefully. You can improve your home with just a few easy actions. Try it yourself and see how effective a bottle jack can be. Safety first, and the job gets done right.


