Is your hydraulic floor jack leaking and causing frustration every time you try to lift your vehicle? A leaking jack not only wastes fluid but also puts your safety at risk.
You don’t have to replace it just yet. With the right steps, you can fix the leak yourself and get your jack working like new again. Keep reading to discover simple, clear solutions that will save you time and money while keeping your equipment safe and reliable.

Credit: www.kgcountry.com
Identifying Leak Sources
Identifying the source of a leak in a hydraulic floor jack is the first step to fixing it. Leaks reduce the jack’s lifting power and can cause damage. Knowing where leaks usually happen helps you find and fix them faster. Below are common leak points and signs of fluid loss to watch for.
Common Leak Points
Hydraulic floor jacks often leak at seals and connections. Check the release valve for wear or damage. The main seal inside the cylinder can crack or wear out. Look around the pump piston for fluid buildup. Hoses and fittings may also develop leaks from cracks or loose parts.
Signs Of Hydraulic Fluid Loss
Fluid loss shows in several ways. The jack may lower slowly or fail to lift heavy loads. Visible oil puddles under the jack are a clear sign. The handle might feel loose or spongy when pumping. Watch for oily stains or damp spots on the jack body. These signs point to a leak that needs attention.
Gathering Essential Tools
Fixing a leaking hydraulic floor jack starts with gathering the right tools. Having everything ready makes the repair faster and easier. It also helps avoid mistakes and keeps you safe during the process.
Required Repair Materials
First, you need some key materials for the repair. Hydraulic oil is essential to refill the jack after fixing leaks. You will also need replacement seals or O-rings to stop the leak. A clean cloth helps wipe away old oil and dirt. A small container can catch leaking fluid. Keep a set of screwdrivers and wrenches handy to open the jack and remove parts. These materials ensure you can complete the job smoothly.
Safety Equipment
Safety matters most when repairing hydraulic jacks. Wear gloves to protect your hands from oil and sharp edges. Safety glasses shield your eyes from splashes and debris. Work in a well-ventilated area to avoid breathing in fumes. Use sturdy shoes to protect your feet from heavy parts. These safety items reduce risk and keep you protected throughout the repair.
Preparing The Jack For Repair
Preparing your hydraulic floor jack for repair is a crucial step. It ensures safety and helps the repair go smoothly. Before fixing a leak, the jack must be clean and free from pressure. These steps protect you and the jack’s parts.
Cleaning The Jack
Start by wiping off dirt and oil from the jack’s surface. Use a clean cloth and mild cleaner. Remove grease around the leaking area to see the problem clearly. Dirt can hide cracks or damaged seals. Cleaning helps you spot the exact leak source.
Relieving Hydraulic Pressure
Next, release all pressure inside the jack. Open the release valve slowly to let hydraulic fluid flow out. This step stops sudden fluid sprays during repair. Never work on a pressurized jack. It can cause injury or damage. Make sure the jack is fully lowered before opening the valve.
Fixing Seal And O-ring Issues
Fixing seal and O-ring issues is key to stopping leaks in your hydraulic floor jack. These parts keep the hydraulic fluid inside the jack. Over time, seals and O-rings wear out or get damaged. This causes fluid to leak and the jack to lose pressure. Replacing these parts can restore your jack’s function and safety.
Removing Old Seals
First, lower the jack completely. This relieves pressure and prevents spills. Locate the seals and O-rings inside the hydraulic cylinder. Use a small flat tool or pick to carefully remove the old seals. Avoid scratching the metal surfaces. Clean the area with a cloth to remove dirt and old fluid.
Installing New Seals
Select new seals and O-rings that match your jack model. Lightly oil them with hydraulic fluid to ease installation. Place each seal gently into its groove. Press firmly but avoid stretching or twisting the seals. Double-check that seals fit snugly and evenly. Reassemble the jack and test for leaks by pumping it a few times.
Replacing Hydraulic Fluid
Replacing the hydraulic fluid is key to fixing a leaking floor jack. Old fluid can cause poor performance and leaks. Fresh hydraulic oil helps the jack work smoothly and safely. Follow simple steps to drain and refill the fluid properly.
Draining Old Fluid
Start by placing the jack on a flat surface. Find the fluid reservoir and open the release valve. Use a container to catch the old fluid as it drains out. Pump the jack a few times to push out all the old oil. Close the valve tightly after draining finishes.
Adding Fresh Hydraulic Oil
Choose the right hydraulic oil for your floor jack model. Pour the fresh oil slowly into the reservoir. Check the fluid level often to avoid overfilling. Pump the jack gently to spread the oil inside. Close the reservoir cap securely to prevent leaks.

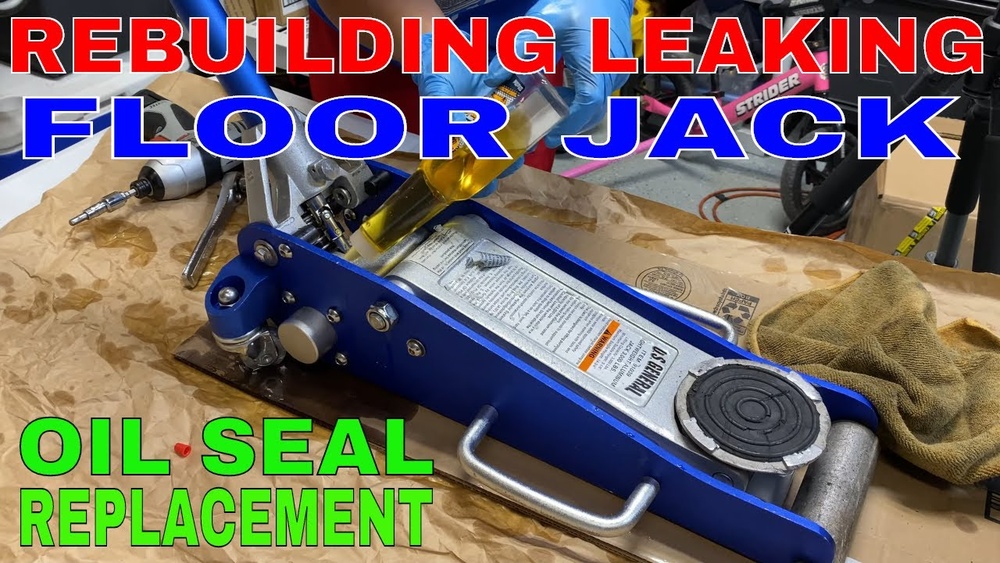
Credit: www.youtube.com
Checking And Tightening Components
Checking and tightening components is a key step in fixing a leaking hydraulic floor jack. Loose parts often cause leaks and reduce the jack’s performance. Careful inspection and proper tightening can stop leaks and keep the jack working safely.
Inspecting Bolts And Fittings
Start by looking at all bolts and fittings on the jack. Use a wrench to check if they are tight. Loose bolts let fluid escape and cause leaks. Tighten any bolts that feel loose. Be careful not to over-tighten, or you may damage the parts.
Look closely at fittings where hoses or tubes connect. These areas often develop leaks if not secure. Make sure these fittings are snug and sealed well. Replace any damaged washers or seals if needed.
Ensuring Proper Assembly
Check if all parts of the jack are assembled correctly. Misaligned components can cause pressure loss and leaks. Follow the jack’s manual to confirm each part is in place.
Pay special attention to the hydraulic cylinder and piston. They must fit tightly without gaps. Reassemble any parts that seem out of place. Proper assembly helps the jack hold pressure and work smoothly.
Testing The Repaired Jack
Testing the repaired hydraulic floor jack is a key step after fixing leaks. It confirms the jack works properly and safely. This process helps avoid accidents and future damage. Follow these simple steps to ensure your jack is ready for use.
Operating The Jack Safely
Place the jack on a flat, solid surface before use. Check that all parts are clean and dry. Slowly pump the handle to raise the jack. Stop if you hear strange noises or see jerky movements. Never exceed the weight limit marked on the jack. Always use safety stands to support the vehicle.
Monitoring For Further Leaks
Inspect the jack closely during and after use. Look for any signs of oil or fluid around seals and joints. Wipe any spots with a clean cloth to see if new leaks appear. Test the jack several times to be sure the leak is fully fixed. Early detection prevents bigger problems and keeps you safe.

Credit: grassrootsmotorsports.com
Preventing Future Leaks
Preventing future leaks in your hydraulic floor jack keeps it safe and functional. Small leaks can turn into big problems fast. Regular care and smart storage help keep seals strong and oil inside. Follow these simple steps to avoid leaks and extend the life of your jack.
Regular Maintenance Tips
Check the oil level often. Low oil causes the jack to work harder and leak. Change the oil at least once a year. Use the correct hydraulic fluid recommended by the manufacturer. Inspect seals and hoses for cracks or damage. Replace any worn parts immediately. Clean dirt and dust from the jack after each use. Lubricate moving parts to reduce wear and tear. A clean and well-lubricated jack lasts longer and leaks less.
Storage Recommendations
Store the jack in a dry place away from moisture. Moisture can cause rust and damage seals. Keep it off cold floors to avoid condensation inside the jack. Lower the jack fully when not in use. This prevents pressure on the seals and reduces the risk of leaks. Cover the jack with a cloth or plastic sheet to keep dust out. Proper storage protects your jack from damage and keeps it leak-free.
Frequently Asked Questions
How Do I Identify A Leaking Hydraulic Floor Jack?
Check for oil puddles beneath the jack or wet spots on its body. Inspect seals and connections for cracks or damage. A leaking jack often loses lifting power and may feel unstable during use. Early detection prevents further damage and ensures safe operation.
What Causes Hydraulic Floor Jack Leaks?
Leaks usually stem from worn or damaged seals, loose fittings, or cracks in the hydraulic cylinder. Dirt and debris can also cause seal wear. Regular maintenance and proper use minimize these issues, prolonging your jack’s life and performance.
Can I Fix A Hydraulic Jack Leak Myself?
Yes, minor leaks can be fixed by replacing seals or tightening fittings. Use the correct seal kit and follow repair instructions carefully. For major damage, professional repair or replacement is safer and more reliable.
How Do I Stop A Hydraulic Floor Jack From Leaking Oil?
Regularly inspect and maintain seals and connections. Tighten loose bolts and replace damaged seals promptly. Avoid overloading the jack, which stresses seals and causes leaks. Proper storage also prevents damage that leads to leaks.
Conclusion
Fixing a leaking hydraulic floor jack saves money and ensures safety. Check seals and oil levels often. Replace damaged parts to stop leaks quickly. Keep the jack clean and well-maintained. Regular care helps the jack last longer. Simple steps can prevent big problems later.
Take action early to avoid costly repairs. A working floor jack is important for any garage. Stay alert to leaks and fix them right away. Your tools will perform better and last longer.