Are you struggling to keep your sink steady and secure? Knowing how to anchor a sink to the wall is a simple skill that can save you from leaks, damage, and costly repairs.
Whether you’re fixing a loose sink or installing a new one, this guide will walk you through the exact steps you need. By the end, you’ll feel confident handling the job yourself—and avoid calling in expensive help. Ready to make your sink solid and safe?
Let’s get started.
Tools And Materials Needed
Anchoring a sink to the wall requires specific tools and materials. Having the right items makes the job easier and safer. Prepare everything before starting to avoid interruptions.
Essential Tools
- Drill with masonry bit for making holes
- Screwdriver for tightening screws
- Level to ensure the sink is straight
- Measuring tape for accurate placement
- Wrench for plumbing connections
- Stud finder to locate wall supports
- Hammer for tapping anchors
Required Materials
- Wall anchors or toggle bolts for strong support
- Mounting brackets to hold the sink securely
- Screws that fit the brackets and anchors
- Silicone sealant to prevent water leaks
- Plumbing pipes and fittings for water supply
- Sink mounting kit if included with the sink

Credit: www.reddit.com
Preparing The Wall
Preparing the wall is the first step to anchor a sink securely. It ensures the sink stays stable and safe over time. This stage requires careful checking and marking on the wall. Proper preparation helps avoid damage and ensures a smooth installation.
Locating Studs
Studs are the wooden or metal beams inside walls. They provide strong support for heavy items like sinks. Use a stud finder to locate these beams accurately. Move the finder slowly across the wall surface. Mark each stud position with a pencil. Ensure marks are clear and easy to see. Anchoring into studs prevents the sink from falling or loosening.
Marking Anchor Points
Anchor points show where you will install screws or bolts. Use the sink’s mounting bracket as a guide. Hold the bracket against the wall at the desired height. Mark the exact spots for each screw hole. Double-check these marks line up with the studs. Clear anchor points reduce mistakes during drilling. Precise markings speed up the installation process.
Choosing The Right Anchors
Choosing the right anchors is key to securing a sink properly. Anchors hold the sink firmly to the wall. Using the wrong type can cause damage or lead to a loose sink. It is important to pick anchors that fit the wall and sink weight. This choice ensures safety and long-lasting support.
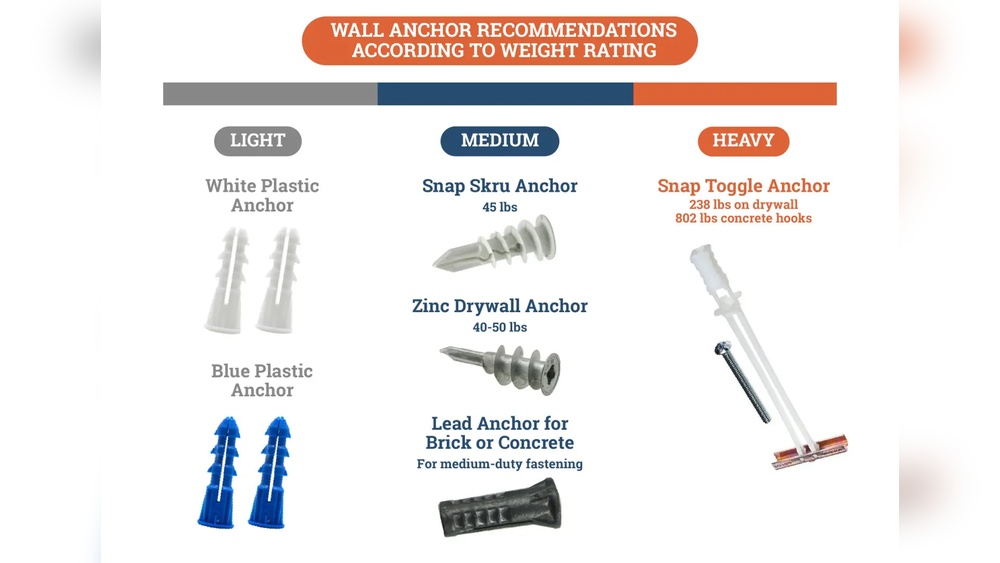
Types Of Wall Anchors
There are several kinds of wall anchors. Plastic expansion anchors are common and easy to use. They work well with light loads and drywall. Toggle bolts offer strong support by spreading weight across a larger area. Molly bolts provide good holding power in hollow walls. Concrete anchors are best for brick or concrete walls. Each type suits different wall conditions and sink weights.
Matching Anchors To Wall Material
Match anchors to the wall for best results. Drywall needs anchors like plastic expansion or toggle bolts. For plaster walls, use molly bolts to avoid cracks. Brick or concrete walls require concrete anchors or sleeve anchors. Wood studs allow screws to be driven directly without anchors. Correct matching prevents wall damage and keeps the sink stable.
Installing The Anchors
Installing the anchors is an important step to hold the sink firmly on the wall. It creates a strong base that supports the sink’s weight. Proper installation prevents the sink from moving or falling.
Follow the steps carefully to install the anchors securely. Prepare the wall and tools before starting to work.
Drilling Pilot Holes
Mark the spots where you will drill the holes. These spots should align with the sink’s mounting holes. Use a pencil for clear marks.
Choose a drill bit that matches the size of the anchor. Drill slowly and straight into the wall. Avoid making holes too big or too deep.
Securing Anchors
Push the anchors into the drilled holes. Tap them lightly with a hammer if needed. Make sure anchors fit flush with the wall.
Check that anchors are tight and do not move. These anchors will hold the screws that keep the sink in place. Proper securing ensures the sink stays safe and stable.
Mounting The Sink
Mounting the sink to the wall is a key step in a bathroom or kitchen setup. A properly mounted sink stays secure and safe during daily use. This process needs care and the right tools to ensure the sink does not loosen over time. Follow these simple steps to mount your sink firmly and correctly.
Aligning The Sink
First, hold the sink against the wall. Check that it is level and at the right height. Mark the wall through the holes or mounting points on the sink. Use a pencil for clear, easy-to-see marks. This step ensures your sink will be straight and stable.
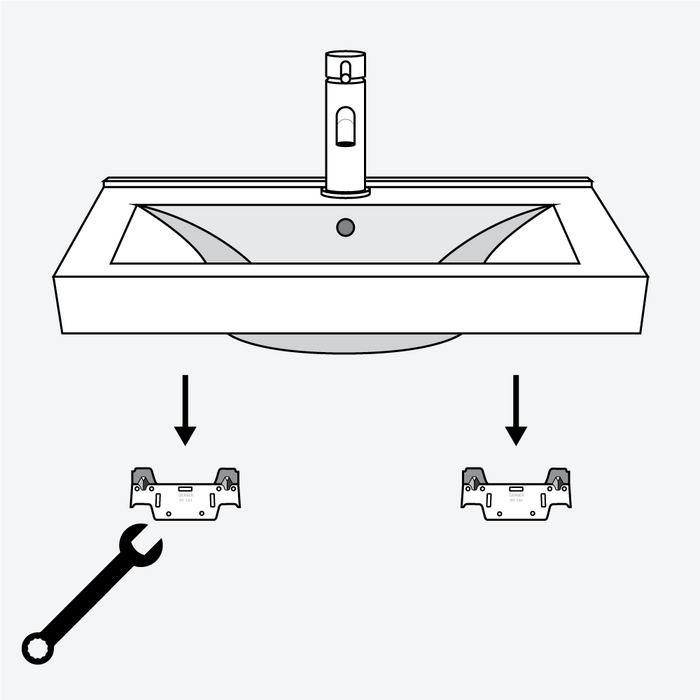
Attaching Mounting Brackets
Next, fix the mounting brackets to the wall. Use a drill to make holes at your marked points. Insert wall anchors if the wall is drywall or plaster. Screw the brackets tightly to hold the sink weight. Brackets provide strong support and prevent the sink from falling.
Fastening The Sink
Now, place the sink onto the mounting brackets. Align it with the screws or hooks on the brackets. Secure the sink by tightening bolts or screws into the brackets. Check again to make sure the sink is level. Tightening the sink properly keeps it stable and safe.

Credit: www.reddit.com
Checking Stability
Checking the stability of your sink after anchoring it to the wall is essential. This step ensures the sink stays secure and safe to use. A stable sink prevents damage to the plumbing and walls. It also keeps your bathroom neat and functional. Follow the simple steps below to confirm your sink is firmly anchored.
Testing For Firmness
Gently push the sink from different sides. Use your hands to apply light pressure. Notice any movement or wobbling. A firm sink should not shift or rock. Try pressing near the basin and the edges. Check if the sink feels solid against the wall. This test shows if the anchors hold well.
Adjusting If Necessary
If the sink moves, adjustments are needed. Tighten the mounting bolts carefully. Use a screwdriver or wrench to secure the anchors. Add extra wall anchors if the current ones are loose. Fill gaps with a sealant or foam for more support. Repeat the firmness test after each adjustment. Keep adjusting until the sink feels stable and secure.
Final Touches
After anchoring the sink to the wall, the final touches help complete the job. These steps make sure the sink looks neat and stays secure over time. Focus on sealing and cleaning for a polished finish.
Sealing Edges
Seal the edges where the sink meets the wall. Use a waterproof silicone sealant for the best protection. This prevents water from leaking behind the sink and damaging the wall. Apply a thin, even bead along the joint. Smooth the sealant with a wet finger or a tool. Let it dry fully before using the sink.
Cleaning Up
Clean any dust, debris, or excess sealant around the sink. Use a damp cloth to wipe surfaces gently. Remove any leftover installation materials and tools. Check for smudges or fingerprints on the sink and wall. A clean area improves the overall look and hygiene. Proper cleanup shows a job well done.
Credit: www.signaturehardware.com
Frequently Asked Questions
How Do You Anchor A Sink To The Wall Safely?
To anchor a sink safely, use wall anchors or toggle bolts for drywall. Secure mounting brackets to studs for strong support. Always check the sink’s weight capacity and follow manufacturer instructions carefully.
What Tools Are Needed To Anchor A Sink?
You need a drill, screwdriver, level, tape measure, wall anchors or toggle bolts, mounting brackets, and a pencil. These tools help ensure proper alignment and secure installation of the sink to the wall.
Can I Anchor A Sink Without Wall Studs?
Yes, use heavy-duty wall anchors or toggle bolts designed for drywall. These provide firm support when studs are unavailable. Always verify weight limits to prevent sink damage or wall failure.
How Do I Ensure My Sink Stays Level When Anchoring?
Use a level tool to check the sink’s position before securing. Adjust mounting brackets until perfectly horizontal. This prevents water pooling and ensures proper drainage.
Conclusion
Anchoring a sink to the wall keeps it stable and safe. Follow the steps carefully for best results. Use the right tools and check for studs. Tighten all screws but avoid overdoing it. Take your time and work patiently. A well-anchored sink lasts longer and looks neat.
Now, you can fix your sink firmly and confidently. Ready to enjoy a sturdy bathroom or kitchen setup?