Have you ever flipped a light switch, only to realize it controls a different outlet than you expected? Changing which outlet a light switch controls can make your space more convenient and tailored to your needs.
Whether you want to light up a lamp without fumbling for the switch or create the perfect ambiance, this simple fix puts you in control. You’ll learn easy steps to change the outlet your switch operates—no electrician needed. Ready to make your home work better for you?
Let’s dive in and get started.
Tools And Materials Needed
Changing which outlet a light switch controls requires some basic tools and materials. Having the right items ready makes the job easier and safer. Preparing ahead helps avoid interruptions during the work.
Safety Gear
Start with safety gear to protect yourself. Wear insulated gloves to avoid electric shocks. Use safety glasses to shield your eyes from dust or sparks.
Basic Hand Tools
A screwdriver set is essential. Both flat-head and Phillips screwdrivers work well. Needle-nose pliers help to bend wires and hold small parts. Wire strippers remove insulation from wires cleanly.
Electrical Tester
An electrical tester or voltage detector checks if power is off. This tool ensures safety before touching wires. Never skip testing the circuit first.
Wire Connectors And Electrical Tape
Wire connectors secure wire connections safely. Use electrical tape to wrap exposed wires. These prevent short circuits and keep connections tight.
Replacement Switch Or Outlet
Have the new switch or outlet ready. Match it to your current setup for compatibility. This avoids extra trips to the store.

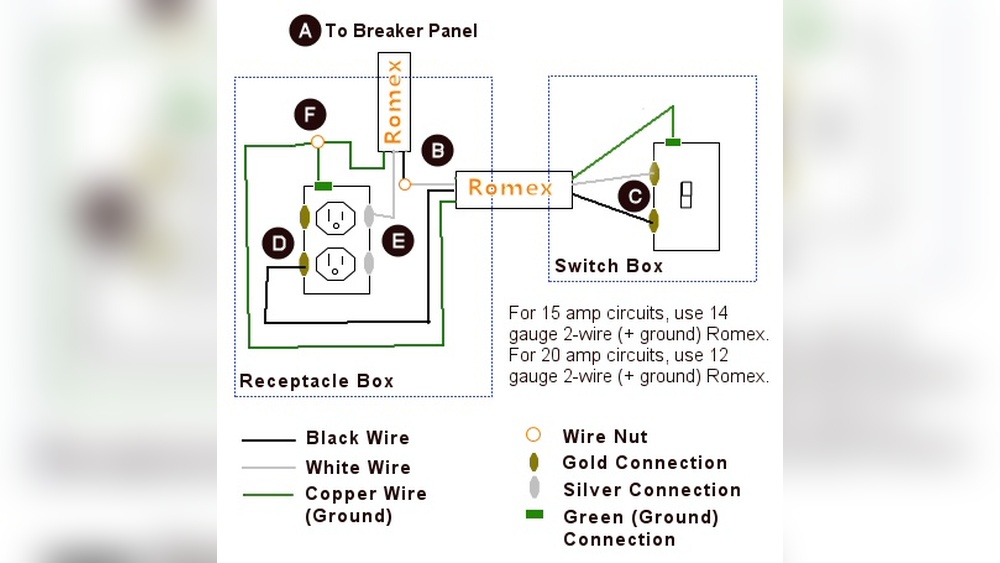
Credit: www.do-it-yourself-help.com
Safety Precautions
Working with electricity needs care and attention. Safety is the top priority when changing which outlet a light switch controls. Following the right steps can stop accidents and keep you safe. This section covers key safety rules to follow before and during the work.
Turn Off Power At The Circuit Breaker
Always switch off power at the main circuit breaker. This stops electricity from flowing to the outlet and switch. Use a tester to check there is no power before touching wires. Never trust the wall switch alone.
Use Proper Tools And Equipment
Use tools made for electrical work. Insulated screwdrivers and wire strippers protect against shocks. Avoid using damaged or worn tools. Good tools make the job safer and easier.
Wear Safety Gear
Wear rubber-soled shoes to prevent shocks. Safety glasses protect your eyes from sparks or debris. Avoid loose clothing that can catch on wires or tools. Simple gear helps prevent injuries.
Know Your Limits
Do not try to fix complicated wiring if unsure. Call a licensed electrician for help. Mistakes can cause fires or serious injury. Safety means knowing when to get expert help.
Identify Current Wiring Setup
Identifying the current wiring setup is the first step in changing which outlet a light switch controls. Knowing how the wires connect helps you work safely and correctly. This section breaks down the process into simple tasks. Follow each step carefully for the best results.
Locate The Switch And Outlet
Start by finding the light switch that controls the outlet. Check the room for all outlets near the switch. The outlet the switch controls will often have a half-powered socket. This means one part works only when the switch is on. Note the exact location of both the switch and the outlet.
Test The Circuit
Turn off the power at the breaker before testing. Use a voltage tester to check the outlet’s power. Flip the switch on and off while testing the outlet. This helps confirm which part of the outlet the switch controls. Write down your findings for easy reference.
Understand Wiring Connections
Remove the switch and outlet covers to see the wires. Identify the hot, neutral, and ground wires by their colors. Hot wires are usually black or red. Neutrals are white, and grounds are green or bare copper. Note how wires connect to each device. This knowledge guides you in changing the control properly.

Credit: community.smartthings.com
Turn Off Power Safely
Turning off power safely is the first step when changing which outlet a light switch controls. Electricity can cause serious injury if handled carelessly. Always take safety seriously before starting any electrical work.
Power must be completely off to avoid shocks or damage. Use the correct tools and follow the steps carefully. This ensures a safe and smooth process for your project.
Locate Your Circuit Breaker
Find the main electrical panel in your home. This panel controls all the power circuits. Look for the breaker that controls the area where you will work.
Switch Off The Correct Breaker
Flip the breaker to the off position. This cuts power to the outlet and switch you want to change. Confirm no power flows by testing the outlet or switch.
Use A Voltage Tester
A voltage tester helps verify power is off. Place it on the outlet or switch terminals. No light or sound means no electricity is present.
Wear Safety Gear
Use insulated gloves and safety glasses. These protect you from accidental shocks and sparks. Keep your tools dry and in good condition.
Disconnect Existing Wiring
Disconnecting the existing wiring is the first step in changing which outlet a light switch controls. This step ensures safety and prepares the circuit for new connections. Turn off the power at the breaker before touching any wires.
Careful handling of wires is important. Wrong moves can cause short circuits or shocks. Follow these steps to disconnect the wires safely and correctly.
Turn Off Power At The Circuit Breaker
Find the correct breaker in your panel. Switch it off to cut power to the light switch and outlet. Use a voltage tester to confirm no electricity flows.
Remove The Switch Cover Plate
Unscrew the cover plate from the switch box. Keep screws safe for later use. Gently pull the plate away from the wall.
Unscrew And Pull Out The Switch
Loosen the screws holding the switch. Pull the switch out carefully to expose the wires. Avoid pulling wires too hard.
Note Wire Positions And Connections
Observe how wires connect to the switch. Take a photo or label them for reference. This helps when reconnecting later.
Disconnect The Wires From The Switch
Loosen the terminal screws to free the wires. If wires are pushed into holes, release them with a small tool. Keep wires straight and untangled.

Credit: www.youtube.com
Choose The New Outlet To Control
Choosing the new outlet to control is an important step. This choice decides which outlet the switch will turn on or off. Picking the right outlet makes your space more useful and safe.
Think about where you need the light the most. Look for outlets that power lamps or other devices. You want the switch to control an outlet that adds convenience.
Find Accessible Outlets
Check outlets that are easy to reach. Avoid outlets behind furniture or appliances. You want to use the switch without moving things around.
Check Outlet Wiring
Look inside the outlet box to see the wires. The outlet must have a hot wire controlled by a switch. This makes it possible to change control to that outlet.
Consider Outlet Location
Choose outlets in rooms where you need extra light. Living rooms, bedrooms, and kitchens often benefit from switched outlets. This helps control lighting better.
Avoid High-power Appliances
Do not select outlets that power heavy appliances. Switches should not control outlets used by refrigerators or microwaves. These need constant power for safety.
Modify Wiring Connections
Modifying wiring connections is a key step to change which outlet a light switch controls. This part requires care and attention. You will adjust the wires so the switch controls the new outlet. Safety is important. Always turn off power at the breaker box before touching wires.
Follow the right steps to connect wires properly. This will ensure the switch works well with the new outlet. Use the right tools and check each connection carefully.
Connect Switch To New Outlet
Start by identifying the wires from the new outlet. Typically, you will find a black (hot), white (neutral), and bare copper or green (ground) wire. Connect the black wire from the new outlet to the switch’s load terminal. The white wires usually stay connected together in the box. Connect the ground wire to the switch’s ground screw. Make sure all connections are tight and secure.
Secure Wire Nuts And Terminals
Use wire nuts to join wires safely. Twist wires together before placing the wire nut on top. Push the wire nut until it feels tight. Give a gentle tug to check if wires hold firmly. Cover terminals with electrical tape for extra safety. This prevents loose connections and electrical shorts. Proper securing avoids problems later and keeps the circuit safe.
Test The New Setup
Testing the new setup is a crucial step after changing which outlet a light switch controls. It ensures everything works safely and correctly. This step helps avoid electrical problems and keeps your home safe.
Turn On The Power
Restore the power at the breaker box. This allows electricity to flow to the switch and outlets. Make sure the switch is in the off position before turning on the power.
Check The Outlet Controlled By The Switch
Flip the light switch on. Look for power in the outlet you changed. Plug in a small lamp or a device to confirm the outlet works with the switch.
Test Other Outlets
Test other outlets near the switched one. Confirm they are not controlled by the switch. This prevents accidental power cuts to other devices.
Use A Voltage Tester
Use a voltage tester on the switched outlet. It shows if power is flowing properly. This tool is safe and simple to use for beginners.
Fix Any Issues
If the outlet does not work, double-check your wiring. Turn off the power before making any changes. Correct wiring mistakes and test again.
Restore Power And Final Checks
After rewiring the light switch and outlet, restoring power is the next step. It helps verify the changes work correctly. This step ensures safety and functionality before final use.
Careful checks prevent electrical issues and hazards. Testing the switch and outlet confirms the new setup is correct. Follow these steps to complete your project confidently.
Turn The Circuit Breaker Back On
Locate your circuit breaker panel. Find the switch controlling the power to your outlet and light switch. Flip it back to the “on” position. This restores electricity to your wiring. Listen for any unusual sounds or smells after turning it on.
Test The Light Switch And Outlet
Flip the light switch to check if the intended outlet powers on. Use a small appliance or a lamp to test the outlet. Make sure the light turns on and off properly. Confirm the outlet works only when the switch is on. This ensures the switch controls the correct outlet.
Inspect For Loose Connections
Turn off the power again before inspecting wires. Remove the outlet and switch covers. Check if all wires are tightly connected to terminals. Look for any signs of damage or corrosion. Tighten loose screws or wires carefully. Proper connections prevent sparks and failures.
Secure Outlet And Switch Covers
Once testing and inspection are complete, replace the covers. Screw them back firmly to avoid any gaps. Covers protect wires and prevent accidental contact. A secure fit improves safety and appearance. Make sure the covers align well with the wall.
Troubleshooting Tips
Changing which outlet a light switch controls can sometimes be tricky. Problems may occur during or after the switch is rewired. Troubleshooting helps find and fix these issues quickly. Follow these tips to solve common problems and ensure safety.
Check The Power Supply
First, make sure the power is off before working. Use a voltage tester to confirm no electricity flows through the wires. This step prevents shocks and keeps you safe.
Test The Switch Function
Turn the power back on and test the switch. Does it turn the correct outlet on and off? If not, the wiring may be wrong or loose. Double-check all connections for tightness and proper placement.
Inspect Wire Connections
Loose or wrong wire connections cause the switch to fail. Look inside the switch box. Ensure black wires connect to the switch terminals. White wires should join together with wire nuts. Ground wires must connect to the green screw.
Verify Outlet Wiring
Check the outlet that the switch controls. The outlet’s black wire should link to the switch’s load wire. If wires are mixed up, the outlet won’t respond to the switch. Fix wiring to match the switch correctly.
Use A Circuit Tester
A circuit tester helps find wiring issues. Test wires at the switch and outlet. It shows if wires carry power or if a break exists. This tool makes troubleshooting faster and easier.
Frequently Asked Questions
How Do I Identify Which Outlet A Switch Controls?
Turn off the breaker, plug a lamp into outlets, then flip the switch. The lamp that turns on shows the controlled outlet.
Can I Change A Switch To Control A Different Outlet?
Yes, by rewiring the switch to a different outlet’s hot wire, you can change control. Always turn off power first.
What Tools Are Needed To Change Switch Control Outlets?
You need a voltage tester, wire stripper, screwdriver, and electrical tape to safely change outlet control by a switch.
Is It Safe To Change Outlet Control Without An Electrician?
If you know basic wiring and safety, you can do it yourself. Otherwise, hiring an electrician is safer and recommended.
Conclusion
Changing which outlet a light switch controls can be done with care. Always turn off the power before starting any work. Follow the steps slowly and check your connections twice. Using basic tools and safety tips helps avoid accidents. This simple project saves time and adds convenience to your home.
With patience, anyone can make this change successfully. Take your time, and enjoy the improved control over your lights.

