Have you ever stared at a stubborn monkey hook stuck in your wall, wondering how to get it out without causing damage? Removing these small but tricky hooks can feel frustrating, especially if you want to keep your walls smooth and clean.
In this guide, you’ll discover simple, effective steps to take monkey hooks out safely and easily. By the end, you’ll have the confidence to handle this task yourself, saving time and money on repairs. Ready to learn how? Let’s dive in!
Tools Needed
Removing monkey hooks from the wall is easier with the right tools. Having these tools ready saves time and avoids damage. Some tools are basic and common. Others are optional but helpful for a cleaner job.
Basic Tools
A flathead screwdriver helps to pry the hook gently from the wall. Needle-nose pliers grip the hook for easy pulling. A utility knife can cut around the hook area if needed. A putty knife smooths the wall after removal. Finally, a small hammer helps tap tools carefully.
Optional Supplies
Wall spackle fills small holes left by the hook. Sandpaper smooths the patched surface. Painter’s tape protects the wall around the hole. A damp cloth cleans dust and debris after work. These supplies improve the wall’s look after the hook is gone.

Credit: ookhardware.com
Types Of Monkey Hooks
Monkey hooks come in different types for various wall needs. Choosing the right type helps in easy removal and less wall damage. Two main categories are plastic and metal monkey hooks.
Plastic Vs Metal
Plastic monkey hooks are light and easy to use. They work well for small pictures or lightweight items. Plastic hooks bend under heavy weight and can break inside the wall. Metal monkey hooks are stronger and more durable. They hold heavier items and stay firm in the wall. Metal hooks may leave a larger hole when removed but are safer for heavy objects.
Weight Capacity
Each monkey hook has a weight limit. Plastic hooks usually hold up to 10 pounds. Metal hooks can support 20 pounds or more. Using the correct hook for your item’s weight prevents damage. Always check the weight capacity before hanging anything on a monkey hook.
Preparing The Area
Preparing the area is an important first step before removing monkey hooks from the wall. It helps keep the space safe and clean. Taking time to get ready makes the process easier and protects your walls and belongings.
Clear The Surroundings
Move furniture and items near the wall. This gives you space to work comfortably. Clearing the area also prevents damage to your things. Make sure the floor is free of clutter to avoid tripping. A tidy space helps you focus on the task.
Protect The Wall
Use painter’s tape around the monkey hook to protect the wall surface. The tape prevents scratches or marks during removal. Cover nearby areas with a drop cloth or old towel. This catches any dust or debris that falls. Protecting the wall keeps it ready for touch-ups or repainting later.
Step-by-step Removal
Removing monkey hooks from the wall requires care to avoid damage. This step-by-step guide helps you take them out easily. Follow each step carefully to keep your walls smooth and safe.
Loosen The Hook
Start by gently moving the hook back and forth. This loosens the grip inside the wall. Avoid using force to prevent wall damage. Loosening the hook makes removal easier and safer.
Gentle Pull Techniques
Hold the hook firmly near the wall. Pull slowly and steadily straight out. Do not twist or yank hard. Gentle pulling reduces risk of holes or cracks. Take your time for the best result.
Using Pliers Safely
Use pliers only if the hook is hard to pull. Grip the hook firmly but gently with the pliers. Pull straight out with slow pressure. Avoid squeezing too tight to stop bending. Pliers give better control for tricky hooks.
Preventing Wall Damage
Removing monkey hooks from walls can be tricky. You want to keep your walls clean and intact. Preventing damage protects your paint and drywall. It also saves time on repairs and repainting. Follow careful steps to avoid common mistakes.
Avoiding Paint Peeling
Pulling monkey hooks too hard can peel paint. Always loosen the hook gently. Use a flat tool to pry the hook slowly. Avoid sudden or fast movements. Warm the area with a hairdryer to soften paint. This helps the paint stay on the wall.
Handling Drywall
Drywall is fragile and can crack easily. Remove the hook straight out to avoid holes. Do not twist or yank the hook. Use a putty knife to push the hook out if stuck. Fill small holes with spackle and smooth it. Sand lightly after drying for a clean finish.
Fixing Minor Wall Marks
Removing monkey hooks from walls can leave small marks or holes. Fixing these minor wall marks is easy and quick. A little care can make your walls look smooth again. Follow simple steps to fill, sand, and paint over the damaged spots.
Filling Small Holes
Use lightweight spackle or wall filler for small holes. Apply a small amount with a putty knife. Press the filler gently into the hole. Smooth the surface by scraping off extra filler. Let it dry fully, usually about 30 minutes. Dry filler is easy to sand and paint over.
Sanding And Painting Tips
Sand the filled area with fine-grit sandpaper. Sand until the surface feels smooth and even. Wipe away dust with a damp cloth before painting. Use matching paint for the best results. Apply paint in thin layers for a neat finish. Allow each layer to dry before adding another. This prevents bumps and uneven color.
Alternative Hanging Solutions
Removing monkey hooks can leave holes and marks on your walls. Alternative hanging solutions help avoid damage and keep walls clean. These options work well for renters or anyone who wants easy wall decor changes. Here are two popular choices that protect your walls and hold your items securely.
Damage-free Hooks
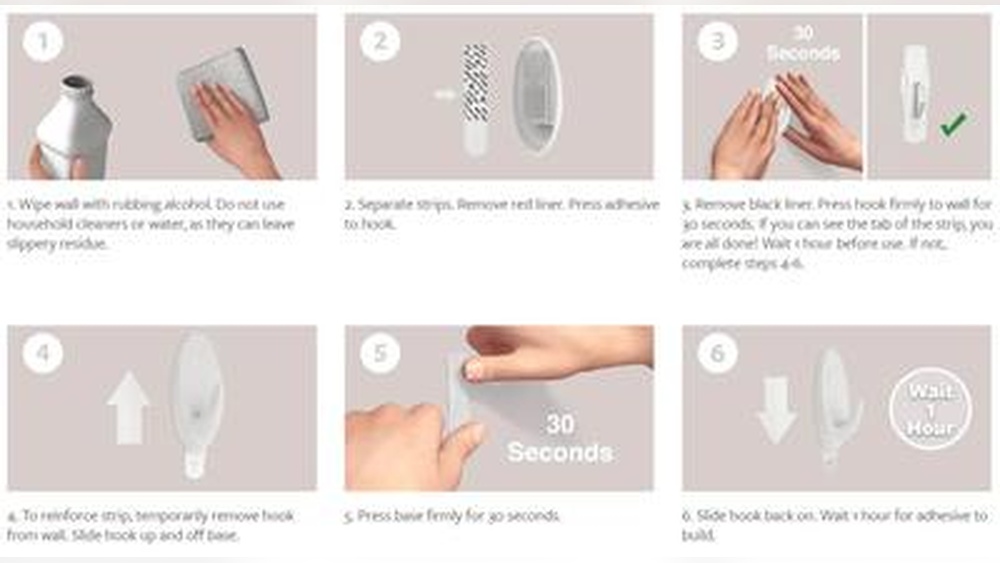
Damage-free hooks use special adhesive strips. These strips stick firmly but peel off without leaving marks. They hold pictures, frames, and light decorations. You can remove them anytime without pulling paint or drywall. These hooks come in various sizes and weight limits. Choose one that fits your item’s weight for safety.
Adhesive Options
Adhesive hooks and strips are simple to use. Clean the wall surface first for better sticking. Press the hook firmly against the wall for a few seconds. Wait for the recommended time before hanging your item. Some adhesives work on tile, glass, or wood too. Always check the product label for suitable surfaces and weight limits.
Credit: www.homedepot.com

Credit: www.amazon.com
Frequently Asked Questions
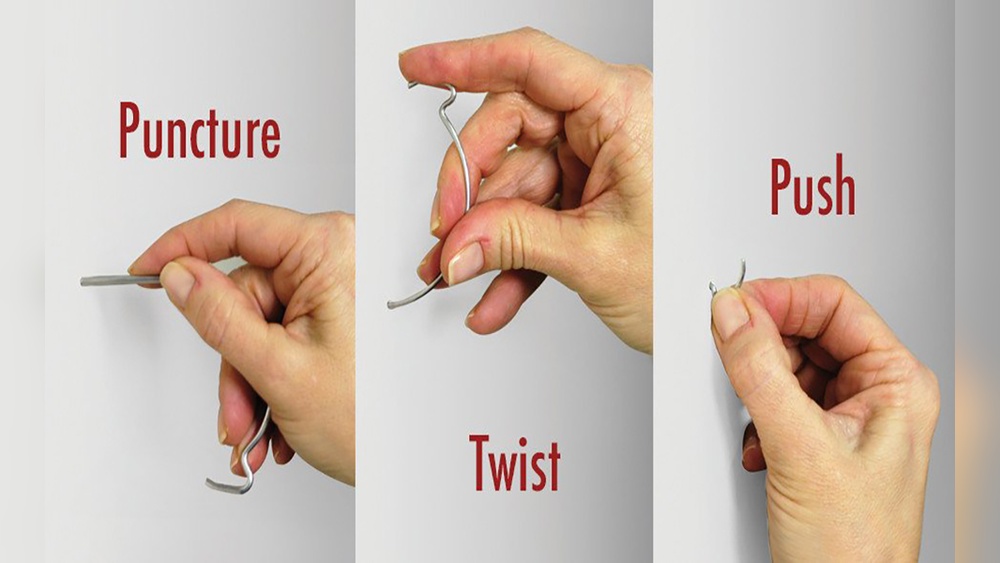
How Do I Safely Remove Monkey Hooks From Walls?
To remove monkey hooks safely, grip the hook firmly and twist it counterclockwise. Pull gently while twisting to avoid wall damage. Use pliers for better grip if needed. Patch holes afterward with spackle for a clean finish.
Can I Reuse Monkey Hooks After Removal?
Yes, you can reuse monkey hooks if they remain undamaged. Inspect the hook for bends or breaks before reuse. Clean off any debris. Proper removal helps maintain the hook’s strength and reliability for future use.
What Tools Are Needed To Remove Monkey Hooks?
You typically need pliers or a wrench to remove monkey hooks. These tools provide a firm grip and better control for twisting. A screwdriver might help if the hook is tight. Keep spackling tools ready to repair wall holes after removal.
Will Removing Monkey Hooks Damage My Wall?
If removed carefully, monkey hooks usually cause minimal wall damage. Twisting the hook out slowly reduces stress on the wall. Small holes remain but can be easily patched with spackle. Avoid pulling forcefully to prevent cracks or larger holes.
Conclusion
Removing monkey hooks from walls is simple and safe with the right steps. Take your time and use basic tools to avoid damage. Small holes can be fixed quickly with filler and paint. This keeps your wall looking neat and clean.
Now, you can change your room’s look without worry. Just follow these easy tips to finish the job well. Your walls will be ready for new decorations or a fresh coat of paint. Simple, quick, and effective—no stress needed.