Have you ever wanted to control two lights from two different switches without any hassle? Imagine being able to turn your lights on or off from either switch, giving you full control and convenience in your home.
Whether you’re upgrading your lighting setup or fixing a tricky wiring problem, understanding how to control two lights with two switches can save you time and frustration. You’ll discover simple steps and clear explanations that make this task easy—even if you’re not an expert.
Keep reading, and you’ll have your lights working exactly the way you want in no time.
Tools And Materials Needed
Controlling two lights with two switches needs the right tools and materials. These items make the job easier and safer. You will need basic electrical tools and some specific parts. Each tool and material has a role in the wiring process.
Gathering everything before starting saves time. It also helps avoid mistakes. Below are the essential tools and materials needed for this task.
Essential Tools
- Voltage Tester – Checks if wires have power.
- Wire Strippers – Remove insulation from wires.
- Screwdrivers – Flathead and Phillips for screws.
- Needle-Nose Pliers – Bend and twist wires.
- Electrical Tape – Insulates wire connections.
- Drill with Bits – For mounting switches or boxes.
- Wire Cutters – Cut wires to needed length.
Required Materials
- Two Single-Pole Switches – Control each light separately.
- Light Fixtures – The lights you want to control.
- Electrical Wire – Usually 14/2 or 12/2 gauge.
- Wire Nuts – Connect wires safely together.
- Electrical Boxes – Hold switches and wire connections.
- Light Bulbs – Choose the right wattage for fixtures.
- Wall Plates – Cover switches for a clean look.
Types Of Switches For Two Lights
Controlling two lights with two switches requires understanding different switch types. Each switch type has a specific use and wiring method. Choosing the right switch ensures smooth operation and easy control. Below are the main switch types used for controlling two lights.
Single-pole Switches
Single-pole switches control one light from one location. They are the simplest switches to install. Each switch turns one light on or off. For two lights, two single-pole switches are needed. This setup works well if each light has its own switch.
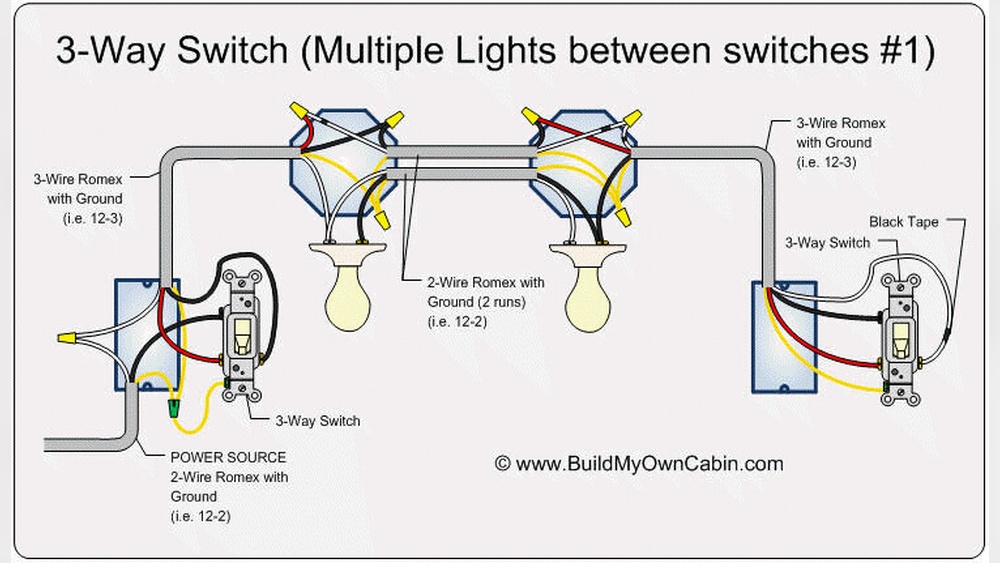
Three-way Switches
Three-way switches control one light from two locations. They have three terminals and require special wiring. This setup is useful for hallways or rooms with two entrances. With two three-way switches, you can turn a light on or off from either switch.
Four-way Switches
Four-way switches work with two three-way switches to control lights from three or more locations. They have four terminals and sit between two three-way switches. This setup is common in larger rooms or long hallways. Four-way switches add flexibility but need more wiring skills.
Basic Wiring Concepts
Understanding basic wiring concepts is essential for controlling two lights with two switches. These concepts help ensure safety and proper function. Wiring involves different types of wires and connections. Knowing their roles makes installation easier and safer.
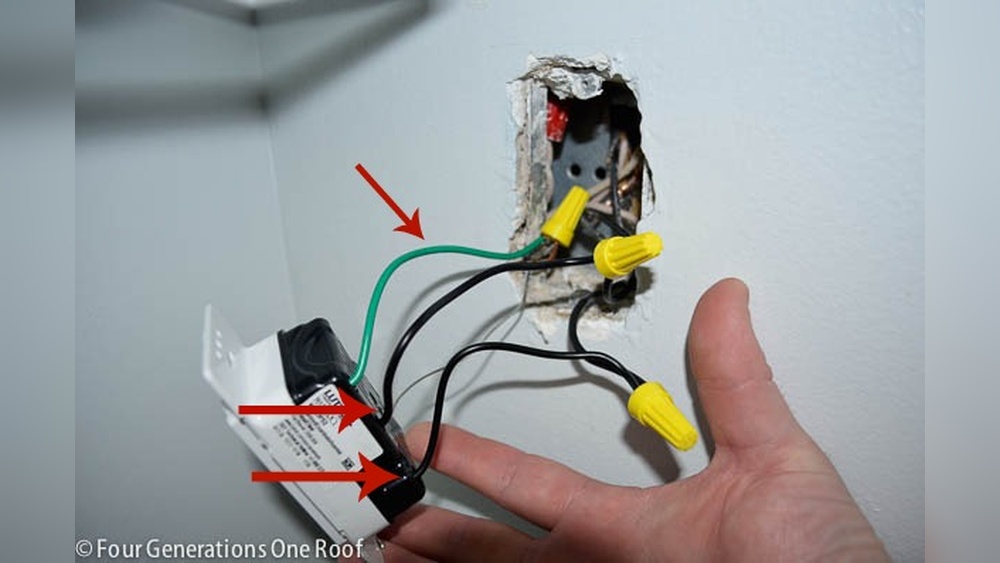
Live, Neutral, And Ground Wires
The live wire carries current from the power source to the switch or light. It is often black or red. The neutral wire completes the circuit by carrying current back to the power source. It is usually white or gray. The ground wire offers a safety path for electricity. It is green or bare copper. Each wire has a specific role for safe and efficient wiring.
Switch Loops
A switch loop is a wiring method that sends power to the switch. It allows the switch to control the light by opening or closing the circuit. The live wire brings power to the switch first. Then, the switched live wire sends power back to the light. Switch loops are common in simple lighting setups.
Wire Color Codes
Wire colors help identify each wire’s purpose. Black or red wires usually mean live wires. White or gray wires indicate neutral wires. Green or bare wires show the ground connection. These color codes help avoid mistakes during wiring. Always follow local electrical codes for safety.

Credit: www.youtube.com
Wiring Two Lights With Two Switches
Wiring two lights with two switches lets you control each light separately. This setup is common in rooms with multiple light fixtures. It gives flexibility and convenience. Understanding the wiring process helps avoid mistakes and ensures safety.
Planning The Circuit
Start by drawing a simple diagram of the circuit. Identify where the lights and switches will be located. Plan the path for the wires between the power source, switches, and lights. Use cables that fit the electrical load safely. Make sure to turn off power before starting any work.
Connecting The First Light
Begin wiring at the first light fixture. Connect the live wire from the power source to the light’s live terminal. Attach the neutral wire from the power source to the light’s neutral terminal. Secure the ground wire to the fixture’s grounding point. Check all connections for tightness.
Adding The Second Light
Run a cable from the first light to the second light. Connect the live wire to the second light’s live terminal. Attach the neutral wire to the second light’s neutral terminal. Connect the ground wire to the second fixture’s grounding point. Ensure wires are properly insulated and secured.
Integrating The Two Switches
Run cables from each switch to its corresponding light fixture. Connect the live wire from each switch to the live terminal of each light. Attach the neutral wires together in the junction box, not to the switches. Connect the ground wires to both switches and light fixtures for safety.
Safety Tips And Precautions
Working with electrical wiring can be risky. Safety must come first when controlling two lights with two switches. Taking precautions helps prevent accidents and injuries.
Follow these safety tips to protect yourself and your home. Simple steps make the job safer and easier to complete.
Turn Off Power At The Circuit Breaker
Always switch off the power before starting any electrical work. Use the main circuit breaker to cut the electricity. Double-check with a voltage tester to ensure the wires are not live.
Use Proper Tools And Equipment
Use insulated tools made for electrical work. Avoid using damaged or worn-out tools. Wear rubber-soled shoes to reduce the risk of electric shock.
Follow Wiring Diagrams Carefully
Use correct wiring diagrams for two lights and two switches. Incorrect wiring can cause short circuits or damage. Label wires clearly to avoid confusion during installation.
Check Local Electrical Codes
Abide by local electrical codes and regulations. These rules ensure safe and proper installation. If unsure, consult a professional electrician for guidance.
Test The Installation Before Closing The Wall
Test all connections before finishing the work. Turn the power back on and check if both lights work properly. Fix any problems before sealing the switches.

Credit: diy.stackexchange.com
Testing And Troubleshooting
Testing and troubleshooting are key steps after wiring two lights with two switches. These steps ensure everything works safely and correctly. Skipping these checks may cause flickering lights or no light at all. Taking time to test helps catch mistakes early. Troubleshooting guides you through fixing common problems. This section explains how to check connections and solve usual issues.
Checking Connections
Start by turning off the power at the breaker box. Use a voltage tester to confirm no power flows to the switches or lights. Open the switch boxes and light fixtures. Look at all wire connections. Ensure wires are tightly twisted together or connected with wire nuts. Check if any wires are loose or disconnected. Also, verify the ground wires are connected properly. Make sure the switch terminals hold the wires securely. Confirm that the wires match the wiring diagram you followed. If anything looks wrong, fix it before restoring power.
Fixing Common Issues
Lights not turning on is a common problem. Check if the bulbs are good and screwed in tightly. Make sure switches are in the on position. If lights flicker, loose wires may cause it. Tighten all connections carefully. If one switch controls both lights incorrectly, check the traveler wires. These wires carry power between switches. Wrong traveler wiring causes switches to work oddly. Swap traveler wires if needed and test again. If a breaker trips, you may have a short circuit. Check for exposed wires touching metal parts. Fix any damaged wire insulation. Replace faulty switches if they do not work properly.

Credit: www.youtube.com
Frequently Asked Questions
How Can I Control Two Lights With Two Switches?
You can use a double-pole double-throw (DPDT) switch or two single-pole switches wired correctly. This setup allows independent control of each light from separate switches.
What Wiring Is Needed For Two Switches And Two Lights?
You need separate live wires running from each switch to its respective light. Neutral and ground wires should be connected properly for safety and functionality.
Can I Use One Switch To Control Two Lights?
Yes, but it controls both lights simultaneously. To control lights independently, two switches are required, each wired to its light.
Is It Safe To Install Two Switches For Two Lights Myself?
Only if you have basic electrical knowledge and follow safety codes. Turn off power before wiring, or consult a licensed electrician to avoid hazards.
Conclusion
Controlling two lights with two switches is simple and useful. You can turn each light on or off separately. This setup saves energy and adds convenience to your space. Just follow the wiring steps carefully for safety. Understanding basic electrical connections helps avoid mistakes.
Try this method to improve your home lighting today. It’s a smart way to manage multiple lights easily.