Have you ever struggled with a pull light switch that just won’t work right? Maybe it’s stuck, flickering, or simply won’t turn on.
Changing a pull light switch might sound tricky, but with the right steps, you can do it yourself quickly and safely. Imagine fixing it on your own without calling an electrician—saving time and money. In this guide, you’ll learn exactly how to replace your pull light switch, even if you’ve never done it before.
Keep reading, and by the end, you’ll feel confident tackling this simple home repair.

Credit: diy.stackexchange.com
Tools And Materials Needed
Changing a pull light switch requires the right tools and materials. Having these ready makes the job easier and safer. This section lists everything needed for the task.
Basic Tools
A screwdriver set is essential. Both flathead and Phillips screwdrivers may be needed. Wire strippers help remove insulation from wires. A voltage tester ensures the power is off before you start. Needle-nose pliers aid in gripping and bending wires.
Safety Equipment
Safety goggles protect your eyes from dust or sparks. Insulated gloves reduce the risk of electric shock. A sturdy ladder helps reach the switch comfortably and safely.
Materials For Replacement
A new pull light switch that fits your fixture is necessary. Electrical tape is useful for securing wire connections. Wire nuts help join wires safely and neatly.
Safety Precautions
Safety comes first when changing a pull light switch. Electricity can be dangerous. Taking the right steps protects you from shocks and injuries. Follow these safety tips to work safely and confidently.
Turn Off The Power
Switch off the power at the circuit breaker. Do not rely on the light switch alone. Test the switch with a voltage tester to confirm no electricity flows.
Use Insulated Tools
Always use tools with insulated handles. They reduce the risk of electric shock. Never use metal tools without insulation near wires.
Wear Protective Gear
Wear rubber-soled shoes and gloves made for electrical work. Avoid working in wet areas or with wet hands. Safety gear adds an extra layer of protection.
Work In A Well-lit Area
Good lighting helps you see wires clearly. Avoid guessing or working in dark spaces. Use a flashlight or portable lamp if needed.
Handle Wires Carefully
Do not touch exposed wires with bare hands. Keep wires separated to avoid short circuits. Use wire nuts or electrical tape to cover exposed ends.
Turning Off The Power
Turning off the power is the first and most important step before changing a pull light switch. It keeps you safe from electric shocks. Always treat electricity with respect. Never skip this step.
Take time to find the correct circuit breaker. This controls the electricity flow to your light switch. Cutting off power prevents accidents and damage to the wiring.
Locate The Circuit Breaker Panel
Find the main electrical panel in your home. It is often in the basement, garage, or utility room. The panel holds switches called circuit breakers. Each breaker controls power to different parts of your house.
Identify The Correct Breaker
Look for the breaker labeled for the room with the pull light switch. If labels are missing or unclear, turn off the main breaker. This stops power to the entire house.
Switch Off The Power
Flip the breaker switch to the OFF position. You will feel or hear a click. This means power is cut off to that circuit. Double-check by trying the light switch or using a voltage tester.
Confirm Power Is Off
Use a voltage tester or a small light bulb tester. Touch the tester to the switch wires. No light or sound means no power. Never work on wires with power still running.
Removing The Old Pull Light Switch
Removing the old pull light switch is the first step in the replacement process. It needs care and attention to avoid damage or injury. This section breaks down the removal into simple steps anyone can follow.
Before starting, make sure the power is off. Safety is the top priority. Use a voltage tester to confirm no electricity flows to the switch. Never skip this step.
Turn Off The Power
Find the main circuit breaker box. Switch off the breaker that controls the light switch. This cuts the electricity and keeps you safe. Double-check with a voltage tester.
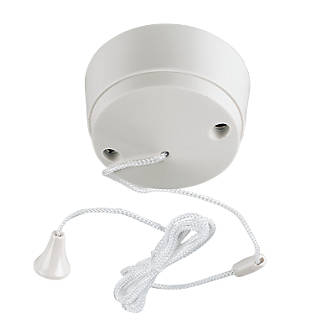
Remove The Pull Chain
Pull gently on the chain to see if it detaches. Some chains have a small clip or screw holding them. Use a screwdriver if needed. Keep the chain safe for reuse.
Unscrew The Switch Plate
Use a screwdriver to remove screws holding the switch plate. Keep the screws in a safe place. Carefully pull the plate away from the wall. It may stick slightly due to paint or dirt.
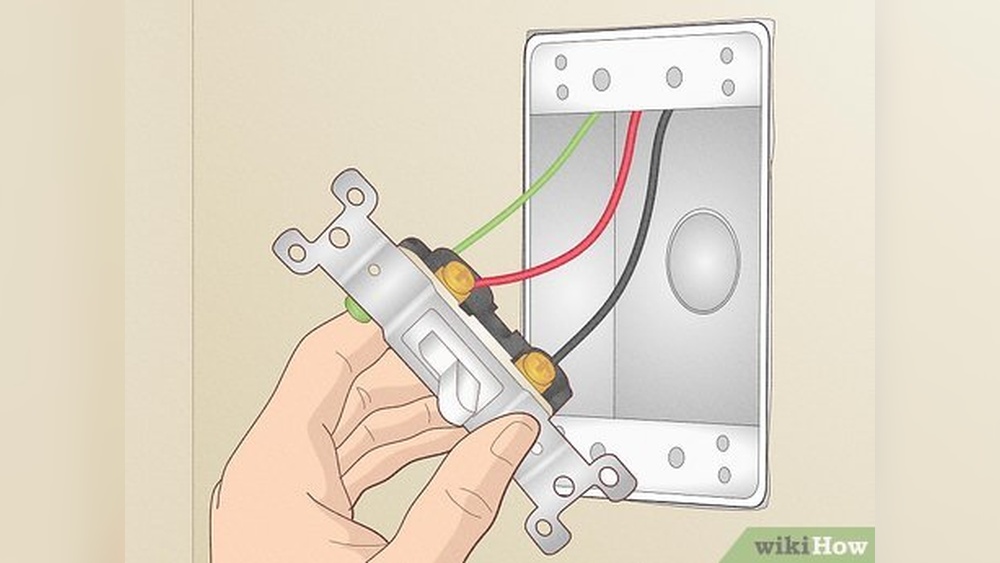
Disconnect The Wires
Look at how the wires connect to the old switch. Use a screwdriver to loosen the terminal screws. Gently pull the wires free. Note the wire positions for the new switch installation.
Wiring The New Pull Light Switch
Wiring the new pull light switch is a key step in the replacement process. It connects the switch to your home’s electrical system. Proper wiring ensures the switch works safely and correctly.
Before starting, make sure the power is off. This prevents any risk of electric shock. Use a voltage tester to confirm no current flows to the wires.
Identify The Wires
Look at the wires coming from the wall. Typically, you will find a live wire, a neutral wire, and a ground wire. The live wire carries electricity to the switch. The neutral wire completes the circuit. The ground wire protects from electrical faults.
Connect The Live Wire
Attach the live wire to the terminal marked “L” or “Line” on the switch. Tighten the screw to hold the wire securely. A loose connection can cause the switch to fail or spark.
Attach The Neutral Wire
Connect the neutral wire to the terminal labeled “N” or “Neutral.” Some switches do not require a neutral wire. Check your switch’s instructions for details.
Secure The Ground Wire
Fasten the ground wire to the green screw or grounding terminal. This step is important for safety. It helps prevent shocks if the switch or wiring develops a fault.
Double-check Your Connections
Review all connections to ensure they are tight and correct. Loose or wrong connections can cause the switch to fail. Use a flashlight to see clearly inside the switch box.
Test The Switch
Turn the power back on. Pull the switch cord to check if the light turns on and off. If it does not work, turn off the power and recheck the wiring.
Credit: www.ccfpjamaica.com
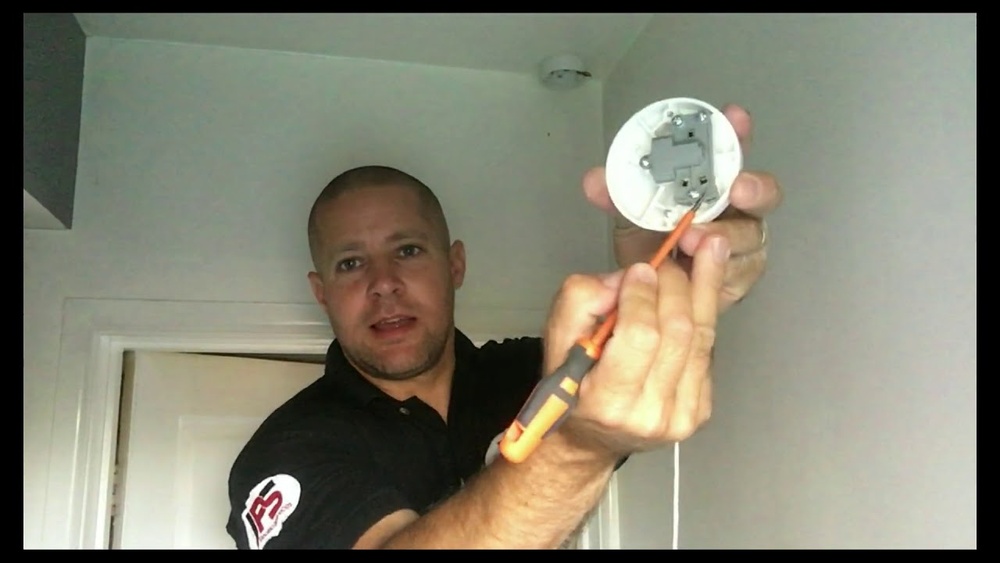
Securing The Switch And Testing
After connecting the wires, securing the switch is very important. A loose switch can cause problems or even danger. Properly fastening the switch keeps it stable and safe.
Testing the switch ensures everything works well. It confirms the wiring is correct and the switch controls the light as expected.
Securing The Switch In Place
First, push the switch back into the electrical box carefully. Make sure no wires get pinched. Use the screws provided to fasten the switch firmly. Tighten screws until the switch does not move. Avoid over-tightening to prevent damage.
Attaching The Switch Cover
Place the switch cover plate over the switch. Align the screw holes correctly. Use a screwdriver to secure the cover plate. This protects the switch and gives a clean look.
Testing The Pull Light Switch
Turn the power back on at the breaker. Pull the switch cord slowly. Check if the light turns on and off smoothly. Pull multiple times to confirm consistent function. If the light does not work, recheck your wiring.
Troubleshooting Common Issues
Troubleshooting common issues with pull light switches saves time and effort. Many problems have simple fixes. Knowing what to check helps avoid costly repairs. This guide covers frequent issues and how to spot them.
Checking The Power Supply
First, ensure the power is on. Switch off the circuit breaker and then turn it back on. A loose connection or tripped breaker often causes the switch to stop working. Use a voltage tester to confirm power reaches the switch.
Inspecting The Pull Cord
The pull cord may be broken or stuck. Pull gently to check if it moves smoothly. Sometimes dirt or debris can block the mechanism. Clean the area around the switch and try again. Replace the cord if it is frayed or snapped.
Testing The Switch Mechanism
The internal switch parts can wear out or get stuck. Remove the switch cover carefully. Press the toggle inside to see if it clicks. If no click occurs, the switch likely needs replacing. Use a multimeter to test for electrical continuity.
Examining The Wiring Connections
Loose or damaged wires cause flickering or no light. Turn off power before handling wires. Check if wires are firmly connected to terminals. Look for signs of burning or corrosion. Tighten or replace wires as needed for a safe connection.

Credit: www.youtube.com
Frequently Asked Questions
How Do I Safely Turn Off Power Before Changing A Pull Light Switch?
Always switch off the circuit breaker controlling the switch. Use a voltage tester to confirm no electricity flows. This ensures safety and prevents electrical shocks while you work on the pull light switch.
What Tools Are Needed To Replace A Pull Light Switch?
You will need a screwdriver, voltage tester, wire stripper, and replacement switch. These basic tools help you safely and efficiently remove and install the new pull light switch.
How Do I Identify Wires On A Pull Light Switch?
Typically, black or red wires are hot, white is neutral, and green or bare is ground. Label wires before disconnecting to ensure correct reconnection with the new pull light switch.
Can I Replace A Pull Light Switch Without Professional Help?
Yes, if you follow safety steps and have basic electrical knowledge. Turn off power, use proper tools, and carefully follow instructions to replace the pull light switch yourself.
Conclusion
Changing a pull light switch is simple and safe with the right steps. Turn off power first to avoid accidents. Use basic tools and follow instructions carefully. Double-check connections before restoring power. This small task can save money on repairs.
Practice patience and take your time. Soon, your pull light switch will work like new. Easy fixes build confidence for future projects. Give it a try—you might surprise yourself.