Have you ever wished you could control your lights from two different spots in a room? Adding a three way light switch lets you do just that.
It’s a simple upgrade that makes your home more convenient and smart. If you’ve been avoiding this project because it sounds complicated, don’t worry—you’re about to discover how easy it can be. Keep reading, and you’ll learn step-by-step how to install a three way switch safely and confidently.
By the end, you’ll have the power to control your lights like a pro. Ready to get started?
Tools And Materials Needed
Adding a three way light switch requires the right tools and materials. Having these ready makes the job easier and safer. This section lists everything needed for the task.
Essential Tools
Gather basic electrical tools first. You will need a screwdriver, wire stripper, and voltage tester. A drill may help for new holes. Pliers and a utility knife come in handy too. These tools ensure you can work with wires safely and precisely.
Required Materials
Use the correct materials to ensure a proper installation. Get two three way switches designed for the job. Use electrical wire rated for your home’s electrical system. Wire nuts help connect wires securely. Electrical tape provides extra insulation. Also, have a switch box to house the switches safely.
Safety Gear
Safety matters most. Wear insulated gloves to protect your hands. Safety glasses keep your eyes safe from dust and debris. A flashlight may be necessary if working in dark spaces. Always turn off power at the breaker before starting.

Credit: www.youtube.com
How A Three Way Switch Works
A three way switch lets you control one light from two places. It works by connecting two switches with special wires. Installing it means running a traveler wire between switches for easy on/off control.
A three way switch controls one light from two different places. This setup is common in hallways or large rooms. It lets you turn the light on or off from either switch.
Inside the switch, there are three terminals for wires. One terminal connects to the power source. The other two terminals, called travelers, connect to the other switch.
When you flip one switch, it changes the path of electricity. This either completes the circuit to light the bulb or breaks it to turn the light off.
The Role Of Traveler Wires
Traveler wires carry electricity between the two switches. They allow the switches to work together. The light turns on or off depending on the connection through these wires.
The Common Terminal Explained
The common terminal links to the power source or the light fixture. It is key to switching the circuit on or off. Correct wiring of this terminal is essential for the switch to work.
Switch Positions And Circuit Paths
Each switch has two positions that change the circuit path. Flipping a switch changes which traveler wire is connected. This action either completes or breaks the circuit.
Safety Precautions
Safety is the top priority when installing a three way light switch. Electricity can be dangerous. Taking the right steps helps avoid injury and damage. Follow these safety tips before and during installation.
Turn Off Power At The Circuit Breaker
Always switch off the power at the main breaker. Do not rely on the wall switch. Use a voltage tester to confirm no electricity flows in the wires.
Use Proper Tools And Equipment
Use insulated tools made for electrical work. Wear rubber-soled shoes to reduce shock risk. Keep your workspace dry and clear of clutter.
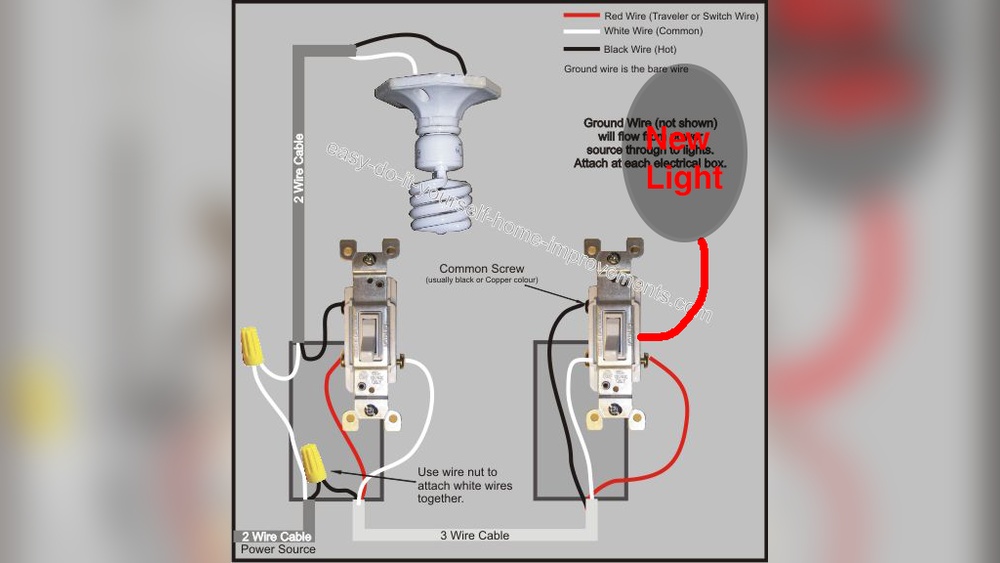
Understand The Wiring Diagram
Study the wiring diagram carefully before starting. Know which wires are hot, neutral, and ground. Mistakes in wiring can cause shorts or fires.
Work In A Well-lit Area
Good lighting helps you see wires clearly. Avoid working in dim or dark spaces. This reduces the chance of errors and accidents.
Wear Safety Gear
Use safety glasses to protect your eyes from sparks or debris. Gloves can protect your hands from sharp edges and shocks.
Do Not Work Alone
Have someone nearby in case of emergency. They can help shut off power or call for help quickly.

Credit: www.finehomebuilding.com
Turn Off Power
Turning off power is the first step in adding a three-way light switch. It keeps you safe while working with electrical wires. Electricity can cause shocks or injuries. Always make sure the power is completely off before starting.
Safety must be your top priority. A small mistake can lead to big problems. Taking time to turn off power prevents accidents and damage. This step protects both you and your home.
Locate The Circuit Breaker
Find your home’s main electrical panel. Look for the circuit breaker that controls the light switch you want to change. It is usually labeled with room names or numbers. If not, you may need to test each breaker.
Switch Off The Power
Flip the correct breaker to the OFF position. This stops electricity from flowing to the switch. Make sure the breaker stays off while you work. Never trust that power is off without testing.
Verify Power Is Off
Use a voltage tester or a non-contact tester. Touch the wires or switch terminals to check for electricity. The tester should show no power. Double-checking prevents shocks and keeps you safe.
Remove Existing Switch
Removing the existing switch is the first step in installing a three way light switch. This process requires caution to avoid electric shock or damage. Always turn off the power at the circuit breaker before starting.
Careful removal helps you understand the wiring setup. It also prepares the space for the new switch installation.
Turn Off Power At The Circuit Breaker
Locate the correct circuit breaker and switch it off. Use a voltage tester to confirm no power flows to the switch. Safety is the top priority during this step.
Remove The Switch Cover Plate
Use a screwdriver to take off the cover plate. Keep the screws safe for later use. This exposes the switch and wiring behind the plate.
Unscrew The Existing Switch
Loosen the screws holding the switch to the wall box. Gently pull the switch out. Avoid pulling the wires forcefully to prevent damage.
Note Wire Positions And Colors
Observe how wires connect to the switch. Take a photo or label wires for easy reference. This helps during the wiring of the new three way switch.
Disconnect The Wires
Loosen the terminal screws and carefully remove the wires. Keep them separate and undamaged. Proper disconnection is crucial for the next installation step.

Credit: diy.stackexchange.com
Identify Wiring
Testing the setup of a three way light switch is a key step. It ensures the wiring is correct and the switches work well together. Careful testing avoids safety issues and saves time on fixes later.
Take your time to check each switch. Confirm the light turns on and off from both locations. This simple test shows if the installation is successful.
Turn On Power And Prepare
After wiring, restore power at the breaker box. Use a voltage tester to confirm power is live. Keep your tools ready. This step makes sure you can safely test switches.
Operate Each Switch
Flip the first switch. The light should turn on or off. Next, flip the second switch. The light should change again. Both switches must control the light independently.
Check For Flickering Or Delay
Watch the light closely as you switch. It should turn on and off instantly. No flickering or delays should happen. Flickering may mean loose wiring or a bad connection.
Repeat Testing Multiple Times
Test the switches several times. Try different switch positions. This ensures the setup works in all cases. Consistent results confirm a reliable installation.
Connect The Three Way Switches
Troubleshooting a three-way light switch can feel tricky. Small mistakes in wiring cause the switch to not work correctly. This section offers clear tips to fix common problems. Follow these steps to save time and avoid frustration.
Check The Power Supply
Make sure the power is off before working on switches. Use a voltage tester to confirm power is off. After wiring, test if power returns properly. No power means the circuit or breaker might be faulty.
Verify Wire Connections
Loose or wrong wire connections cause the switch to fail. Double-check that each wire matches the correct terminal. Tighten all screws to ensure good contact. Use the switch’s wiring diagram as a guide.
Test The Switches Individually
Remove one switch and test it alone. This helps identify if one switch is broken. Replace faulty switches with new ones. Testing switches separately narrows down the issue quickly.
Inspect The Traveler Wires
Traveler wires connect the two switches. Check for broken or disconnected traveler wires. Ensure traveler wires are on the right terminals. Damaged traveler wires disrupt the switch operation.
Use A Continuity Tester
A continuity tester checks if wires connect properly inside switches. Use it to find breaks or shorts in wiring. No continuity means a wire is damaged or loose. This tool helps find hidden wiring problems fast.
Frequently Asked Questions
What Tools Are Needed To Add A Three Way Light Switch?
You need a screwdriver, voltage tester, wire stripper, electrical tape, and wire nuts. These tools ensure safe and proper installation of the switch.
How Does A Three Way Light Switch Work?
A three way switch controls one light from two different locations. It uses traveler wires to send current between switches, allowing control from either switch.
Can I Install A Three Way Switch Myself?
Yes, if you understand basic electrical wiring and safety precautions. Always turn off power before starting and follow wiring diagrams carefully.
What Wires Connect To A Three Way Switch?
Typically, you connect a common wire, two traveler wires, and a ground wire. Proper identification and connection are crucial for the switch to function correctly.
Conclusion
Adding a three-way light switch can improve your home’s lighting control. Follow each step carefully for safety and success. Double-check your wiring before turning on the power. Take your time and don’t rush the process. This upgrade lets you control lights from two places easily.
Enjoy the convenience and comfort it brings to your space. Keep learning and practicing your home electrical skills. Small projects like this build confidence and save money. Remember, safety first—always turn off power before working. Now, you’re ready to add a three-way switch yourself.