Have you ever wished you had an extra outlet right next to your light switch? Adding one can make your space more convenient, letting you plug in devices without hunting for a faraway socket.
But how do you do it safely and correctly? In this guide, you’ll discover simple, step-by-step instructions to add an outlet off a light switch. By the end, you’ll have the confidence to upgrade your room and make everyday tasks easier.
Keep reading—you’re just a few easy steps away from a smarter, more functional space.
Tools And Materials Needed
Preparing the right tools and materials is key to adding an outlet off a light switch. Having everything ready saves time and keeps the project safe. Each item plays a role in the process, from cutting wires to securing the outlet.
Gathering these tools and materials ensures a smooth and efficient installation. It helps avoid mistakes and keeps the work neat and professional.
Essential Tools For The Job
- Screwdriver set (flat and Phillips)
- Wire stripper and cutter
- Voltage tester
- Drill with bits
- Measuring tape
- Fish tape or wire puller
- Level
Materials You Will Need
- Electrical outlet (receptacle)
- Outlet box (old work type for retrofit)
- Electrical wire (14/2 or 12/2 gauge)
- Wire nuts
- Electrical tape
- Faceplate cover
- Wire connectors or clamps
Safety Gear To Use
- Insulated gloves
- Safety glasses
- Work boots
- Dust mask (optional)
Safety Precautions
Working with electricity requires care and attention. Safety is the top priority before adding an outlet off a light switch. Following safety steps protects you from shocks and damage. Taking time to prepare helps the project go smoothly and safely.
Turn Off Power At The Circuit Breaker
Always switch off the power at the breaker box. This stops electricity from flowing to the switch and outlet. Use a tester to confirm no current is present before starting work.
Use Proper Tools And Equipment
Use insulated tools made for electrical work. Avoid using old or damaged tools. Wear safety gloves and goggles to protect your hands and eyes.
Understand Wiring And Codes
Know the wiring layout and local electrical codes. Follow rules for wire size and connections. This prevents hazards and ensures the outlet works correctly.
Work In A Dry Environment
Keep your workspace dry to avoid electric shock. Do not work in damp or wet areas. Dry conditions improve safety and comfort during the task.
Double-check Connections Before Restoring Power
Inspect all wires and connections carefully. Make sure no bare wires are exposed. Tighten screws and secure wires properly before turning power back on.
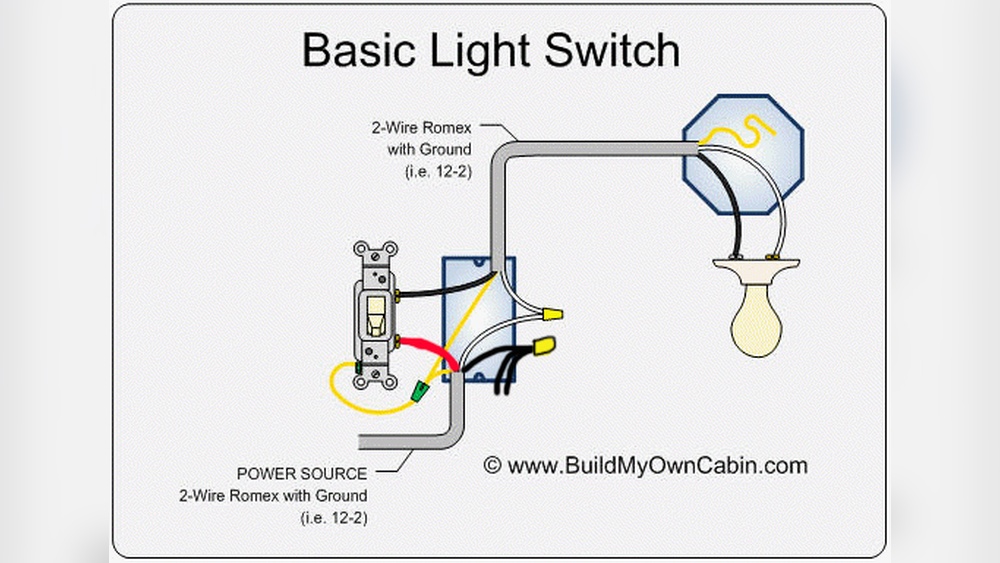
Locate The Light Switch Wiring
Locating the light switch wiring is the first step to adding an outlet. This step helps you find the right wires to connect the new outlet safely. Knowing where the wires are avoids mistakes and keeps the work clean.
Before starting, turn off the power at the breaker box. Safety is very important when working with electricity.
Turn Off Power To The Switch
Find the circuit breaker for the light switch. Flip it off to stop electricity flow. Use a voltage tester to make sure power is off. Never work on live wires.
Remove The Switch Cover Plate
Unscrew the cover plate with a screwdriver. Gently pull it away from the wall. This reveals the switch and wiring behind it.
Identify The Wires Behind The Switch
Look for black, white, and ground wires. Black wires usually carry power. White wires are neutral, and the ground is bare or green. Note which wires connect to the switch.
Use A Voltage Tester To Confirm Wiring
Test each wire with the voltage tester. This confirms which wire has power. Mark the hot wire with tape for easy ID later.
Check For Space In The Electrical Box
Look inside the box to see if space is enough. You need room for new wire connections. Crowded boxes can cause problems during installation.

Credit: diy.stackexchange.com
Turn Off Power And Test
Turning off power and testing are crucial steps before working on electrical outlets. Safety must come first to avoid shocks and injuries. Always treat wires as if they are live until tested.
Before starting, locate the correct circuit breaker. Switch it off to cut power to the light switch and outlet area. Double-check to ensure no electricity flows through the wires.
Turn Off The Circuit Breaker
Find the circuit breaker panel in your home. Identify the breaker that controls the room’s light switch. Flip the breaker to the off position. This stops electricity from reaching the wires.
Use A Voltage Tester
Grab a non-contact voltage tester or a multimeter. Hold the tester near the wires or terminals of the light switch. If the tester lights up or beeps, power is still present.
Double Check Power Is Off
Test multiple points, including the light switch and outlet box. Confirm no current flows anywhere you will work. Only proceed once the tester shows no voltage.
Remove The Light Switch Cover
Removing the light switch cover is the first step in adding an outlet off a light switch. This step gives you access to the wiring behind the switch. It allows safe work on the electrical components.
Make sure to turn off the power at the circuit breaker. This stops any risk of electric shock while working. Use a voltage tester to confirm no electricity flows to the switch.
Gather Necessary Tools
Get a screwdriver, usually a flathead or Phillips. Have a voltage tester ready to check power. Keep a small container to hold screws safe.
Unscrew The Light Switch Cover
Find the screws on the switch cover plate. Turn the screws counterclockwise carefully. Remove the cover plate and place it aside gently.
Check For Power
Use the voltage tester on the wires behind the cover. Ensure the tester shows no power. This step confirms it is safe to work.
Identify Wiring Connections
Identifying wiring connections is a key step when adding an outlet off a light switch. This step ensures safety and proper function of both the switch and outlet. Understanding the wires helps you avoid mistakes and electrical hazards.
Before starting, turn off the power at the circuit breaker. Use a voltage tester to confirm no electricity flows through the wires. This simple check protects you from shocks.
Locate The Light Switch Box
Begin by removing the switch cover plate. Use a screwdriver to unscrew the switch from the electrical box. Gently pull the switch out to see the wires behind it.
Identify The Wires
Look for three main types of wires: hot, neutral, and ground. The hot wire usually has black or red insulation. The neutral wire is white, and the ground wire is green or bare copper.
Trace The Hot Wire
The hot wire carries power to the switch. It connects to one of the switch terminals. Note which wire this is, as it will supply power to the new outlet.
Find The Neutral Wire
The neutral wire completes the electrical circuit. Sometimes it is bundled with other white wires inside the box. If no neutral appears at the switch, check the nearby outlet or junction box.
Locate The Ground Wire
The ground wire improves safety by directing electricity away in a fault. It usually connects to a green screw or metal box. Ensure you include this wire when adding the outlet.
Label The Wires
Use tape or markers to label each wire. This practice helps you keep track of connections. Clear labels reduce confusion during installation.
Run Cable To Outlet Location
Start by running the electrical cable from the light switch box to the new outlet spot. Make sure the cable is properly secured and follows local electrical rules. This step ensures a safe and reliable power connection for the outlet.
Prepare The Work Area
Start by turning off power at the circuit breaker. Confirm no electricity flows to the switch. Use a voltage tester for safety. Clear the wall space where you want the new outlet. Remove any drywall or obstacles carefully. Keep the area tidy to avoid accidents.
Choose The Right Cable
Select a cable matching your home’s wiring code. Usually, 14/2 or 12/2 NM cable works well. Check the amperage of your circuit before picking cable. Use cable rated for your circuit’s load and length. Avoid using damaged or old cables. Proper cable ensures safe and reliable power.
Run Cable From Switch To Outlet
Measure the distance from the switch box to outlet spot. Cut cable a bit longer than the distance. Feed cable through wall studs or ceiling joists. Use a fish tape to pull cable through tight spaces. Secure cable with staples every 12 inches. Leave extra cable length inside boxes for connections.

Credit: www.youtube.com
Install The New Outlet Box
Installing the new outlet box is a key step in adding an outlet off a light switch. This task requires care and accuracy to ensure safety and function. The outlet box holds the new outlet securely and protects the wiring inside the wall.
Choose the right type of box for your wall. It must fit the space and hold the outlet firmly. Follow these steps to install the box correctly.
Locate The Position For The New Outlet Box
Mark the spot where the new outlet will go. It should be near the existing switch box. Use a level to keep it straight on the wall. Make sure there is enough space behind the wall for the box.
Cut The Hole In The Wall
Use a drywall saw to cut along the marked outline. Cut slowly to avoid damaging wires or pipes inside the wall. Check the hole size by placing the outlet box inside. Adjust the hole if needed for a snug fit.
Run The Electrical Cable To The New Box
Pull the cable from the switch box to the new outlet box hole. Leave extra cable length inside the box for easy connections. Use fish tape or wire puller if the cable runs through wall studs.
Secure The Outlet Box In Place
Insert the box into the hole in the wall. Use screws or built-in clamps to hold the box tight. The box should not move or wiggle. Check that it sits flush with the wall surface.
Connect Wires To The Outlet
Connecting wires to the outlet is a key step in adding an outlet off a light switch. This step ensures the outlet receives power safely and works properly. Understanding how to connect the wires helps avoid mistakes and keeps your home safe.
Before starting, make sure the power is off at the breaker. Use a voltage tester to confirm no electricity flows to the wires. Safety first.
Identify The Wires
Look at the wires coming from the switch box. Usually, you will see a black (hot), white (neutral), and bare copper or green (ground) wire. Each wire has a specific role in the electrical circuit.
Prepare The Outlet
Choose a standard outlet for the connection. Loosen the screws on the side to attach the wires. Make sure the outlet matches your home’s electrical system, usually 120 volts.
Connect The Hot Wire
Attach the black wire to the brass-colored screw on the outlet. Tighten the screw firmly to hold the wire in place. This wire carries the power from the switch to the outlet.
Connect The Neutral Wire
Attach the white wire to the silver-colored screw on the outlet. Make sure the wire is secure under the screw. This wire completes the electrical circuit.
Connect The Ground Wire
Attach the bare copper or green wire to the green grounding screw on the outlet. This wire protects against electric shock by grounding the outlet.
Double-check Connections
Check that all wires are tight and in the correct positions. Loose connections can cause sparks or power loss. Safety depends on proper wiring.
Secure The Outlet In The Box
Push the wired outlet back into the electrical box carefully. Screw it in place to keep it stable. Attach the outlet cover plate to finish the setup.
Modify Light Switch Wiring
Adding an outlet from a light switch lets you power devices easily. Start by turning off the power and checking the wiring inside the switch box. Connect the new outlet wires carefully, following safety rules to avoid shocks.
Understanding The Existing Wiring
Start by turning off the power at the circuit breaker. Use a voltage tester to check the wires in the switch box. Identify the hot wire, neutral wire, and ground wire. The hot wire usually connects to the switch terminal. The neutral wire often bypasses the switch and runs directly to the light. Understanding these wires is key to safe modification.
Disconnecting The Light Switch
Remove the switch cover plate carefully. Unscrew the switch from the electrical box. Note how wires are connected to the switch. Take a photo for reference if needed. Gently disconnect the wires, keeping them separated to avoid accidental contact.
Adding A Pigtail For The Outlet
Create a pigtail by twisting a new wire with the hot wire from the switch. Use a wire nut to secure the connection. This pigtail will supply power to the new outlet. Attach the pigtail to the switch terminal where the hot wire was connected. This allows both the switch and the outlet to receive power.
Connecting The Neutral And Ground Wires
Find the bundle of neutral wires in the box. Add a new neutral wire by twisting it with the existing neutrals. Secure with a wire nut. Repeat the same process for the ground wires. Ensure the new wires are the same gauge as the existing ones. Proper grounding is vital for safety.
Testing The Modified Wiring
Before closing the box, turn the power back on. Use a voltage tester to check the outlet’s terminals. The outlet should have power regardless of the switch position. The switch should still control the light. If all works correctly, turn off the power again to finish the installation.
Secure All Connections
Securing all connections is a key step when adding an outlet off a light switch. Loose or poor connections cause electrical problems or hazards. Take time to make each connection tight and safe. This ensures the new outlet works well and stays reliable over time.
Use the right tools and materials for every connection. Double-check each wire and terminal before closing the outlet box. Safety and proper function depend on good connections.
Check Wire Stripping Length
Strip the wires to the correct length. Too much exposed wire can cause shorts. Too little wire makes weak connections. Aim for about half an inch of bare wire.
Tighten Terminal Screws Firmly
Wrap wires around terminal screws clockwise. Tighten screws firmly but do not over-tighten. Loose screws cause sparks. Over-tightening may break the wire or screw.
Use Wire Nuts Correctly
Twist wires together neatly before adding wire nuts. Push the wire nut on until it feels tight. Tug wires gently to confirm they hold well inside.
Inspect Ground Connections
Connect the ground wire to the outlet’s green screw. Ground wires prevent shocks. Make sure the ground wire is secure and unbroken.
Organize Wires Inside The Box
Place wires neatly inside the outlet box. Avoid crowding or pinching wires. Proper wire placement prevents damage and makes the outlet easier to install.
Test The New Outlet
Testing the new outlet is a key step after installation. It ensures the outlet works correctly and is safe to use. Skipping this step can lead to problems or hazards later. Take time to test carefully.
Use A Voltage Tester
Start by using a voltage tester. Touch the tester’s probes to the outlet slots. The tester should show power if the outlet is live. No power means a wiring issue. Fix any problems before use.
Check The Outlet With A Plug-in Device
Plug a small device like a lamp or phone charger into the outlet. Turn on the device to see if it works. If it turns on, the outlet is functioning. If not, recheck your connections.
Test The Ground Connection
Use a three-prong outlet tester to check grounding. Proper grounding is important for safety. The tester will show if the ground is correct or missing. Fix grounding issues immediately.
Confirm The Switch Controls The Outlet
Flip the light switch on and off. Observe if the outlet turns power on and off too. This confirms the outlet is wired to the switch properly. If not, review wiring steps carefully.
Replace Covers And Clean Up
After installing the new outlet off a light switch, it is important to replace the covers and clean up the area. This step makes your work look neat and protects the wiring inside the wall. It also helps keep dust and dirt away from electrical parts.
Taking time to carefully replace covers and tidy up adds a professional touch to your project. It ensures safety and improves the overall appearance of the room.
Replace The Outlet And Switch Covers
Start by placing the outlet cover back on the new outlet. Use a screwdriver to tighten the screws securely. Do not overtighten to avoid cracking the cover. Next, replace the cover on the light switch. Make sure both covers sit flat against the wall. Check that no wires are visible or pinched under the covers.
Clean The Work Area
Remove any debris or dust from the workspace. Use a dry cloth to wipe around the outlet and switch. Clean the wall surface carefully without damaging paint or wallpaper. Remove tools and leftover materials to keep the area safe. Proper cleanup prevents accidents and keeps your home tidy.
Test The Outlet And Switch
After replacing covers, test the outlet to confirm it works correctly. Plug in a small device or lamp to check power. Flip the switch on and off to ensure it controls the outlet as expected. Testing verifies your installation is successful and safe to use.
Troubleshooting Common Issues
Adding an outlet off a light switch can sometimes lead to common issues. These problems can stop your outlet from working properly. Knowing how to fix them saves time and frustration. Here are some simple troubleshooting tips to help you get the job done right.
Check The Circuit Breaker
First, look at your home’s circuit breaker panel. A tripped breaker can cut power to the outlet. Flip the breaker off and then back on to reset it. This often restores power quickly.
Verify Wiring Connections
Loose or wrong wiring is a common cause of outlet problems. Turn off the power before inspecting wires. Ensure all wires are tight and connected to the right terminals. Black wires go to brass screws, white wires to silver screws.
Test The Outlet With A Voltage Tester
Use a voltage tester to check if electricity reaches the outlet. This tool shows if power flows through the wires. No power means a wiring or breaker issue. Power present but no outlet function may mean a faulty outlet.
Inspect The Light Switch
The switch controlling the outlet may have issues. Switch off the power and check switch wiring. Replace the switch if it looks damaged or old. A bad switch can stop the outlet from working.
Look For Gfci Or Afci Protection
Some outlets have special breakers for safety. These include GFCI or AFCI devices. They can trip and cut power to the outlet. Press the reset button on these devices to restore power.
Credit: www.reddit.com
Frequently Asked Questions
How Do I Add An Outlet From A Light Switch?
To add an outlet from a light switch, turn off power first. Connect wiring from the switch box to the new outlet. Use a proper electrical box and secure all connections. Follow local codes and test the outlet after installation.
Can I Use Existing Switch Wiring For An Outlet?
Yes, you can use existing switch wiring if it has a constant power source. Identify the hot, neutral, and ground wires. Ensure the wiring gauge matches outlet requirements. Always turn off power before working and verify connections with a tester.
What Tools Are Needed To Add An Outlet Off A Switch?
You need a voltage tester, wire stripper, screwdriver, electrical box, outlet, wire nuts, and cable. Always have safety gloves and a flashlight handy. These tools help ensure a safe and efficient installation process.
Is It Safe To Add An Outlet Off A Light Switch?
Yes, it is safe if done correctly with power off. Use proper wiring, follow electrical codes, and secure all connections. If unsure, consult a licensed electrician to avoid hazards and ensure compliance with safety standards.
Conclusion
Adding an outlet off a light switch can save space and add convenience. Follow safety steps carefully to avoid risks. Use the right tools and check local codes before starting. Take your time and double-check connections for best results. This simple project can make your home more functional.
Always prioritize safety and consider asking a professional if unsure. With patience, you can complete this task confidently.