Have you ever wanted to control your lights with a simple flick of a switch but didn’t know where to start? Adding a switch to a light can seem tricky, but it doesn’t have to be.
Imagine the ease of turning your lights on and off exactly when you want, saving energy and making your space more comfortable. In this guide, you’ll discover clear, step-by-step instructions that anyone can follow—even if you’re not a pro. By the end, you’ll have the confidence to install your own switch and enjoy the convenience it brings.
Ready to make your lighting smarter and simpler? Let’s dive in.

Credit: diy.stackexchange.com
Tools And Materials Needed
Adding a switch to a light requires some basic tools and materials. These help you work safely and finish the job correctly. Prepare everything before starting the installation. This makes the process faster and smoother.
Essential Tools
Gather tools like a screwdriver, wire stripper, and voltage tester. A screwdriver helps remove and secure screws. Wire strippers remove insulation from wires without damage. A voltage tester checks if wires carry electricity. Needle-nose pliers help bend or twist wires. A drill may be needed to make holes for the switch box.
Necessary Materials
You need a light switch that fits your circuit type. Electrical wires connect the switch to the light and power source. A switch box holds the switch securely on the wall. Wire nuts join wires safely. Electrical tape insulates and protects wire connections. Choose materials that match your home’s electrical system.
Safety Gear
Wear safety glasses to protect eyes from dust and sparks. Use insulated gloves to avoid electric shocks. Keep a fire extinguisher nearby for emergencies. Proper safety gear prevents accidents during the installation.

Credit: www.youtube.com
Safety Precautions
Safety comes first when adding a switch to a light. Working with electricity can be risky without proper care. Taking the right precautions keeps you safe and prevents damage. Follow these safety steps before starting your project.
Turn Off The Power
Switch off the circuit breaker or remove the fuse for the light you will work on. Double-check that the power is off by testing the wires with a voltage tester. Never work on live wires.
Use Proper Tools And Equipment
Choose insulated tools made for electrical work. Wear rubber-soled shoes and avoid working in wet areas. Use a sturdy ladder if you need to reach high places. Safety gear matters.
Understand The Wiring
Know the wire colors and their functions before cutting or connecting. Follow local electrical codes and instructions from the switch manufacturer. Mistakes in wiring cause shorts or shocks.
Work In A Well-lit Area
Good lighting helps you see wires and connections clearly. Avoid working in dim or dark places. Clear your workspace to avoid accidents or mistakes.
Ask For Help If Unsure
Contact a licensed electrician if you feel confused or unsafe. Electrical work can be dangerous for beginners. It is better to get professional help than risk injury.
Locating The Power Source
Finding the power source is the first step to add a switch to a light. It means knowing where the electricity comes from. This helps you connect the switch safely and correctly.
Power usually comes from the circuit breaker or fuse box. The wires run through walls and ceilings. You must trace these wires to find the right spot for the switch.
Identify The Circuit Breaker
Locate the circuit breaker box in your home. It is often in a basement or utility room. Look for labels that show which breaker controls the light.
Turn Off The Power
Switch off the breaker to cut power to the light. Use a voltage tester to confirm no electricity flows. Safety is very important during this step.
Trace The Wiring
Look inside the light fixture or outlet box. Find the wires that carry power to the light. Follow these wires to decide where to place the switch.
Turning Off The Electricity
Turning off the electricity is the first step before adding a switch to a light. This step keeps you safe. Electricity can cause shocks or injuries if not handled properly. Always make sure power is off before starting any electrical work.
Turning off the electricity also protects your tools and wiring. It prevents short circuits and damage to your home’s electrical system. Safety must come first in every electrical project.
Locate The Circuit Breaker
Find the main electrical panel in your home. It is usually in the basement, garage, or utility room. Look for the circuit breaker that controls the light you want to work on. The breaker will have a label or number.
Switch Off The Correct Breaker
Flip the switch to the OFF position. This stops the flow of electricity to the light fixture. Double-check by turning the light on to confirm the power is off. Never assume the power is off without testing.
Use A Voltage Tester
Before touching any wires, use a voltage tester. This tool checks for electric current. Test all wires in the light fixture and switch box. If the tester shows no power, you are safe to proceed.
Wear Safety Gear
Put on insulated gloves and safety glasses. These protect you from electric shocks and debris. Safety gear is simple but very important. It reduces the risk of injury.
Removing The Existing Fixture Or Outlet
Removing the existing fixture or outlet is the first step in adding a switch to a light. This step clears the area and makes room for new wiring and the switch. It also helps you understand how the current wiring works. Safety is key during this process.
Turn off the power at the circuit breaker. This prevents electric shock while working.
Gather Necessary Tools
Use a screwdriver, voltage tester, and wire cutters. These tools help you safely remove the fixture or outlet. Have a flashlight ready for better visibility.
Remove The Fixture Or Outlet Cover
Unscrew the cover plate carefully. Set screws aside in a safe place. Removing the cover exposes the wiring behind it.
Test For Power
Use a voltage tester on the wires. Confirm there is no electricity flowing. This step ensures safety before touching wires.
Disconnect The Wires
Loosen the screws holding the wires. Gently pull wires free from the fixture or outlet. Keep track of which wire connects where.
Remove The Fixture Or Outlet From The Box
Unscrew the mounting screws holding the fixture or outlet. Carefully pull it out from the electrical box. Clear the space for installing the new switch.
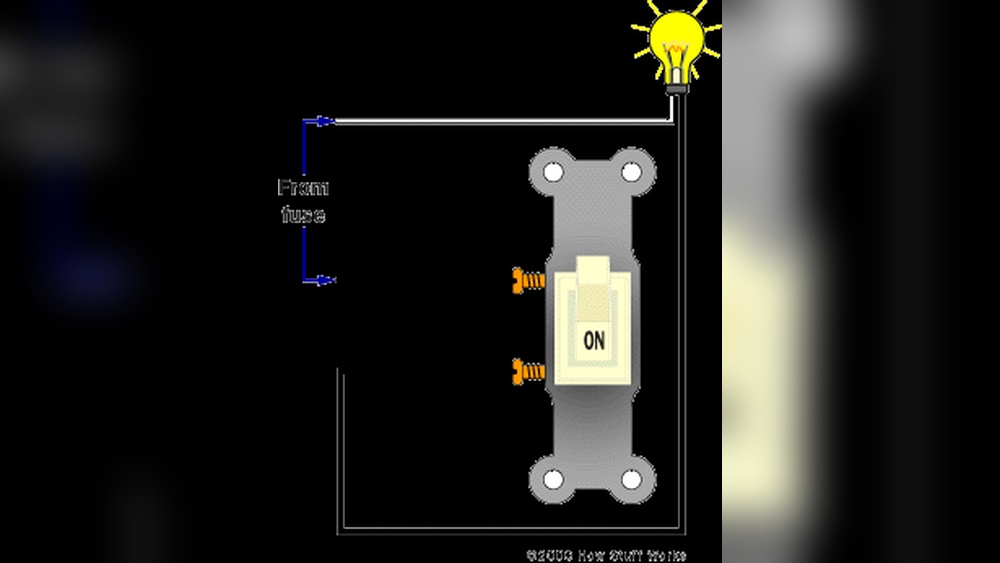
Wiring The Switch
Wiring the switch is a key step in adding a switch to a light. It controls the flow of electricity to the light. Proper wiring ensures the light works safely and correctly. Understanding the wires and how to connect them is essential before starting.
Identifying Wires
First, turn off the power at the breaker. Use a voltage tester to confirm no power is present. Most homes have three types of wires: hot, neutral, and ground. The hot wire carries electricity from the power source. It is usually black or red. The neutral wire completes the circuit and is often white. The ground wire is green or bare copper. It protects from electrical shocks.
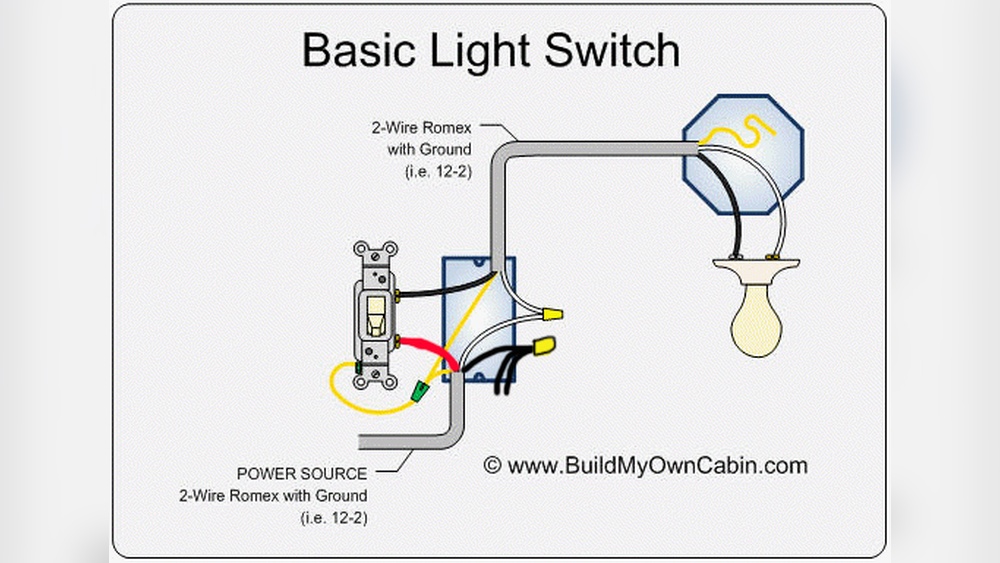
Connecting Wires To The Switch
Connect the hot wire to one screw on the switch. This is usually a brass-colored screw. Attach the other hot wire from the light to the other screw on the switch. The neutral wires should be joined together with a wire nut, not connected to the switch. Connect the ground wire to the green screw on the switch. Make sure all connections are tight and secure. Carefully tuck the wires into the box before attaching the switch plate.
Installing The Switch Box
Installing the switch box is a key step in adding a switch to a light. It holds the switch safely and makes wiring easier. Correct placement of the box ensures easy access and a neat finish.
Before you start, turn off the power at the circuit breaker. Safety first. Use a voltage tester to check no current is flowing where you will work.
Choose The Right Location
Pick a spot near the light fixture or where the switch is easy to reach. The box should be at a comfortable height, usually about 48 inches from the floor. Avoid placing it too close to corners or door frames.
Mark And Cut The Wall
Use the switch box as a template. Trace its outline on the wall. Double-check the measurements before cutting. Use a drywall saw or utility knife to make a clean hole in the wall.
Secure The Switch Box
Insert the box into the hole. Use screws or nails to fix it tightly to a wall stud or support. Make sure it does not move. A secure box keeps the switch stable and safe.
Prepare For Wiring
Leave enough space for the wires to enter the box easily. Remove any insulation around the hole carefully. This step helps prevent damage to the wires and keeps the installation tidy.
Mounting The Switch And Cover Plate
Mounting the switch and cover plate is a key step in adding a light switch. This step secures the switch in place and protects the wiring inside the wall. A properly mounted switch looks neat and works safely.
Follow careful steps to fit the switch and cover plate correctly. Use the right tools and take your time. This helps avoid damage and ensures the switch functions well.
Prepare The Switch Box
Start by checking the switch box in the wall. It must be clean and free of dust or debris. Clear any obstacles that block the switch from sitting flat. This creates a stable base for mounting.
Attach The Switch To The Box
Hold the switch inside the box, aligning the screw holes. Use a screwdriver to tighten the mounting screws gently. Avoid overtightening, which can crack the switch or box.
Install The Cover Plate
Place the cover plate over the switch once it is secure. Align the holes and insert the screws. Tighten the screws evenly to keep the plate flat against the wall.
Restoring Power And Testing
After installing a new switch, restoring power is the next step. This step is important to check if the switch works properly. Safety is key while turning the power back on.
Testing the switch helps find any wiring problems early. It ensures the light turns on and off as expected. Follow the steps carefully to avoid damage or injury.
Turn The Circuit Breaker On
Go to your home’s electrical panel. Find the circuit breaker for the light you worked on. Flip the breaker switch to the ON position. This restores power to the switch and light fixture.
Check The Switch Operation
Stand near the installed switch. Flip it up and down several times. The light should respond instantly. If it doesn’t, double-check your wiring connections.
Look For Any Issues
Watch for flickering or dim light. Listen for buzzing sounds from the switch. These signs may mean a loose wire or wrong connection. Turn the breaker off before fixing any problems.
Use A Voltage Tester
Use a voltage tester to confirm power at the switch. Place the tester on the switch terminals. It should show power when the switch is ON. No power means a wiring issue or breaker problem.

Credit: www.do-it-yourself-help.com
Troubleshooting Common Issues
Adding a switch to a light can sometimes cause small problems. These issues are common and easy to fix. Knowing what to check saves time and effort. This section covers common problems and how to solve them quickly.
Check The Power Supply
First, ensure the power is on. A tripped breaker or blown fuse stops electricity. Test the outlet or light socket with a tester. No power means no light or switch function. Reset breakers or replace fuses if needed.
Inspect Switch Wiring
Loose or incorrect wiring causes the switch to fail. Turn off power before touching wires. Check all connections are tight and correct. Use a wiring diagram for guidance. Wrong wires can stop the light from turning on.
Test The Light Bulb
A burned-out bulb is a simple cause of light failure. Replace the bulb with a new one. Use the right wattage for the fixture. A good bulb rules out this common issue.
Examine The Switch Itself
Faulty switches do not work properly. Use a multimeter to test switch continuity. A broken switch needs replacement. Choose a switch rated for your light’s load.
Look For Loose Connections At The Fixture
Loose wires at the light fixture cause flickering or no light. Turn off power before inspection. Tighten any loose wire nuts or screws. Secure connections ensure steady power flow.
Frequently Asked Questions
How Do I Safely Add A Switch To A Light?
Turn off the power at the breaker before starting. Use a voltage tester to ensure no current flows. Follow wiring diagrams carefully and use proper tools. If unsure, consult a licensed electrician to avoid hazards.
What Tools Are Needed To Install A Light Switch?
You need a screwdriver, wire stripper, voltage tester, and electrical tape. A drill may help for mounting the switch box. Having a wire connector and pliers also makes the installation easier and safer.
Can I Add A Switch To An Existing Light Fixture?
Yes, you can add a switch by cutting power and rewiring. Connect the switch inline with the fixture’s hot wire. Ensure all connections are secure and insulated before restoring power.
What Type Of Switch Works Best For Lighting?
A standard single-pole switch is best for simple light control. For multiple switch control, consider a three-way switch. Choose switches rated for the light’s voltage and current for safety.
Conclusion
Adding a switch to a light can improve your home’s comfort and safety. Always turn off the power before starting any work. Use the right tools and follow the steps carefully. Check your connections to avoid problems later. A simple switch can make your lighting more convenient.
With patience, you can do this yourself. Enjoy the satisfaction of completing a useful home project. Keep learning and improving your skills with each task. Safe wiring means a safer home for everyone.