Have you ever wondered how a simple flick of a switch can light up an entire room? Building your own light switch might sound tricky, but with the right steps, you can do it yourself and save money.
Imagine the satisfaction of controlling your home’s lighting with something you made. In this guide, you’ll discover easy, clear instructions that anyone can follow—even if you’ve never worked with electrical parts before. Ready to take control and learn a skill that can brighten your space and your day?
Keep reading to find out how to build a light switch from start to finish.

Credit: www.youtube.com
Tools And Materials Needed
Building a light switch is a simple and useful project. Having the right tools and materials makes the task easier and safer. This section lists everything you need before starting.
Essential Tools
A few basic tools will help you build the switch correctly. You need a screwdriver to open and close the switch cover. Wire strippers remove the insulation from the wires. A voltage tester checks if the wires carry current. Pliers help bend and hold wires firmly. A drill might be needed to make holes for mounting.
Required Materials
The right materials ensure the switch works well and lasts long. You need a light switch unit, which controls the electrical flow. Electrical wires connect the switch to the power source and the light. Wire connectors join wires securely and safely. An electrical box holds the switch inside the wall. Use electrical tape to cover exposed wire parts.
Safety Gear
Safety is very important while working with electricity. Wear insulated gloves to protect your hands from shocks. Safety glasses guard your eyes from sparks or debris. Use shoes with rubber soles to avoid electrical grounding. Always turn off the power supply before starting any work. Double-check safety gear before handling wires.

Credit: www.youtube.com
Types Of Light Switches
Light switches control the flow of electricity to lights. Different types fit various needs and wiring setups. Choosing the right switch ensures easy use and safety.
Single-pole Switch
A single-pole switch controls one light or set of lights. It has two terminals and one toggle. This switch turns lights on or off from one place. It is the most common and simple type.
Three-way Switch
A three-way switch controls lights from two locations. It has three terminals and works with another three-way switch. Common in hallways or large rooms with two entrances. This switch lets you turn lights on or off from two spots.
Dimmer Switch
A dimmer switch adjusts light brightness. It works by changing the power flow to the bulb. Useful for mood lighting or saving energy. It may have a knob, slider, or touch control. Dimmer switches fit many room styles.
Preparing The Workspace
Preparing the workspace is the first step in building a light switch. A clean and safe area helps you work faster and avoid mistakes. Take time to get ready before starting the project. This saves effort and keeps you safe.
Turning Off Power
Always turn off the power before working on any electrical project. Find the correct circuit breaker and switch it off. Use a voltage tester to confirm there is no electricity. This step prevents shocks and accidents.
Clearing The Area
Remove any objects near your workspace. Clear tables, floors, and walls around the switch area. A tidy space helps you move freely and keeps tools organized. Avoid distractions and hazards.
Gathering Supplies
Collect all needed tools and materials before you start. Common items include screwdrivers, wire strippers, electrical tape, and the light switch itself. Having everything ready makes the job smooth and easy.
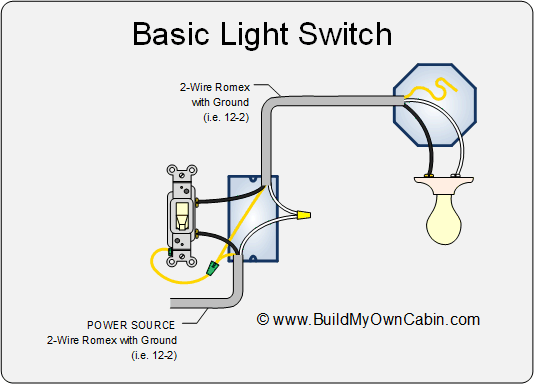
Credit: www.buildmyowncabin.com
Wiring Basics
Understanding wiring basics is key to building a light switch safely. It helps you connect the right wires and avoid mistakes. This section explains the essential steps to handle wiring with confidence.
Identifying Wires
Different wires have different jobs in a switch circuit. The common wires are live, neutral, and ground. Live wire carries electricity to the switch. Neutral wire completes the circuit back to the power source. Ground wire protects from electrical shocks. Use a voltage tester to find live wires. Check wire colors: black or red is usually live, white is neutral, and green or bare copper is ground.
Understanding Circuit Flow
Electricity flows from the power source through the live wire. It passes through the switch, then moves to the light fixture. When the switch is on, the circuit closes and lights turn on. When off, the circuit opens and stops the flow. Knowing this flow helps you connect wires in the right order. It also keeps the switch safe and functional.
Using Wire Connectors
Wire connectors join wires safely and neatly. They prevent wires from touching and causing shorts. Twist wires together, then screw on a wire connector. Make sure the wires fit tightly inside the connector. Use the right size connector for your wires. Secure connectors inside the switch box to avoid loose connections. Proper connectors keep your switch working and reduce fire risks.
Step-by-step Installation
Installing a light switch is a simple task anyone can do. This step-by-step guide helps you replace an old switch safely. Follow each step carefully to avoid mistakes. Basic tools and some patience are all you need to finish the job.
Removing Old Switch
First, turn off the power from the main circuit box. Use a screwdriver to remove the switch cover plate. Unscrew the switch from the wall box. Pull the switch out gently to see the wires. Note the wire positions or take a picture for reference.
Connecting Wires To New Switch
Match the wires with the new switch terminals. Usually, the black or red wires connect to brass screws. The white wire goes to the silver screw. Attach the ground wire to the green screw. Tighten all screws firmly to ensure a good connection.
Securing The Switch
Push the wires carefully back into the wall box. Align the switch with the screw holes. Screw the switch into the box, making it snug but not too tight. Replace the cover plate and secure it with screws. The switch should fit flush against the wall.
Testing The Installation
Turn the power back on at the circuit box. Flip the switch to check if the light works. If it does not, turn off power and recheck wire connections. Once confirmed, test the switch several times to ensure it operates smoothly. Your new switch is ready to use.
Troubleshooting Tips
Troubleshooting is key when building a light switch. It helps you fix problems quickly and safely. Understanding common issues can save time and prevent damage. Simple fixes often solve many problems. Knowing when to ask for help keeps you safe.
Common Issues
Light switches may not work due to several reasons. The switch might feel loose or not click properly. Sometimes, the light bulb is the problem. Worn-out wires can cause flickering or no light. Dirt or dust inside the switch can block connections.
Fixing Loose Connections
Loose connections are a frequent cause of switch failure. Turn off the power before checking wires. Tighten any screws holding wires to the switch. Make sure wires are wrapped well around screws. If wires are damaged, cut and strip them again. Secure all parts firmly to avoid future problems.
When To Call A Professional
Call a professional if you see sparks or smell burning. Avoid fixing issues if you feel unsure. Complex wiring or repeated problems need expert help. Professionals prevent hazards and ensure a safe repair. Protect yourself by knowing your limits.
Enhancing Your Setup
Enhancing your light switch setup can make your home more functional and stylish. Small changes can improve how you control lighting and how the switch looks. This section shows easy ways to upgrade your light switch installation.
These tips help you create a better lighting experience for every room.
Adding Smart Switch Features
Smart switches let you control lights using a phone or voice commands. They add convenience and save energy by scheduling lights to turn on or off. Installing a smart switch is simple and fits into your existing wiring. You can choose models with dimming or color options for more control.
Installing Multiple Switches
Multiple switches control one light from different places. This setup is useful for long hallways or large rooms. You need special wiring called three-way or four-way switches. It lets you turn lights on or off from several spots. This setup improves safety and comfort at home.
Improving Aesthetics
Choose switch plates that match your room’s style. Materials like wood, metal, or glass add a nice touch. Color and texture can blend with walls or stand out as design elements. Keep switch size and shape comfortable for use. Clean and replace old plates to refresh your room’s look.
Frequently Asked Questions
What Tools Are Needed To Build A Light Switch?
To build a light switch, you need a screwdriver, wire stripper, voltage tester, pliers, and electrical tape. These tools ensure safe and precise installation. Always use insulated tools to avoid electric shocks.
How Do I Safely Wire A Light Switch?
Turn off the power before wiring. Connect the hot wire to the switch’s input terminal. Attach the output terminal to the light fixture wire. Secure all connections with wire nuts and test with a voltage tester.
Can I Use Any Wire Type For Light Switches?
Use 14-gauge wire for standard 15-amp circuits and 12-gauge for 20-amp circuits. Always choose wires rated for your home’s electrical load. Avoid using damaged or low-quality wires to ensure safety.
What Are Common Mistakes When Building A Light Switch?
Common mistakes include not turning off power, loose connections, and incorrect wiring. These errors cause short circuits or switch failure. Double-check all connections and test the switch before finishing the installation.
Conclusion
Building a light switch can be simple and rewarding. Follow the steps carefully for safety and success. Use the right tools and materials for best results. Take your time and double-check each connection. Practice will help you feel more confident.
Now, you know how to create a basic light switch. Keep learning and trying new projects. Small skills lead to big improvements. Stay safe and enjoy your work.