
Are you ready to transform your space by adding a wood stud wall to your brick surface? Anchoring a wood stud wall to brick may sound tricky, but with the right steps, you can do it yourself and get solid, lasting results.
Imagine having a sturdy frame to hang shelves, pictures, or even create a new room divider. In this guide, you’ll discover simple techniques and tips that make the process clear and manageable. Keep reading, and soon you’ll have the confidence to tackle this project like a pro.
Tools And Materials Needed
Anchoring a wood stud wall to brick requires the right tools and materials. Using proper equipment ensures a strong, safe connection. Prepare before starting to save time and avoid mistakes.
Essential Tools
You need a hammer drill to make holes in the brick. A screwdriver or drill with a driver bit helps insert anchors. Use a tape measure for accurate measurements. A level keeps the wall straight. Safety glasses protect your eyes. A pencil marks drill points clearly.
Recommended Anchors
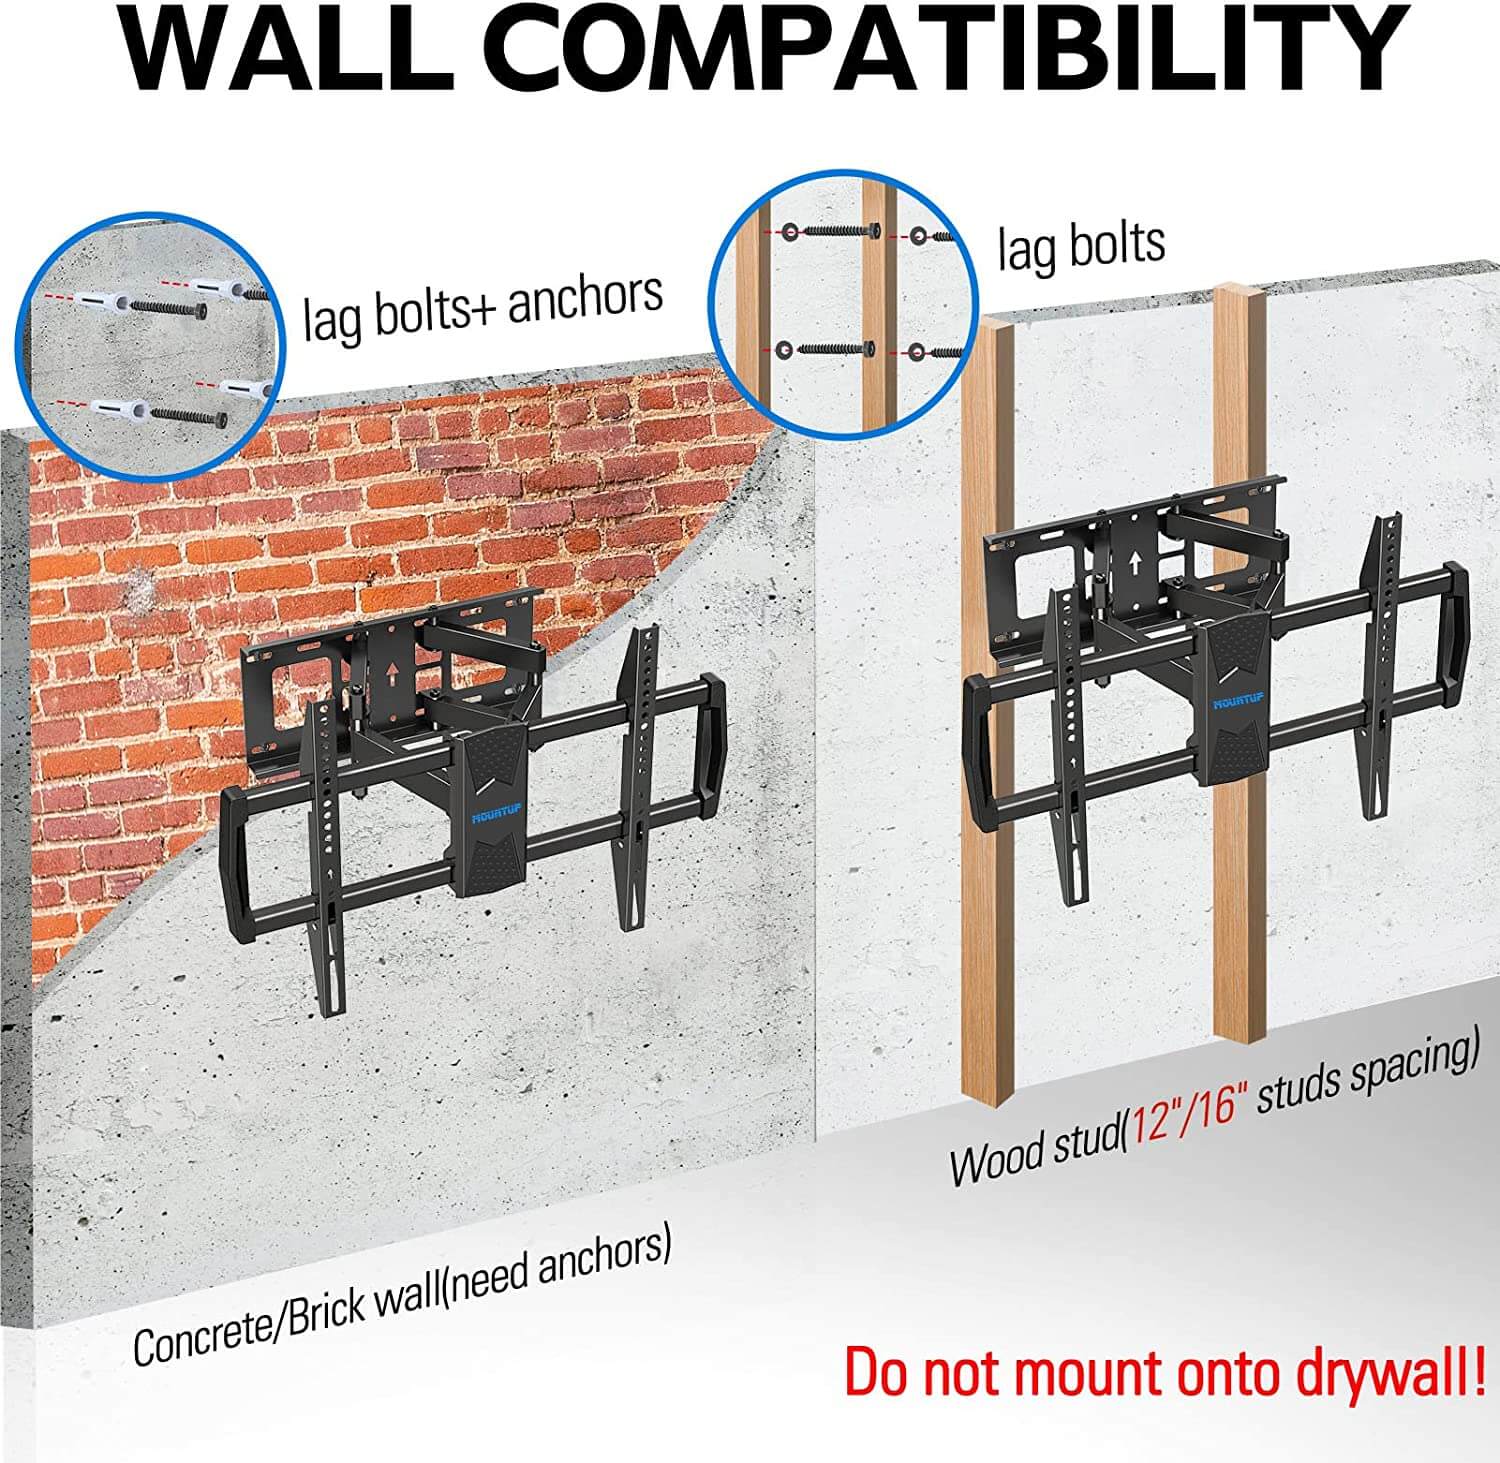
Choose anchors made for brick walls. Sleeve anchors work well for heavy loads. Tapcon screws are good for medium-weight walls. Plastic wall plugs fit small holes but hold less weight. Pick anchors that match the wall weight and thickness.
Wood Stud Selection
Use dry, straight wood studs for the frame. Common sizes are 2×4 or 2×6 inches. Pressure-treated wood lasts longer and resists moisture. Check for cracks or warping before use. Quality wood makes the wall strong and stable.
Preparing The Brick Wall
Preparing the brick wall is a key step before anchoring a wood stud wall. A clean and well-marked surface helps secure the studs firmly. This process makes the installation safer and stronger. Follow simple steps to get the wall ready for anchoring.
Cleaning The Surface
Start by removing dust, dirt, and loose mortar from the brick wall. Use a stiff brush or broom to sweep the surface. Dirt can stop anchors from gripping tightly. Make sure the wall is dry before moving to the next step. A clean surface improves the hold of the anchors.
Marking Anchor Points
Next, mark where the wood studs will attach to the brick wall. Use a pencil and a level to draw straight lines. Mark points every 16 or 24 inches to match standard stud spacing. Clear marks guide drilling and ensure even support. Accurate marking saves time and effort during installation.
Measuring And Cutting Studs
Measuring and cutting wood studs correctly is the key to a strong stud wall. This step sets the foundation for the entire wall. Accurate measurements ensure each stud fits perfectly between the floor and ceiling. Proper cutting techniques keep the wood straight and safe to handle. Care here saves time and effort later.
Accurate Measurements
Start by measuring the height between the floor and the ceiling. Use a tape measure and write down the exact number. Measure twice to avoid mistakes. Mark the measurement clearly on the stud with a pencil. Make sure the mark is straight across the wood. Consistent marks help when cutting multiple studs.
Cutting Techniques
Use a saw suited for wood, like a handsaw or circular saw. Place the stud on a flat surface before cutting. Align the saw blade with the pencil mark. Cut slowly and steadily to keep the line straight. Wear safety gear like goggles and gloves. Smooth the edges with sandpaper to prevent splinters.
Credit: mountup.com
Drilling Into Brick
Drilling into brick is a key step when anchoring a wood stud wall. It creates strong holes for anchors and screws. This task needs the right tools and care to avoid damage.
Choosing The Right Drill Bit
Use a masonry drill bit for brick surfaces. These bits have a special tip made of carbide. The tip helps cut through hard brick without cracking it. Pick a bit size matching your anchor diameter. A larger bit can make holes too loose. A smaller bit makes it hard to insert anchors.
Drilling Tips
Start with a small pilot hole to guide the drill. Hold the drill steady and straight to avoid angled holes. Use a slow speed to prevent overheating the bit. Do not push too hard; let the drill do the work. Clear dust from the hole often with a brush or air blower. This helps anchors fit tightly and hold better.
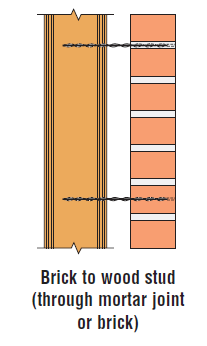
Installing Anchors
Installing anchors is a key step in securing a wood stud wall to a brick surface. Anchors hold the wall firmly in place. They prevent movement and ensure stability. Choosing the right anchors and placing them correctly matters a lot. This section explains the types of anchors and how to place them properly.
Types Of Anchors
Several anchors work well for wood stud walls and brick. Sleeve anchors are strong and easy to install. They expand inside the hole to grip the brick tightly.
Tapcon screws are another option. These screws cut threads into the brick, providing a solid hold.
Plastic anchors are good for light loads. They expand when the screw goes in but are not as strong as metal anchors.
Choose anchors based on the wall weight and brick type. Metal anchors work best for heavy walls.
Proper Anchor Placement
Place anchors evenly along the wall frame. Keep a distance of 16 to 24 inches between anchors. This spacing matches common stud intervals.
Position anchors near the top and bottom of the wall for balance. Avoid placing anchors too close to the edges of bricks to prevent cracking.
Mark anchor spots carefully before drilling. Use a level to ensure the wall stays straight. Proper placement helps the wall stay secure and last longer.
Attaching The Wood Studs
Attaching wood studs to a brick wall is a key step in building a strong frame. The studs must hold firmly to support drywall or other materials. This part explains how to secure the wood studs properly. Follow these tips to ensure a solid and even setup.
Securing With Screws
First, place the wood stud against the brick wall. Use a power drill with masonry drill bits to make pilot holes through the stud and into the brick. Insert concrete screws or masonry anchors to fasten the stud tightly. Tighten the screws evenly to avoid gaps. Check that each screw is deep enough to hold well. This method keeps the studs stable and safe.
Ensuring Level Alignment
Use a spirit level on the stud to check vertical alignment. Adjust the stud until it stands perfectly straight. Mark the position on the brick for consistent placement. Secure the stud temporarily with clamps if needed. Make sure all studs line up evenly before final fastening. Proper alignment prevents walls from leaning or warping later.
Checking Stability
Checking stability is an essential step after anchoring a wood stud wall to brick. It ensures the wall is secure and safe for further work. A stable wall will not wobble or shift under pressure. This step helps avoid future repairs and accidents.
Testing The Wall Support
Start by gently pushing the wood stud wall from different angles. Watch for any movement or looseness. Use a level to check if the wall stands straight. Listen for any creaks or unusual sounds. These signs may indicate weak spots. Confirm all anchor points hold tight against the brick.
Adjustments If Needed
If the wall moves or feels unstable, tighten the anchors. Replace any damaged or weak fasteners. Add extra anchors in areas that feel loose. Check the brick surface for cracks or crumbling. Repair any brick damage before reattaching the wall. Small adjustments improve the wall’s strength and safety.
Credit: seblog.strongtie.com
Common Mistakes To Avoid
Anchoring a wood stud wall to brick requires care and attention. Many people make simple mistakes that weaken the wall or cause damage. Avoiding these common errors helps ensure a strong, safe installation. Here are two frequent mistakes to watch out for.
Incorrect Anchor Use
Using the wrong type of anchor can cause failure. Brick walls need anchors that expand or grip well in masonry. Avoid using anchors made for drywall or wood alone. They won’t hold tight in brick. Choose heavy-duty masonry anchors or sleeve anchors designed for brick walls. Also, don’t skip pre-drilling holes of the right size. Too large or too small holes reduce anchor strength.
Poor Measurement Practices
Incorrect measurements lead to misaligned studs and weak walls. Always measure twice before drilling. Check the spacing of studs carefully. Uneven or off-center holes can cause the wall to lean or wobble. Mark drill points clearly on both wood and brick. Use a level to keep studs straight. Consistent measurements help the wall stay secure and look professional.

Credit: brickdr.com
Frequently Asked Questions
How Do You Anchor A Wood Stud Wall To Brick?
To anchor a wood stud wall to brick, use masonry anchors or sleeve anchors. Drill holes into the brick, insert anchors, and secure the studs with screws. This ensures a stable and secure attachment between the wood and brick surfaces.
What Tools Are Needed For Anchoring Wood Studs To Brick?
You need a hammer drill, masonry bit, anchors, screws, a drill, level, and measuring tape. These tools help in drilling precise holes, placing anchors, and aligning the wood studs accurately against the brick wall.
Can I Use Regular Screws To Attach Wood Studs To Brick?
No, regular screws won’t hold in brick. Use masonry anchors or sleeve anchors designed for brick. These provide a strong grip and prevent the studs from loosening over time, ensuring a durable installation.
How Far Apart Should Wood Studs Be When Anchored To Brick?
Wood studs are typically spaced 16 inches on center for strong support. This spacing balances structural integrity and material efficiency, making the wall sturdy and easy to finish with drywall or paneling.
Conclusion
Anchoring a wood stud wall to brick takes some care and the right tools. Start by measuring and marking your spots clearly. Use strong anchors and screws to hold everything tight. Drill slowly to avoid cracking the brick. Check your wall often to keep it straight and secure.
With patience and attention, your wall will stand firm. This simple guide helps you build safely and well. Try these steps for a solid, lasting result.


