Changing a single light switch might seem tricky, but it’s easier than you think. If your switch is old, faulty, or you just want to upgrade, this guide will help you do it safely and quickly.
You don’t need to be an expert or call a professional. With simple steps and clear instructions, you’ll have your light switch replaced in no time. Keep reading, and by the end, you’ll feel confident handling this common home fix on your own.

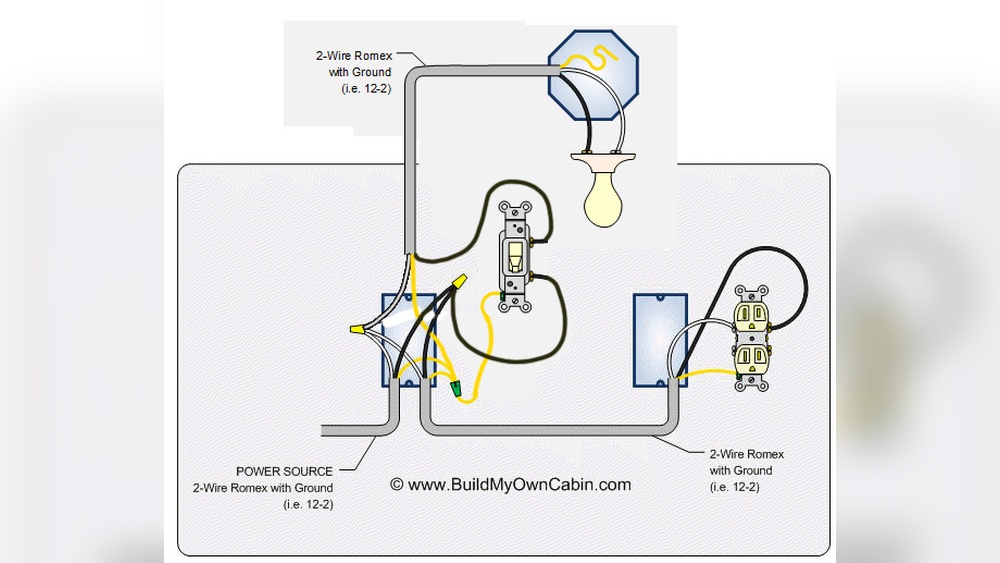
Credit: icreatables.com
Tools And Materials Needed
Changing a single light switch requires a few basic tools and materials. Having the right items makes the job faster and safer. You do not need many tools, but each one has a specific role.
Gathering everything before starting helps avoid interruptions. Safety is important, so choose tools that work well and are in good condition.
Essential Tools
A screwdriver is the main tool for this task. A flathead and a Phillips screwdriver cover most screws on light switches.
Wire strippers help remove the insulation from wires safely. They prevent damage to the wires themselves.
A voltage tester checks if the power is off. It keeps you safe from electric shock.
Pliers help twist wires together or hold them while working. Needle-nose pliers are especially handy for tight spaces.
Materials Needed
You need a new light switch that matches the old one. Single-pole switches are common for simple on/off control.
Wire connectors, also called wire nuts, join wires securely. They keep connections safe and stable.
Electrical tape adds extra protection around wire nuts and exposed wires. It prevents accidental contact.
Optional: a faceplate to cover the switch and wall opening. It keeps the area neat and safe.
Safety Precautions
Changing a single light switch requires careful attention to safety. Electrical work can be risky if you do not take the right steps. Following safety rules protects you from shocks and injuries. Before starting, learn the key precautions to keep yourself safe.
Turn Off Power At The Circuit Breaker
Always switch off the power at the main breaker. This stops electricity from flowing to the switch. Do not rely only on the wall switch to cut power. Use a circuit tester to confirm the power is off before you touch any wires.
Use Insulated Tools
Choose tools with insulated handles. These tools protect you from electric shocks. Avoid using metal tools without insulation. Always hold tools by their handles only.
Wear Safety Gear
Wear rubber-soled shoes to reduce shock risk. Use safety glasses to protect your eyes. Avoid loose clothing or jewelry that can catch wires. Keep your hands dry at all times.
Work In A Well-lit Area
Good lighting helps you see wires clearly. Avoid working in dark or dim places. Use a flashlight or portable lamp if needed. Clear the workspace of any clutter to avoid accidents.
Double-check All Connections
Inspect each wire connection before finishing. Loose wires can cause short circuits and fires. Tighten screws and secure wires properly. Use wire nuts to cover exposed wire ends.
Turn Off Power
Turning off power is the first step in changing a single light switch. It keeps you safe from electric shock. Never start work without cutting the power.
Always treat electricity with respect. Even a small mistake can cause injury. Taking time to turn off power protects you and your home.
Locate The Main Circuit Breaker
Find your home’s main circuit breaker panel. It is usually in the basement, garage, or utility room. The panel controls all electricity in the house.
Identify The Correct Breaker
Look for the breaker labeled for the room or area with the switch. It might say “lights” or the room name. If no label exists, turn off the main breaker.
Switch Off The Breaker
Flip the breaker to the off position. This stops power flow to the light switch. Double-check by trying the light switch to see if it works.
Use A Voltage Tester
Use a voltage tester to be sure power is off. Touch the tester to the wires in the switch box. No light or sound means no power.
Work Safely
Wear insulated gloves if possible. Avoid touching wires with bare hands. Safety first. If unsure, call a professional electrician.

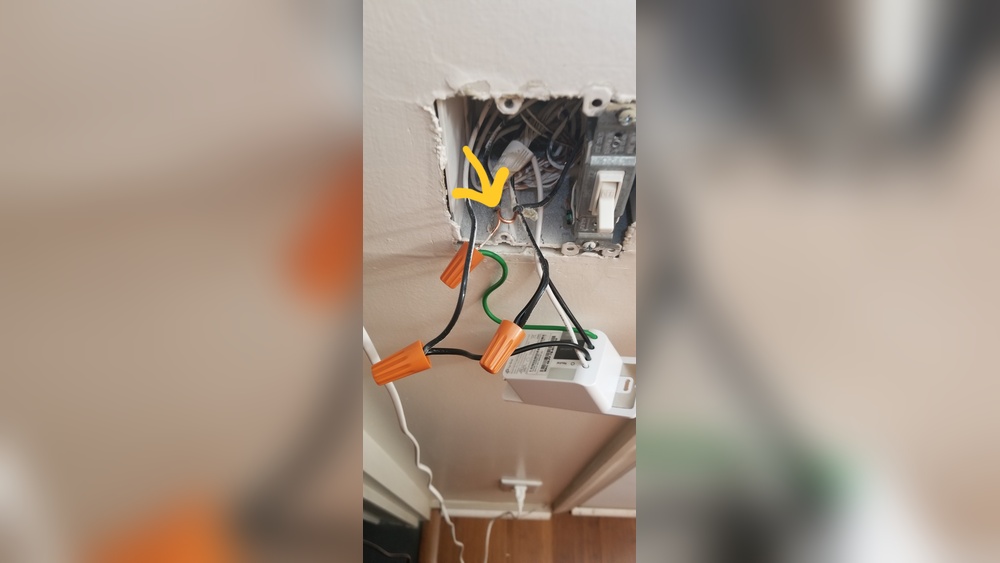
Credit: diy.stackexchange.com
Remove The Old Switch
Removing the old light switch is the first step to install a new one. It is important to do this safely and carefully. Turn off the power to the switch at the circuit breaker. This prevents any risk of electric shock. Use a tester to double-check that no electricity flows to the switch.
Next, remove the switch cover plate. This reveals the screws that hold the switch in place. Unscrew these with a screwdriver. Then, gently pull the switch out from the wall box. Be careful not to pull too hard. The wires are still connected to the back of the switch.
Turn Off The Power
Find the right circuit breaker and switch it off. Test the switch with a voltage tester. Make sure no electricity is present. Safety first.
Remove The Switch Cover Plate
Use a screwdriver to remove the screws on the cover plate. Take off the plate and set it aside. This gives you access to the switch.
Unscrew The Switch
Locate the screws holding the switch to the wall box. Use a screwdriver to remove them. Pull the switch out carefully.
Disconnect The Wires
Notice how wires connect to the switch. Use a screwdriver to loosen terminal screws. Gently remove the wires. Remember their positions for the new switch.
Identify Wires
Start by turning off the power at the breaker box. Look for the black (hot), white (neutral), and green or bare (ground) wires. Label each wire to avoid confusion when installing the new switch.
Understanding The Purpose Of Each Wire
Before changing a light switch, identify each wire carefully. Wires have different roles in the circuit. Knowing their purpose helps avoid mistakes and keeps you safe.
The common wires are the live wire, neutral wire, and ground wire. The live wire carries electricity to the switch. The neutral wire completes the circuit back to the power source. The ground wire protects against electrical shocks.
Using A Voltage Tester To Find Live Wire
A voltage tester is a simple tool to find the live wire. Touch the tester to each wire. The live wire will make the tester light up or beep. This step is important to know which wire controls the switch.
Make sure the power is on while testing. Mark the live wire with tape or a marker. This makes it easier to connect wires later.
Identifying The Neutral And Ground Wires
The neutral wire usually has white or light-colored insulation. The ground wire often has green or bare copper. Look for these colors to tell them apart.
Double-check by comparing wire colors with your home’s wiring standards. If unsure, use a continuity tester or ask an expert for help.
Labeling Wires For Easy Reconnection
Label each wire after identification. Use small pieces of tape and write the wire type. This step prevents confusion during installation.
Clear labels help you or anyone else working on the switch later. It saves time and avoids errors.
Connect The New Switch
Connecting the new light switch is a key step in changing a switch. This process involves attaching the wires to the switch properly. Doing this carefully ensures the switch works safely and correctly.
Each wire has a specific place on the new switch. Understanding where each wire goes helps prevent problems. Take your time to connect each wire firmly.
Identify The Wires
Look at the wires coming from the wall. Usually, you will see a black (hot) wire, a white (neutral) wire, and a green or bare copper (ground) wire. The black wire carries power to the switch. The white wire returns power to the light fixture. The ground wire protects against electrical faults.
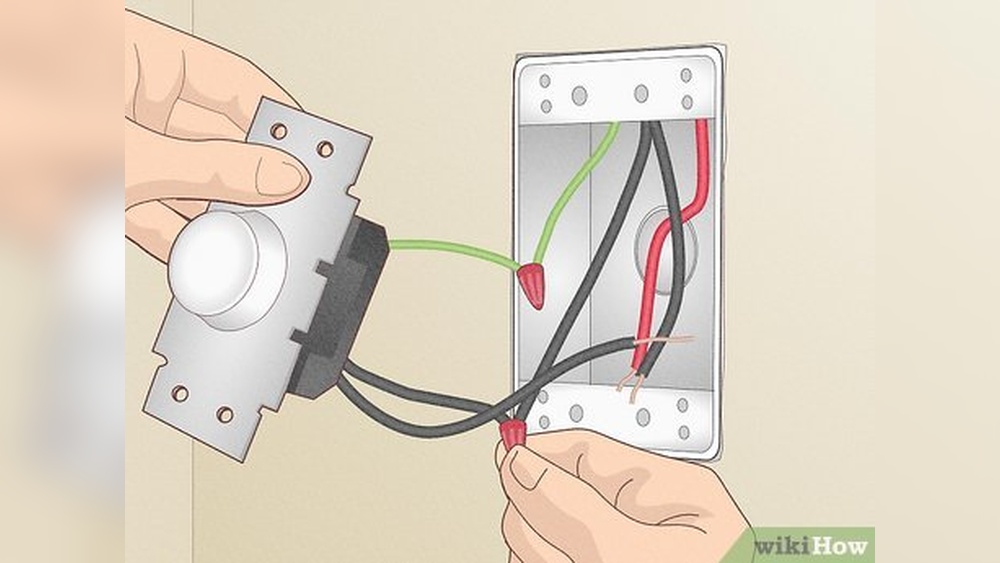
Attach The Ground Wire
Start by connecting the ground wire to the green screw on the switch. Wrap the wire around the screw in a clockwise direction. Tighten the screw firmly but do not overtighten.
Connect The Hot Wire
Next, attach the black hot wire to one of the brass screws on the switch. Loop the wire around the screw clockwise. Secure it tightly to avoid loose connections.
Connect The Neutral Wire (if Needed)
Some switches require the white neutral wire to be connected. If your switch has a silver screw, attach the neutral wire there. If not, the neutral wires should be twisted together and capped with a wire nut.
Check All Connections
Make sure all wires are secure and no bare copper is exposed. Loose connections can cause sparks or switch failure. Use pliers to tighten if needed.
Secure And Test
Securing the light switch properly is crucial to ensure safety and functionality. This step keeps wires in place and prevents electrical hazards. Testing the switch confirms that it works as expected before finishing the job.
Take your time to secure all connections tightly. Loose wires can cause flickering or short circuits. Make sure the switch fits snugly into the electrical box.
Secure The Switch In The Electrical Box
Use the screws provided to attach the switch firmly. Tighten them evenly to avoid tilting. The switch should sit flat and not wobble.
Reattach The Cover Plate
Place the cover plate over the switch carefully. Screw it in without overtightening to avoid cracking. A properly attached cover protects wires and adds a clean look.
Restore Power And Test The Switch
Turn the power back on at the breaker. Flip the switch on and off several times. Check if the light responds correctly without flickering or delay.
Check For Any Issues
Listen for buzzing sounds or unusual noises. Look for sparks or smoke. If anything seems wrong, turn off the power and inspect the wiring again.

Credit: icreatables.com
Troubleshooting Tips
Troubleshooting a single light switch can save time and frustration. Small mistakes happen. Knowing how to spot and fix problems helps you finish the job quickly. This section gives simple tips for common issues when changing a light switch.
Check The Power Supply
First, ensure the power is off. Use a voltage tester on wires. No power means it is safe to work. If power stays on, the circuit breaker might be faulty. Double check the breaker panel and switch it off again.
Inspect The Wiring Connections
Loose wires cause switches to fail. Look at each wire connection. Tighten screws on terminals. Make sure wires are wrapped clockwise around screws. This ensures a strong connection and good contact.
Test The Switch Itself
Sometimes the switch is broken. Use a multimeter to test continuity. Flip the switch on and off while testing. No continuity means the switch needs replacement. A new switch fixes the issue fast.
Look For Damaged Wires
Wires can wear out or break. Check for frayed or burnt wires. Cut off damaged parts carefully. Strip fresh wire ends before attaching. Safe wiring prevents shorts and sparks.
Confirm The Switch Type Matches
Using the wrong switch causes problems. Make sure your new switch fits the circuit type. Single-pole switches work for one light. Using a three-way switch in place of a single-pole can confuse wiring.
Frequently Asked Questions
How Do I Safely Turn Off Power Before Changing A Switch?
Turn off the circuit breaker connected to the switch. Use a voltage tester to confirm the power is off before starting work.
What Tools Do I Need To Replace A Single Light Switch?
You need a screwdriver, voltage tester, wire stripper, and the new switch. These tools ensure safe and easy replacement.
How Do I Identify Wiring On A Single Light Switch?
Look for a common wire and traveler wires. The common wire is usually darker or marked with black tape.
Can I Replace A Light Switch Without Electrician Help?
Yes, if you follow safety steps carefully. Turn off power, use correct tools, and follow wiring instructions.
Conclusion
Changing a single light switch is simple and safe with the right steps. Always turn off the power before starting work. Take your time and double-check connections. Use basic tools and follow instructions carefully. This small task can improve your home quickly.
Feel confident to handle it yourself. Practice makes the process easier next time. A well-done switch ensures your lights work smoothly. Don’t rush—safety first. Try it today and see the difference.