Are you looking to make your home smarter and more energy-efficient? Connecting a light sensor switch could be the perfect solution.
Imagine your lights turning on exactly when you need them and off when you don’t, saving you money and hassle. In this guide, you’ll learn simple, step-by-step instructions to connect your light sensor switch quickly and safely—even if you’re not an expert.
Keep reading, and by the end, you’ll have the confidence to upgrade your lighting with ease.
Choosing The Right Light Sensor Switch
Choosing the right light sensor switch is key to a successful installation. The right switch ensures your lights work automatically and save energy. It also matches your home’s wiring and lighting needs.
Understanding different types of switches helps you pick the best one. Checking if the switch fits your home wiring avoids installation problems.
Types Of Light Sensor Switches
Photoelectric switches react to natural light. They turn lights off during the day and on at night.
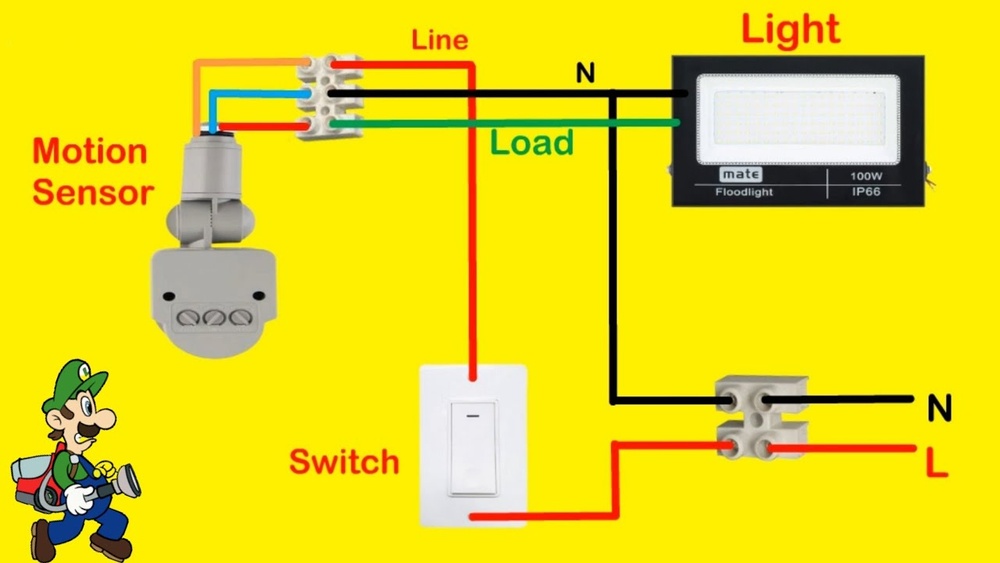
Motion sensor switches detect movement to control lighting. They work well in hallways or rooms that are not used often.
Some switches combine both light and motion sensors. They save more energy by using both methods.
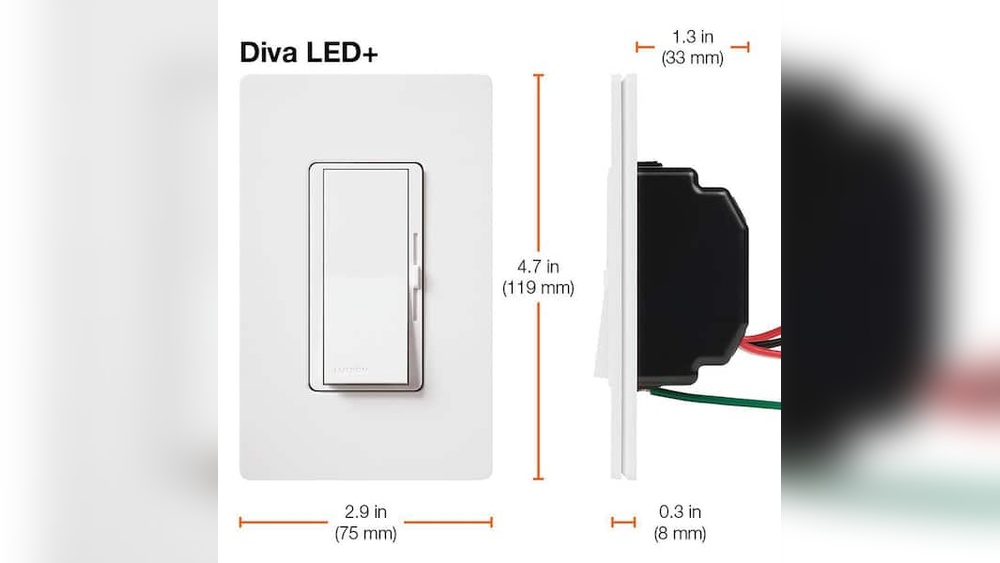
Compatibility With Existing Wiring
Check if your home has a neutral wire. Some light sensor switches need it to work properly.
Older homes might lack a neutral wire. Look for switches designed for such setups.
Confirm the switch voltage matches your home electrical system. This prevents damage and ensures safety.

Credit: www.wikihow.com
Tools And Materials Needed
Before connecting a light sensor switch, gather the right tools and materials. This step ensures a smooth and safe installation process. Missing tools can cause delays or errors. Prepare everything in advance for best results.
Essential Tools For Installation
Start with a screwdriver, preferably a flathead and a Phillips. A wire stripper helps remove insulation from wires cleanly. Use a voltage tester to check if power is off. Needle-nose pliers aid in bending and holding wires. Electrical tape secures wire connections and prevents shorts. A drill may be needed to mount the switch box. Keep a small flashlight handy for dark spaces.
Safety Equipment
Wear insulated gloves to protect from electric shocks. Safety goggles shield your eyes from dust or sparks. Use a dust mask if drilling into walls. Wear closed-toe shoes to protect your feet. Turn off the power at the circuit breaker before starting. Use a lockout tag if possible, to prevent accidental power return.
Preparing For Installation
Preparing for installation of a light sensor switch is an important step. It helps ensure safety and smooth setup. Taking time to prepare can avoid problems later. This section guides you through the basic preparation tasks.
Turning Off Power Safely
Start by turning off the power at the circuit breaker. This stops electricity from flowing to the switch. Use a voltage tester to double-check that power is off. Never skip this step. It protects you from electric shock and injury.
Removing Old Switch
Remove the cover plate of the old switch carefully. Unscrew the switch from the electrical box. Gently pull the switch out to see the wiring. Note the wire positions and colors. Take a photo for reference. Disconnect the wires from the old switch one by one.
Wiring The Light Sensor Switch
Wiring the light sensor switch is a key step to make it work properly. It involves connecting a few wires safely and correctly. This process is simple if you follow the right steps. Pay attention to each wire and connection. Safety matters most. Turn off the power before starting.
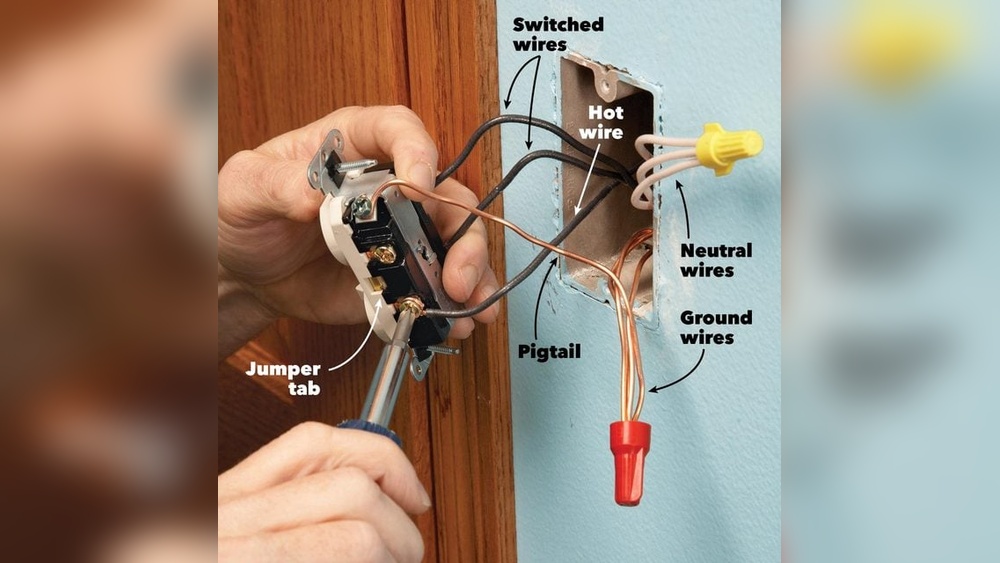
Identifying Wires
First, find the wires in your switch box. Usually, you will see three types: live, neutral, and ground. The live wire carries current from the power source. The neutral wire returns current to the power source. The ground wire protects against electrical shock. Check your switch and sensor for wire colors. Common colors are black or red for live, white for neutral, and green or bare copper for ground. Confirm each wire before connecting.
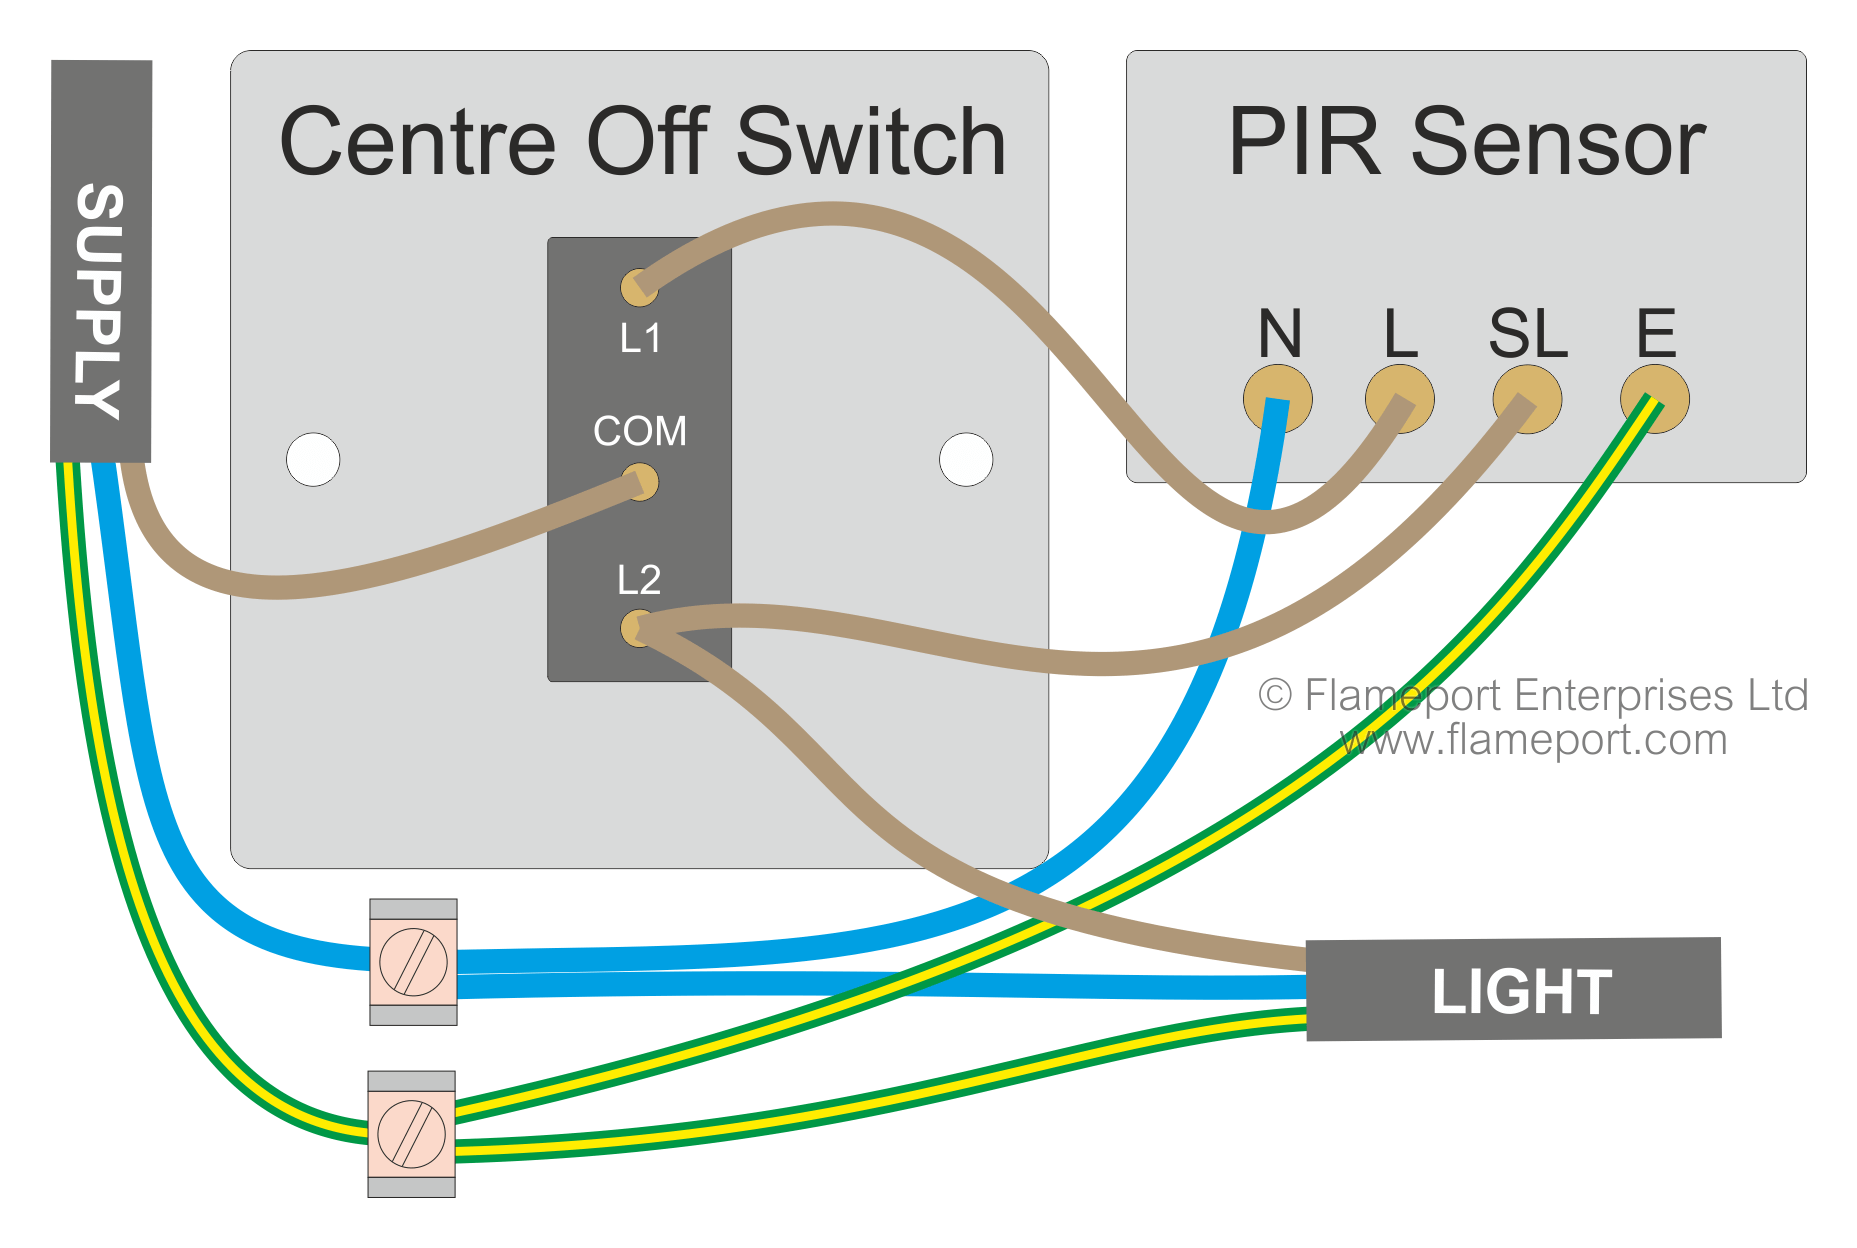
Connecting The Sensor Switch
Match the wires from the light sensor to the wires in the box. Connect the live wire from the sensor to the live wire in the box. Connect the neutral wire from the sensor to the neutral wire in the box. Attach the ground wire from the sensor to the ground wire in the box. Use wire nuts to twist wires together tightly. Make sure no bare wire shows outside the nuts.
Securing The Connections
After connecting, push the wires neatly into the box. Avoid bending or pinching wires. Screw the sensor switch into the box securely. Check that all wire nuts are tight. Loose connections can cause flickering or failure. Turn the power back on and test the sensor switch. Confirm the light turns on or off based on light levels.
Testing The Sensor Switch
Testing the light sensor switch is an important step to ensure it works correctly. You need to check if the sensor reacts to light changes and controls the light as expected. This process helps find any wiring or setting errors before final use.
Restoring Power
After connecting the sensor switch, restore power at the circuit breaker. Turn the breaker back on carefully. Watch the sensor switch for any signs of power, like a small LED light. This shows the sensor is active and ready to test.
Adjusting Sensitivity Settings
The sensor switch has sensitivity controls to detect light levels. Adjust the settings to match your environment. Turn the dial or press buttons to increase or decrease sensitivity. Test by covering the sensor or exposing it to light. Find the right balance so the switch activates at proper light levels.
Credit: flameport.com
Troubleshooting Common Issues
Troubleshooting common issues with a light sensor switch can save time and effort. Many users face problems like the sensor not responding, flickering lights, or false triggers. Understanding these problems helps fix them fast. This section explains how to identify and solve these common issues effectively.
Sensor Not Responding
Check the power supply first. Ensure the switch is properly connected to the circuit. Loose wires can cause no response. Test the sensor in a dark room; some sensors only work in low light. Clean the sensor lens to remove dust or dirt. Replace batteries if your sensor uses them. Reset the switch by turning off power for a few seconds. If the sensor still does not respond, it may be faulty and need replacement.
Flickering Lights
Flickering lights often mean a poor connection. Tighten all wire connections carefully. Use a voltage tester to check for unstable power supply. Replace bulbs with compatible types, as some sensors need specific bulbs. Avoid mixing LED and incandescent bulbs on the same circuit. Interference from other devices can also cause flickering. Move the sensor away from strong electrical devices. If flickering continues, try a different switch or consult an electrician.
False Triggers
False triggers happen when the sensor turns on without reason. Check the sensor’s sensitivity settings and lower them. Remove nearby moving objects like fans or pets. Avoid placing the sensor near heat sources or direct sunlight. Adjust the sensor angle to reduce false detection. Some sensors have a delay timer; increase the delay to avoid quick triggers. If false triggers persist, consider upgrading to a sensor with better motion detection technology.
Maintenance Tips For Longevity
Proper care helps your light sensor switch last longer and work better. Regular maintenance keeps the sensor clean and functioning well. This section shares easy tips to keep your switch in top shape.
Cleaning The Sensor
Dust and dirt can block the sensor’s light detection. Wipe the sensor gently with a soft, dry cloth. Avoid using water or cleaning sprays on the sensor. Clean it at least once a month to keep it clear. A clean sensor reacts faster and saves energy.
Regular Function Checks
Test the sensor switch regularly to ensure it works correctly. Turn off the lights and see if the sensor turns them on with enough light. Check in different lighting conditions. Fix or replace parts if the sensor acts slow or fails. Regular checks prevent sudden failures and extend lifespan.

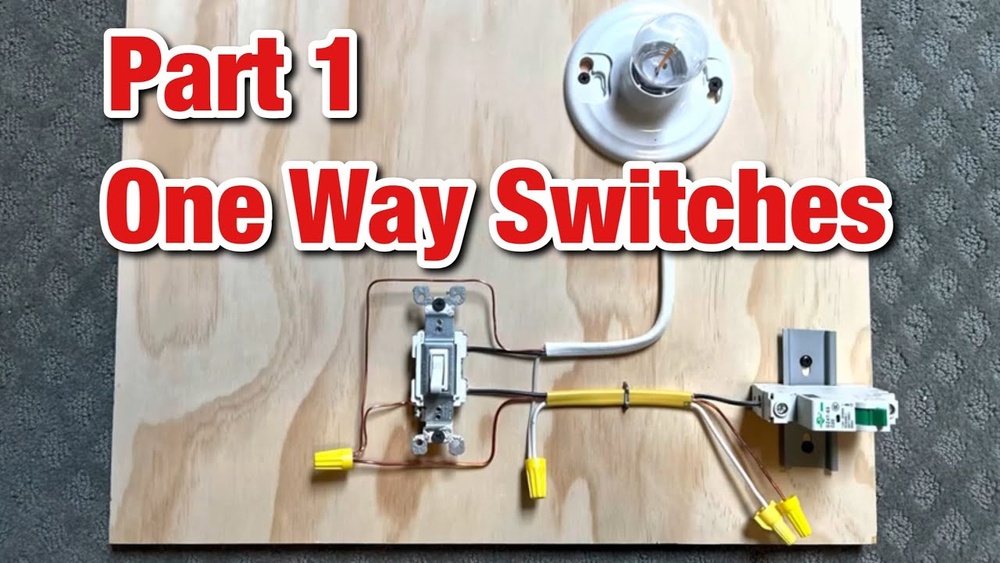
Credit: www.youtube.com
Frequently Asked Questions
What Tools Are Needed To Connect A Light Sensor Switch?
You will need a screwdriver, wire strippers, voltage tester, and electrical tape. These tools ensure safe and efficient installation of the light sensor switch.
How Do I Identify Wires For Light Sensor Switch Installation?
Look for the live, neutral, and load wires in your electrical box. Use a voltage tester to confirm wire functions before connecting the sensor switch.
Can I Install A Light Sensor Switch Myself Safely?
Yes, if you follow safety guidelines and switch off power at the breaker. If unsure, consult a professional electrician to avoid risks.
How Does A Light Sensor Switch Work In Lighting Control?
It detects ambient light levels and automatically turns lights on or off. This helps save energy by adjusting lighting based on natural light availability.
Conclusion
Connecting a light sensor switch can save energy and add convenience. Follow the steps carefully for a safe and proper setup. Test the sensor to ensure it works correctly. Adjust the settings to match your lighting needs. Enjoy automatic lighting that turns on and off by itself.
This simple device helps reduce electricity bills. Stay safe by turning off power before starting. Now, your space lights up only when needed. Easy to install and useful in many places. Give it a try and see the difference.