Have you ever noticed your light switch sticking out too far or sitting too deep in the wall? It’s not just an eyesore—it can be a safety hazard or make your room look unfinished.
Adjusting your light switch depth is easier than you think, and you don’t need to be an expert to fix it. In this guide, you’ll learn simple steps to make your switches flush with the wall, improving both the look and safety of your space.
Keep reading, and you’ll have perfectly aligned switches in no time!
Tools Needed
Adjusting the depth of a light switch is a simple task with the right tools. Using proper tools makes the process smooth and safe. Prepare everything before starting your work to avoid delays or mistakes.
Essential Tools List
Gather a flathead screwdriver and a Phillips screwdriver for removing the switch cover. A voltage tester helps check if the power is off. Use needle-nose pliers to handle wires carefully. A tape measure ensures the switch is set at the right depth. A flashlight may help if the area is dark.
Safety Gear
Wear insulated gloves to protect from electrical shocks. Safety glasses keep dust and debris out of your eyes. Use a face mask if the area is dusty. Comfortable shoes with rubber soles reduce the risk of slipping. Always work in a well-lit area for clear visibility.
Assessing Switch Depth
Assessing switch depth is the first step to a safe and neat light switch installation. It ensures the switch fits well inside the wall box. This prevents electrical hazards and keeps the switch flush with the wall surface.
Checking the depth helps avoid switches that stick out or sit too far in. It also ensures the cover plate fits correctly without gaps or pressure on wires.
Checking Existing Setup
Start by removing the switch cover plate carefully. Use a screwdriver to take out the screws. Pull the switch gently to see how deep it sits inside the box.
Look for any space between the switch and the wall. Check if wires are bent or crowded. Note if the switch feels loose or tight in the box.
Measuring Switch Box
Use a tape measure or ruler to measure the depth of the switch box. Measure from the front edge of the box to the back inside wall.
Write down the exact depth. Compare this to the switch body size. The switch should fit comfortably inside without forcing wires.
Knowing the box depth helps pick the right switch or decide if adjustments are needed.
Turn Off Power
Turning off the power is the first and most important step before adjusting a light switch depth. Working with electricity can be dangerous. Always make sure the power is off to avoid shocks or injury. This step protects you and your home.
Locate Circuit Breaker
Find your home’s circuit breaker panel. It is usually in the basement, garage, or utility room. Open the panel door carefully. Look for the breaker that controls the room with the light switch. The breakers are usually labeled, but if not, turn off the main breaker to cut power to the whole house.
Verify Power Is Off
After switching off the breaker, check if the power is really off. Use a voltage tester or a non-contact tester on the light switch. The tester should not light up or beep. If it does, the power is still on. Double-check the breaker and test again. Only start working when you are sure the power is off.
Credit: anythingscout.com
Remove Switch Cover
Removing the switch cover is the first step to adjusting the light switch depth. It gives clear access to the switch and wiring. This step needs care to avoid damage or electric shock. Follow simple steps to remove the cover safely.
Unscrewing Faceplate
Start by turning off the power at the circuit breaker. This prevents electric shock. Use a screwdriver to remove the screws holding the faceplate. Keep the screws in a safe place for later. Gently pull the faceplate away from the wall once screws are out.
Handling Switch Carefully
After removing the faceplate, the switch is visible. Handle the switch with care to avoid breaking wires. Do not pull the switch too hard. Use your fingers to gently pull it forward. Check for any loose wires before making adjustments.
Adjusting Switch Position
Adjusting the light switch depth helps the switch sit flush with the wall. Loosen screws, move the switch forward or backward, then tighten screws again. This keeps the switch safe and neat.
Loosening Mounting Screws
Start by turning off the power to the switch from the main breaker. Safety first.
Use a screwdriver to gently loosen the screws that hold the switch in place. Do not remove them completely. Loosening these screws allows the switch to move forward or backward in the wall box.
Be careful not to damage the wires connected to the switch. Slight wiggles help to adjust the depth without stress on the wiring.
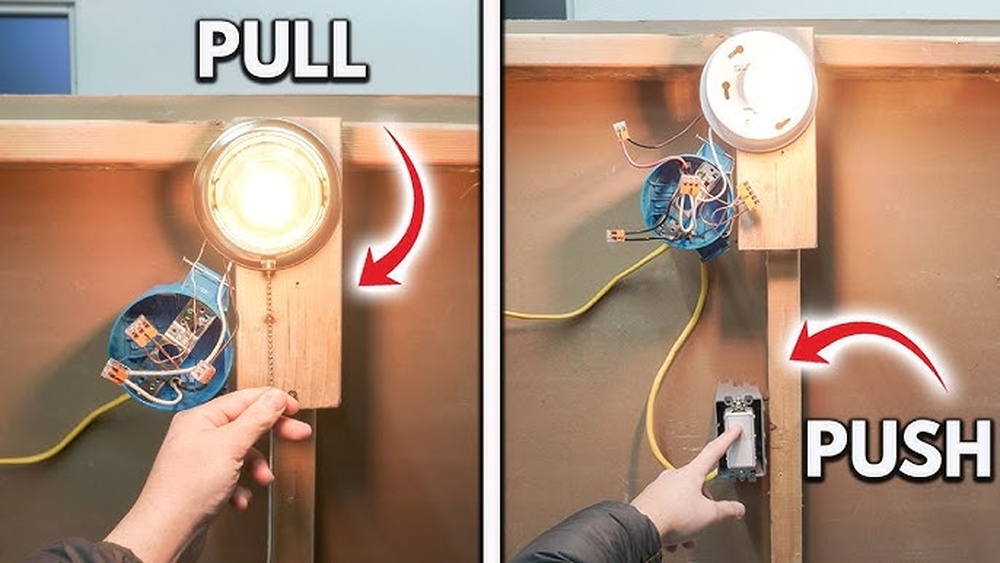
Repositioning The Switch
Push or pull the switch gently to the desired depth. The switch should sit flush with the wall surface or slightly recessed.
If the switch is too deep, pull it out carefully. If it sticks out too far, push it back into the box.
Make sure the switch is level and straight. Check that the mounting holes align with the box before tightening the screws.
Once the switch is in the right position, tighten the mounting screws securely. Avoid over-tightening to prevent damage.
Turn the power back on and test the switch for proper operation and feel. Adjust again if needed.
Using Spacers Or Box Extenders
Adjusting the depth of a light switch is important for safety and style. Using spacers or box extenders helps fix switches that sit too deep in the wall. These tools bring the switch closer to the wall surface.
They are simple to use and save time. Both spacers and box extenders prevent wires from getting pinched or damaged. They also make the switch easier to operate.
When To Use Spacers
Spacers work well when the switch box is slightly recessed. They fill small gaps between the switch and the wall plate. Use spacers if the switch feels loose or sits too far inside.
Spacers come in different thicknesses. Choose one that matches the depth difference. They fit behind the switch or the mounting screws. This adjustment keeps the switch flush with the wall.
Installing Box Extenders
Box extenders are best for switches set deep inside the wall. They extend the switch box to meet the wall surface. This is common in walls with thick drywall or tile.
To install, turn off power first. Remove the switch cover and unscrew the switch. Place the box extender over the existing box opening. Attach it securely, then reinstall the switch and cover.
Box extenders provide a solid, safe mounting surface. They prevent electrical hazards from exposed wires. This method ensures a neat and professional look.
Reinstalling Switch And Cover
Reinstalling the switch and cover is an important step after adjusting the switch depth. This step ensures the switch sits properly and looks neat on the wall. It also protects the wiring inside the box.
Take time to secure the switch firmly. A loose switch can cause problems and even pose safety risks.
Securing Switch Firmly
Place the switch back into the electrical box carefully. Align the screw holes on the switch with the holes on the box. Use a screwdriver to tighten the screws evenly. Do not over-tighten. Tight screws keep the switch stable and prevent it from moving.
Check that the switch is flush with the wall surface. It should not stick out or sit too deep. Adjust the screws slightly if needed to get the perfect fit.
Replacing Faceplate
After securing the switch, put the faceplate back on. The faceplate covers the switch and box, giving a clean look. Align the faceplate holes with the switch screws. Screw the faceplate in place gently. Avoid cracking the plastic or metal.
Make sure the faceplate sits flat against the wall. No gaps should appear between the plate and the wall. A tight faceplate improves safety and appearance.

Credit: www.kgcountry.com
Testing The Switch
Testing the switch is a crucial step after adjusting its depth. It ensures the switch works safely and correctly. This process helps you spot any issues before fully finishing your project. Follow these steps to verify your work.
Turning Power Back On
First, turn the power back on at the circuit breaker. This restores electricity to the switch. Be careful and avoid touching wires inside the box. Use the breaker labeled for the room or switch you worked on.
Ensuring Proper Operation
Next, test the switch by flipping it on and off several times. Check if the light or device responds properly. The switch should feel firm and click smoothly. If it feels loose or does not work, turn off power and adjust again.
Troubleshooting Fit Issues
Adjusting the depth of a light switch can sometimes lead to fit issues. These problems might stop the switch from sitting flush against the wall. Troubleshooting these fit issues is key to a neat and safe installation. This section helps identify common problems and offers quick fixes that save time and effort.
Common Problems
One common problem is the switch box sitting too far back in the wall. This leaves the switch too deep, making it hard to attach the cover plate. Another issue is the box sticking out too far. This causes the switch to sit proud of the wall.
Sometimes, the wall surface is uneven. This makes the switch plate not sit flat. Wiring can also get in the way, pushing the switch out of place. Finally, using the wrong box size or switch type can cause fit problems.
Quick Fixes
Use spacer rings to bring the switch box forward if it sits too far back. These rings fill the gap between the box and wall. For boxes that stick out, try shimming or adjusting the mounting screws. This pulls the switch back to the right depth.
Sand or smooth the wall surface if it is uneven. This helps the cover plate sit flat. Push wires carefully inside the box to avoid blocking the switch. Check that the box size matches the switch. Replace parts if they do not fit well.

Credit: www.ebay.com
Frequently Asked Questions
How Do I Know If My Light Switch Is Too Deep?
Check if the switch plate sits flush with the wall. If it protrudes or is recessed, the depth may need adjustment. Proper depth ensures safe and easy operation of your light switch.
What Tools Are Needed To Adjust Light Switch Depth?
You will need a screwdriver, wire strippers, and possibly spacer rings or electrical box extenders. These tools help safely remove and reposition the switch for correct depth.
Can I Adjust Light Switch Depth Myself Safely?
Yes, if you turn off power at the circuit breaker first. Follow instructions carefully and avoid touching wires directly. If unsure, consult a professional electrician for safety.
Why Is Adjusting Light Switch Depth Important?
Proper switch depth prevents electrical hazards and improves switch function. It also ensures the switch plate fits securely and looks neat against the wall.
Conclusion
Adjusting the light switch depth is a simple task anyone can do. It makes your switches fit better and look neat. Always turn off the power before starting to stay safe. Use the right tools and take your time with each step.
A well-set switch can prevent problems later. Try this fix yourself and see the difference it makes. Small changes like this improve your home’s comfort and safety.