Are you struggling to keep your Gladiator shelves steady and secure on your wall? Knowing how to anchor your Gladiator shelf properly can save you from accidents and keep your space organized.
In this guide, you’ll discover simple, step-by-step instructions to make sure your shelves stay firmly in place. Whether you’re storing heavy tools or everyday items, getting the anchoring right is key. Keep reading to learn the easy tricks that will give you confidence and peace of mind every time you use your shelves.
Credit: www.homedepot.com
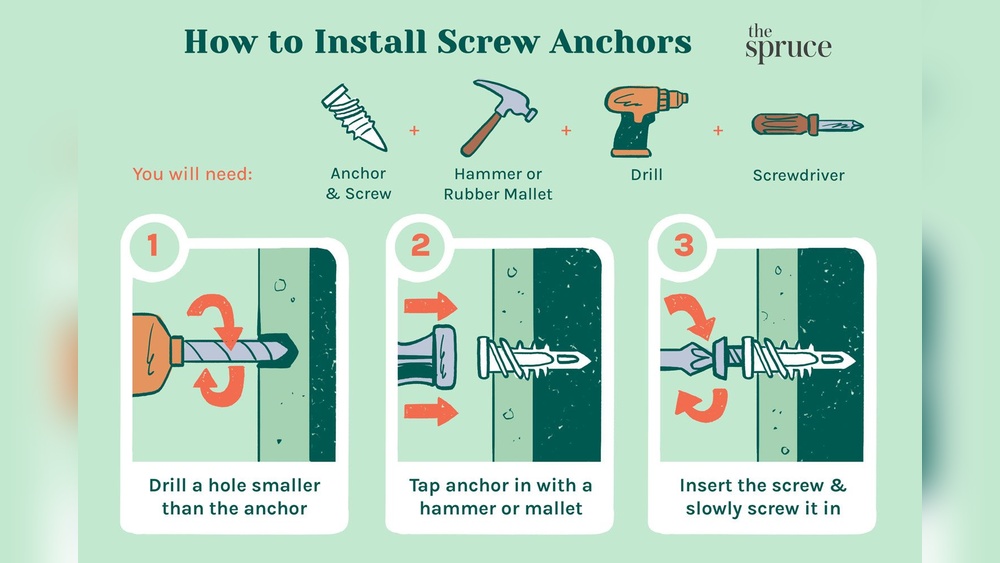
Choose The Right Tools
Choosing the right tools is key to safely anchoring a Gladiator shelf. Using proper equipment makes the job easier and ensures the shelf stays secure. The right tools help avoid damage to the wall or shelf during installation.
Essential Equipment
Start with a drill that has a suitable drill bit for your wall type. A stud finder helps locate strong points in the wall for mounting. A level ensures the shelf is perfectly straight. Use a screwdriver or a power driver for tightening screws. Measuring tape is important to mark exact points. Anchors and screws must match the wall material and shelf weight.
Safety Gear
Wear safety glasses to protect your eyes from dust and debris. Use work gloves to avoid cuts or scrapes. Ear protection is useful if you use loud power tools. A dust mask keeps you safe from inhaling particles while drilling. Keep a first aid kit nearby in case of small injuries.

Credit: www.gladiatorgarageworks.com
Locate Wall Studs
Locating wall studs is a key step before anchoring a Gladiator shelf. Studs provide strong support for heavy items. Without anchoring to studs, shelves can fall or damage walls. This part guides you to find wall studs safely and easily.
Using A Stud Finder
A stud finder is a small device that detects wood or metal behind the wall. Hold it flat against the wall and slowly move it horizontally. The device beeps or lights up when it finds a stud. Move it back and forth to mark the edges of the stud. This helps you find the exact center for mounting.
Marking Stud Positions
Use a pencil to mark the stud’s center on the wall. Mark both the top and bottom of the stud for accuracy. Measure the distance between marks to confirm straight alignment. These marks guide where to drill holes for shelf anchors. Clear markings ensure a secure and level installation.
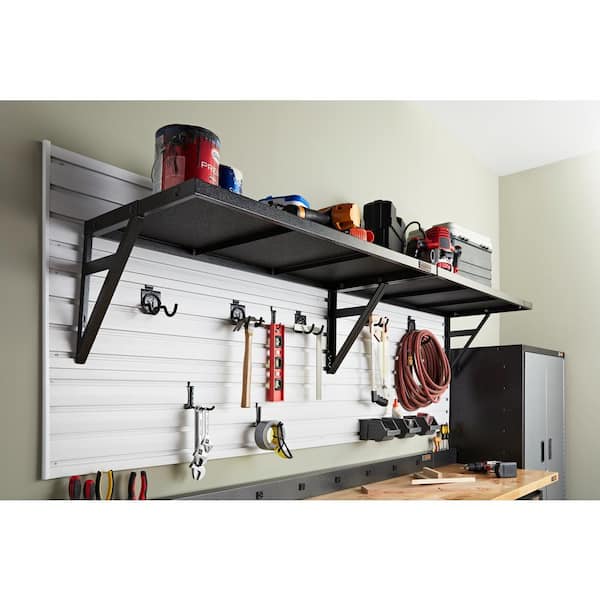
Prepare The Shelving Unit
Preparing the shelving unit is a key step before anchoring it to the wall. It ensures the shelf is stable and safe. Taking time to prepare helps avoid problems later.
Start by assembling the Gladiator shelf carefully. Follow the instructions that come with the unit. Make sure each part fits well and the shelf stands firm. Check all screws and connectors are tight. A strong frame supports heavy items without bending or wobbling.
Assemble The Gladiator Shelf
Lay out all parts on a flat surface. Identify shelves, posts, and hardware clearly. Attach shelves to posts one by one. Use the right tools, like a screwdriver or wrench. Check that shelves are level and aligned. Tighten all bolts securely. Avoid leaving any piece loose or shaky.
Identify Mounting Points
Look for holes or brackets designed for wall mounting. These points are usually near the top or sides of the frame. Mark their exact spots for drilling later. Confirm the mounting points match your wall type. Proper alignment prevents shelf from tilting or falling. Measure twice before drilling any holes.
Drill Pilot Holes
Drilling pilot holes is a crucial step in anchoring your Gladiator shelf securely to the wall. These small holes guide the screws and prevent the wall or shelf material from splitting. Taking time to drill precise pilot holes ensures a strong, lasting hold for your shelf.
Start by marking the exact spots where the shelf brackets will attach. Then, prepare your drill and choose the right drill bit size. Proper pilot holes help the screws grip better and make installation easier.
Select Proper Drill Bit
Pick a drill bit slightly smaller than the screw diameter. This size allows the screw to bite into the wall firmly. Using too large a bit makes the hole loose. Too small a bit can crack the wall or make screwing difficult. For wood studs, a bit 70-80% of the screw’s thickness works best. For drywall anchors, follow the anchor package instructions for the right bit size.
Drilling Into Studs
Studs give the strongest support for your Gladiator shelf. Use a stud finder to locate these wooden supports behind the drywall. Mark the stud center before drilling. Drill pilot holes straight into the stud for maximum strength. Avoid drilling at an angle, which weakens the hold. Drill slowly and steadily to keep the hole clean and accurate.
Attach Mounting Brackets
Attaching mounting brackets is a key step in securing your Gladiator shelf to the wall. These brackets hold the shelf firmly in place. Proper attachment prevents the shelf from wobbling or falling.
Take your time to position the brackets correctly. This ensures the shelf stays level and strong. Follow the instructions carefully to avoid mistakes.
Position Brackets
Start by holding the brackets against the wall. Match them with the stud marks or anchors. Use a level to keep the brackets straight. Mark the screw holes with a pencil. Double-check the spacing to fit the shelf size.
Secure With Screws
Use a drill or screwdriver to fasten the screws. Drive each screw fully into the wall or anchor. Check that the brackets do not move after tightening. Secure screws evenly to distribute the shelf weight. Tighten all screws carefully to avoid damage.

Credit: www.gladiatorgarageworks.com
Anchor The Shelves
Checking the stability of your Gladiator shelf is key to safe use. A stable shelf holds items firmly and prevents accidents. After anchoring, always verify the shelf does not wobble or lean.
Look closely at how the shelf feels. It should stay steady under light pressure. A shaky shelf needs fixing before placing heavy objects.
Test Shelf Strength
Put a few items on the shelf to see how it holds. Start with light items. Press gently on the shelf surface. Notice any movement or bending.
Increase weight gradually. Watch for signs of weakness or instability. The shelf should not tilt or shift. This test shows if anchors are secure.
Make Adjustments If Needed
Find any loose screws or anchors. Tighten them carefully using the right tools. Check the wall anchors are well fixed inside the studs.
Replace any damaged parts. Use stronger anchors if needed. Repeat the strength test after adjustments. Your shelf must feel solid before use.
Frequently Asked Questions
How Do I Securely Anchor A Gladiator Shelf To The Wall?
Use a stud finder to locate wall studs. Mark holes on the shelf bracket. Drill pilot holes and use heavy-duty screws to secure the shelf tightly. Anchoring into studs ensures maximum stability and safety for heavy items.
What Tools Are Needed To Anchor Gladiator Shelves?
You will need a stud finder, drill, level, screwdriver, measuring tape, and heavy-duty screws or anchors. These tools help ensure proper alignment and secure installation on drywall or masonry walls.
Can I Install Gladiator Shelves On Drywall Without Studs?
Yes, use appropriate wall anchors designed for drywall. Toggle bolts or molly bolts provide strong support. However, anchoring into studs is recommended for heavier loads to prevent shelf failure.
How High Should Gladiator Shelves Be Mounted On Walls?
Mount shelves at a convenient height for easy access and storage. Typically, 5 to 6 feet from the floor is ideal, but adjust based on room layout and user needs.
Conclusion
Anchoring a Gladiator shelf to the wall keeps it safe and steady. Start by choosing the right tools and anchors for your wall type. Measure carefully and mark where the shelf will go. Drill holes and secure the shelf firmly using screws and anchors.
Check the shelf’s stability before placing heavy items. Simple steps like these help prevent accidents and protect your items. Now your Gladiator shelf can hold your tools and gear with confidence and strength. Solid and secure shelving makes your space neat and organized.