Is your child’s play kitchen wobbling or tipping over? That’s not just frustrating—it can be dangerous.
You want your little one to enjoy hours of creative fun without any risk of accidents. Anchoring your play kitchen to the wall is the simple solution that keeps it steady and safe. In this guide, you’ll discover easy, step-by-step tips to secure your play kitchen quickly and confidently.
Keep reading to protect your child and enjoy peace of mind every time they play.
Choose The Right Spot
Choosing the right spot to anchor a play kitchen is very important. It keeps the kitchen steady and safe for kids. A good spot prevents the kitchen from tipping over during play. This step makes sure the kitchen stays in place and protects children from accidents.
Think about the room layout and where kids will use the kitchen most. The spot should have enough space around for easy movement. Also, choose a wall that can support the weight of the kitchen securely.
Find A Wall Stud
Look for a wall stud before anchoring the kitchen. Wall studs give strong support and hold the screws firmly. Use a stud finder tool or tap the wall to hear a solid sound. Mark the stud location clearly to guide your drilling.
Measure Space And Height
Measure the space where the kitchen will go. Check the width and height to fit the kitchen perfectly. Make sure there is enough room for kids to play comfortably. Measure the height to place anchors at a safe and strong level.
Gather Necessary Tools
Gathering the right tools is the first step to anchor a play kitchen safely. Having everything ready makes the process smooth and quick. Avoid searching for tools midway to keep focus on the task.
List Of Tools Needed
Prepare these essential tools before starting:
- Drill with appropriate drill bits
- Screwdriver (manual or electric)
- Stud finder to locate wall studs
- Measuring tape for accuracy
- Level to ensure straight installation
- Anchors and screws suitable for your wall type
- Pencil for marking spots on the wall
These tools help secure the play kitchen firmly and safely.
Safety Gear
Protect yourself during installation by using safety gear.
- Safety goggles to protect eyes from dust and debris
- Work gloves to prevent cuts and scrapes
- Dust mask if drilling creates dust
Wearing safety gear reduces risks and keeps you safe.
Prepare The Play Kitchen
Start by finding the right spot on the wall for the play kitchen. Use screws and anchors to fix it securely. This keeps the kitchen safe and steady during playtime.
Clear The Area
Start by clearing the space around the play kitchen. Remove toys, furniture, or any items that block your work area. This gives you enough room to move freely and work safely. A clean area helps avoid accidents and makes the process smooth.
Check Assembly Instructions
Find the play kitchen’s assembly instructions before starting. Read them carefully to understand the parts and tools needed. Some kitchens have special steps for wall anchoring. Following instructions ensures the kitchen stays secure and safe for children.
Credit: www.mrs-b-organized.com
Mark Anchor Points
Marking anchor points is a key step to secure your play kitchen safely. It ensures the kitchen stays stable and prevents tipping. Take your time to mark the exact spots. This helps make the installation easier and more accurate.
Align Kitchen With Wall
Place the play kitchen against the wall where it will stay. Check that it sits flat and straight. Use a level to make sure it is even. Proper alignment stops the kitchen from leaning or wobbling later.
Mark Drill Spots
Look for the sturdy parts of the kitchen frame to attach anchors. Mark these spots on the wall with a pencil. Make small marks that you can see clearly. These marks show where to drill holes for anchors. Double-check the marks before drilling to avoid mistakes.
Drill And Install Anchors
Drilling and installing anchors is a key step to safely secure a play kitchen to the wall. This process keeps the kitchen stable and prevents it from tipping over. Proper anchors support the weight and keep the play kitchen steady during play. Follow these steps carefully for a strong, safe setup.
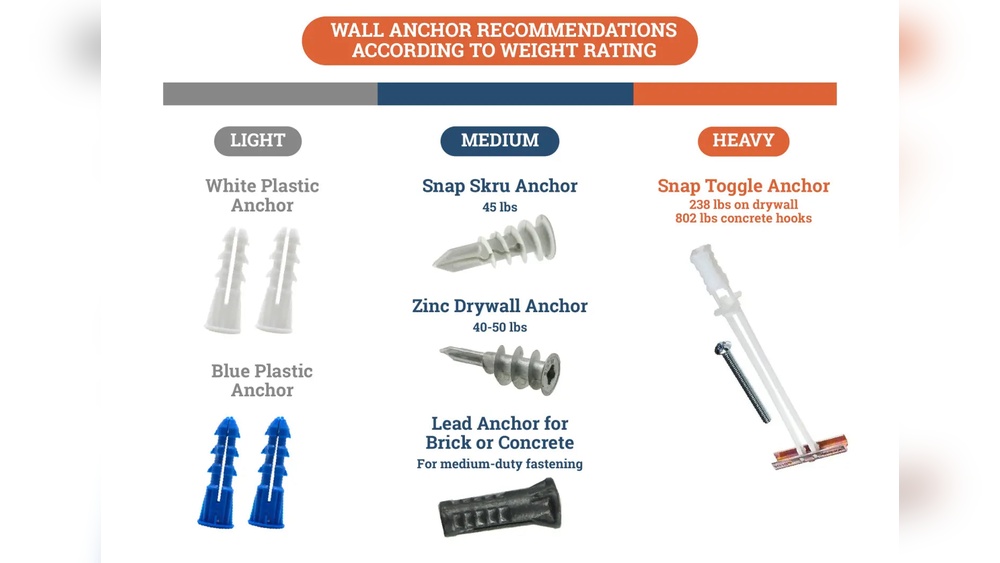
Choose Proper Anchors
Select anchors based on your wall type and kitchen weight. Drywall anchors work well for light loads. For heavier kitchens, use toggle bolts or molly bolts. Make sure anchors fit the screws and match the wall material. Proper anchors ensure the kitchen stays firmly in place.
Drill Pilot Holes
Mark spots on the wall where anchors will go. Use a pencil for accuracy. Choose a drill bit slightly smaller than the anchor size. Drill straight pilot holes to avoid wall damage. Pilot holes help anchors fit securely and hold weight better.
Insert Wall Anchors
Push anchors gently into the pilot holes. Tap lightly with a hammer if needed. Make sure anchors sit flush with the wall surface. Screw in the provided screws, leaving enough length to attach the play kitchen. Firm anchors prevent wobbling and keep the kitchen safe for kids.

Credit: www.walmart.com
Secure Play Kitchen
Securing your play kitchen to the wall is important for safety. It stops the kitchen from tipping over. This keeps children safe while they play. Follow simple steps to make sure the kitchen stays in place.
Use the right tools and parts to anchor the kitchen firmly. Check the wall type and choose proper hardware. A secure play kitchen means worry-free fun for your kids.
Attach Brackets Or Straps
Start by finding the right spot on the wall. Attach metal brackets or safety straps to the back of the play kitchen. Use a drill or screwdriver for this step. Make sure brackets or straps are tight and fit well. Secure the other end to the wall using anchors or screws. This holds the kitchen firmly and prevents movement.
Tighten Screws Safely
Check all screws and fasteners after attaching brackets. Use a screwdriver or drill to tighten them fully. Avoid over-tightening, which can damage the kitchen or wall. Make sure screws are flush and secure. Test the kitchen by gently pushing it to check stability. Tight screws keep the play kitchen safely in place.
Test Stability
Testing the stability of your anchored play kitchen is a key step. It ensures the kitchen stays safe during playtime. A stable setup prevents accidents and keeps children secure. Take your time to check the kitchen thoroughly after anchoring it.
Check For Movement
Gently push the play kitchen from different sides. Notice any shaking or wobbles. Even small movements can be risky. Look closely at the points where the kitchen meets the wall. These areas should feel firm and steady. If you see any looseness, the kitchen needs more support.
Adjust If Needed
Make changes to the anchors or screws if the kitchen moves. Tighten all hardware carefully. Use a level to confirm the kitchen is straight. Adjust the anchors so they hold the kitchen tightly against the wall. Repeat the movement check after adjustments. Keep adjusting until the play kitchen is fully stable.
Maintain Safety
Maintaining safety is key after you anchor a play kitchen to the wall. It keeps kids safe from accidents and gives parents peace of mind. Safety is not just about fixing the kitchen but also about regular care and teaching.
Checking the kitchen often helps catch problems early. Teaching kids about safety helps them understand how to play safely around the kitchen.
Regular Inspections
Look at the anchors and screws every few weeks. Make sure they are tight and not loose. Check the wall for any cracks or damage near the anchors. Look at the play kitchen itself for broken parts. Fix anything that looks unsafe right away. This simple step keeps the kitchen steady and safe.
Teach Kids About Safety
Talk to children about why the kitchen is anchored. Explain that it should not be moved or climbed on. Show them safe ways to play near the kitchen. Teach them to tell an adult if something breaks. This helps kids understand the rules and stay safe. Safe habits protect them and keep the kitchen in good shape.

Credit: www.amazon.com
Frequently Asked Questions
How Do I Securely Anchor A Play Kitchen To The Wall?
Use wall anchors or brackets designed for furniture. Locate studs, drill pilot holes, and fasten brackets tightly. This prevents tipping and ensures safety for kids during play.
What Tools Are Needed To Anchor A Play Kitchen?
You’ll need a drill, screwdriver, wall anchors or brackets, a stud finder, and a level. These tools help ensure secure and precise installation.
Can I Anchor A Play Kitchen Without Studs?
Yes, use heavy-duty wall anchors or toggle bolts in drywall. They provide strong support but studs offer the safest option for anchoring.
How High Should I Mount The Anchor On The Wall?
Mount anchors at the top rear of the play kitchen, near its center of gravity. This height prevents tipping and keeps the kitchen stable during use.
Conclusion
Anchoring your play kitchen to the wall keeps it safe and steady. It stops tipping accidents and protects your child during play. Use the right tools and follow steps carefully for best results. Check anchors regularly to make sure they stay tight.
A secure play kitchen means more fun and less worry. Take a few minutes now for lasting safety and peace of mind. Simple steps make a big difference in your child’s play space.