Building a deck is a great way to add space and value to your home. But if your deck isn’t properly anchored to the wall, it can become unsafe and unstable.
You want your deck to stay strong through every season, no matter the weather. That’s why knowing how to anchor your deck to the wall correctly is so important. In this guide, you’ll learn simple, step-by-step methods to secure your deck safely and effectively.
Keep reading, and you’ll have the confidence to protect your investment and enjoy your outdoor space worry-free.
Choosing The Right Materials
Choosing the right materials is key to a strong deck anchored to a wall. The materials affect the deck’s safety and lifespan. Picking suitable decking boards and fasteners ensures the deck stays secure. Also, knowing your wall type helps select the best anchors.
Selecting Decking Boards
Choose decking boards that resist weather and decay. Pressure-treated wood is a common, affordable option. Cedar and redwood resist rot naturally. Composite boards last longer and need less care. Pick boards thick enough to support weight and traffic.
Picking Suitable Fasteners
Fasteners must hold the deck firmly to the wall. Use corrosion-resistant screws or bolts, like stainless steel or coated ones. Avoid nails; they can loosen over time. Fasteners should match the deck wood type to prevent damage. Make sure they are long enough to reach through the board and into the wall anchor.
Wall Type Considerations
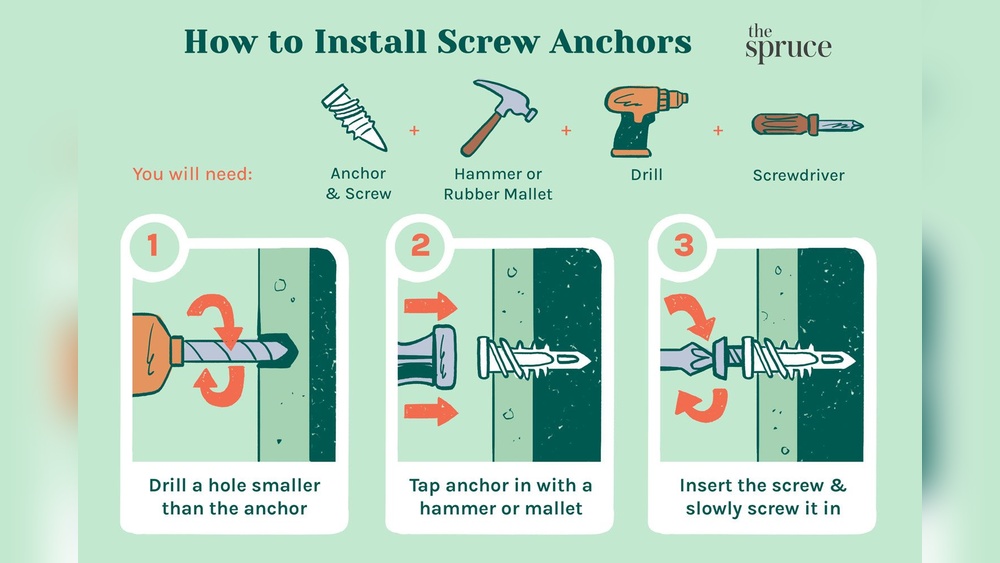
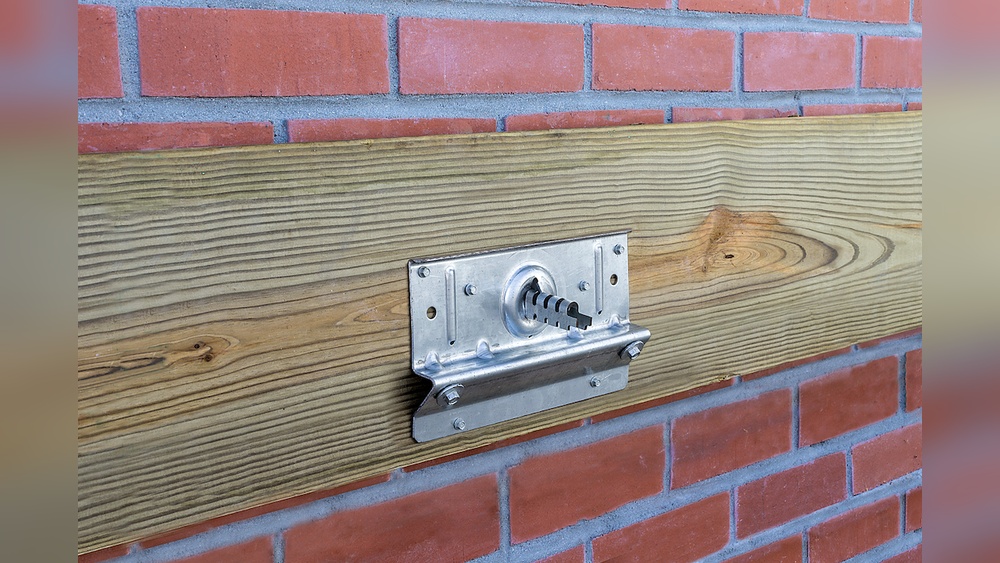
Identify your wall material before choosing anchors. Concrete and brick walls need heavy-duty anchors or expansion bolts. Wood walls require lag bolts or through-bolts for better grip. Drywall or hollow walls need special toggle bolts or anchors. Match anchors to wall strength and deck size for safety.

Credit: structuretech.com
Preparing The Wall And Deck
Preparing the wall and deck is an important step before anchoring your deck to the wall. It ensures a strong, safe connection. Taking time to prepare helps avoid problems later.
Start by checking the wall surface for any damage. Next, measure and mark where the anchors will go. Finally, gather all tools needed for the job. Each step builds the foundation for a secure deck.
Inspecting The Wall Surface
Look closely at the wall where the deck will attach. Check for cracks, loose bricks, or weak spots. The wall must be solid to hold the deck safely. Repair any damage before continuing. A strong wall keeps your deck stable.
Measuring And Marking
Use a tape measure to find the exact spots for anchors. Mark these spots clearly with a pencil. Measure twice to avoid mistakes. Correct marks make drilling easier and more accurate. Proper placement keeps the deck balanced and secure.
Gathering Necessary Tools
Collect all tools before starting to work. Common tools include a drill, anchors, screws, a level, and a pencil. Having tools ready saves time and frustration. Check that everything is in good condition. Being prepared leads to smooth, safe work.
Installing The Ledger Board
Installing the ledger board is the first key step in anchoring your deck to the wall. The ledger board holds the deck joists and connects them firmly to your home. It must be installed correctly for a safe and stable deck.
Positioning The Ledger
Start by choosing the right height for the ledger board. It should be level and straight along the wall. Use a level tool to mark a line where the ledger will sit. Keep the board above the ground to avoid water damage. Make sure it does not block any vents or windows.
Drilling Anchor Holes
Next, drill holes through the ledger board into the wall. Use a drill bit that fits your anchors. Space the holes evenly, about 16 inches apart. Drill deep enough to reach the wall’s solid structure. Clear any dust from the holes before inserting anchors.
Securing The Ledger To Wall
Insert strong anchors into the drilled holes. Use lag bolts or structural screws to fasten the ledger board. Tighten the bolts firmly, but avoid over-tightening. Check the ledger is still level and flush against the wall. This ensures a strong, safe connection for the deck.
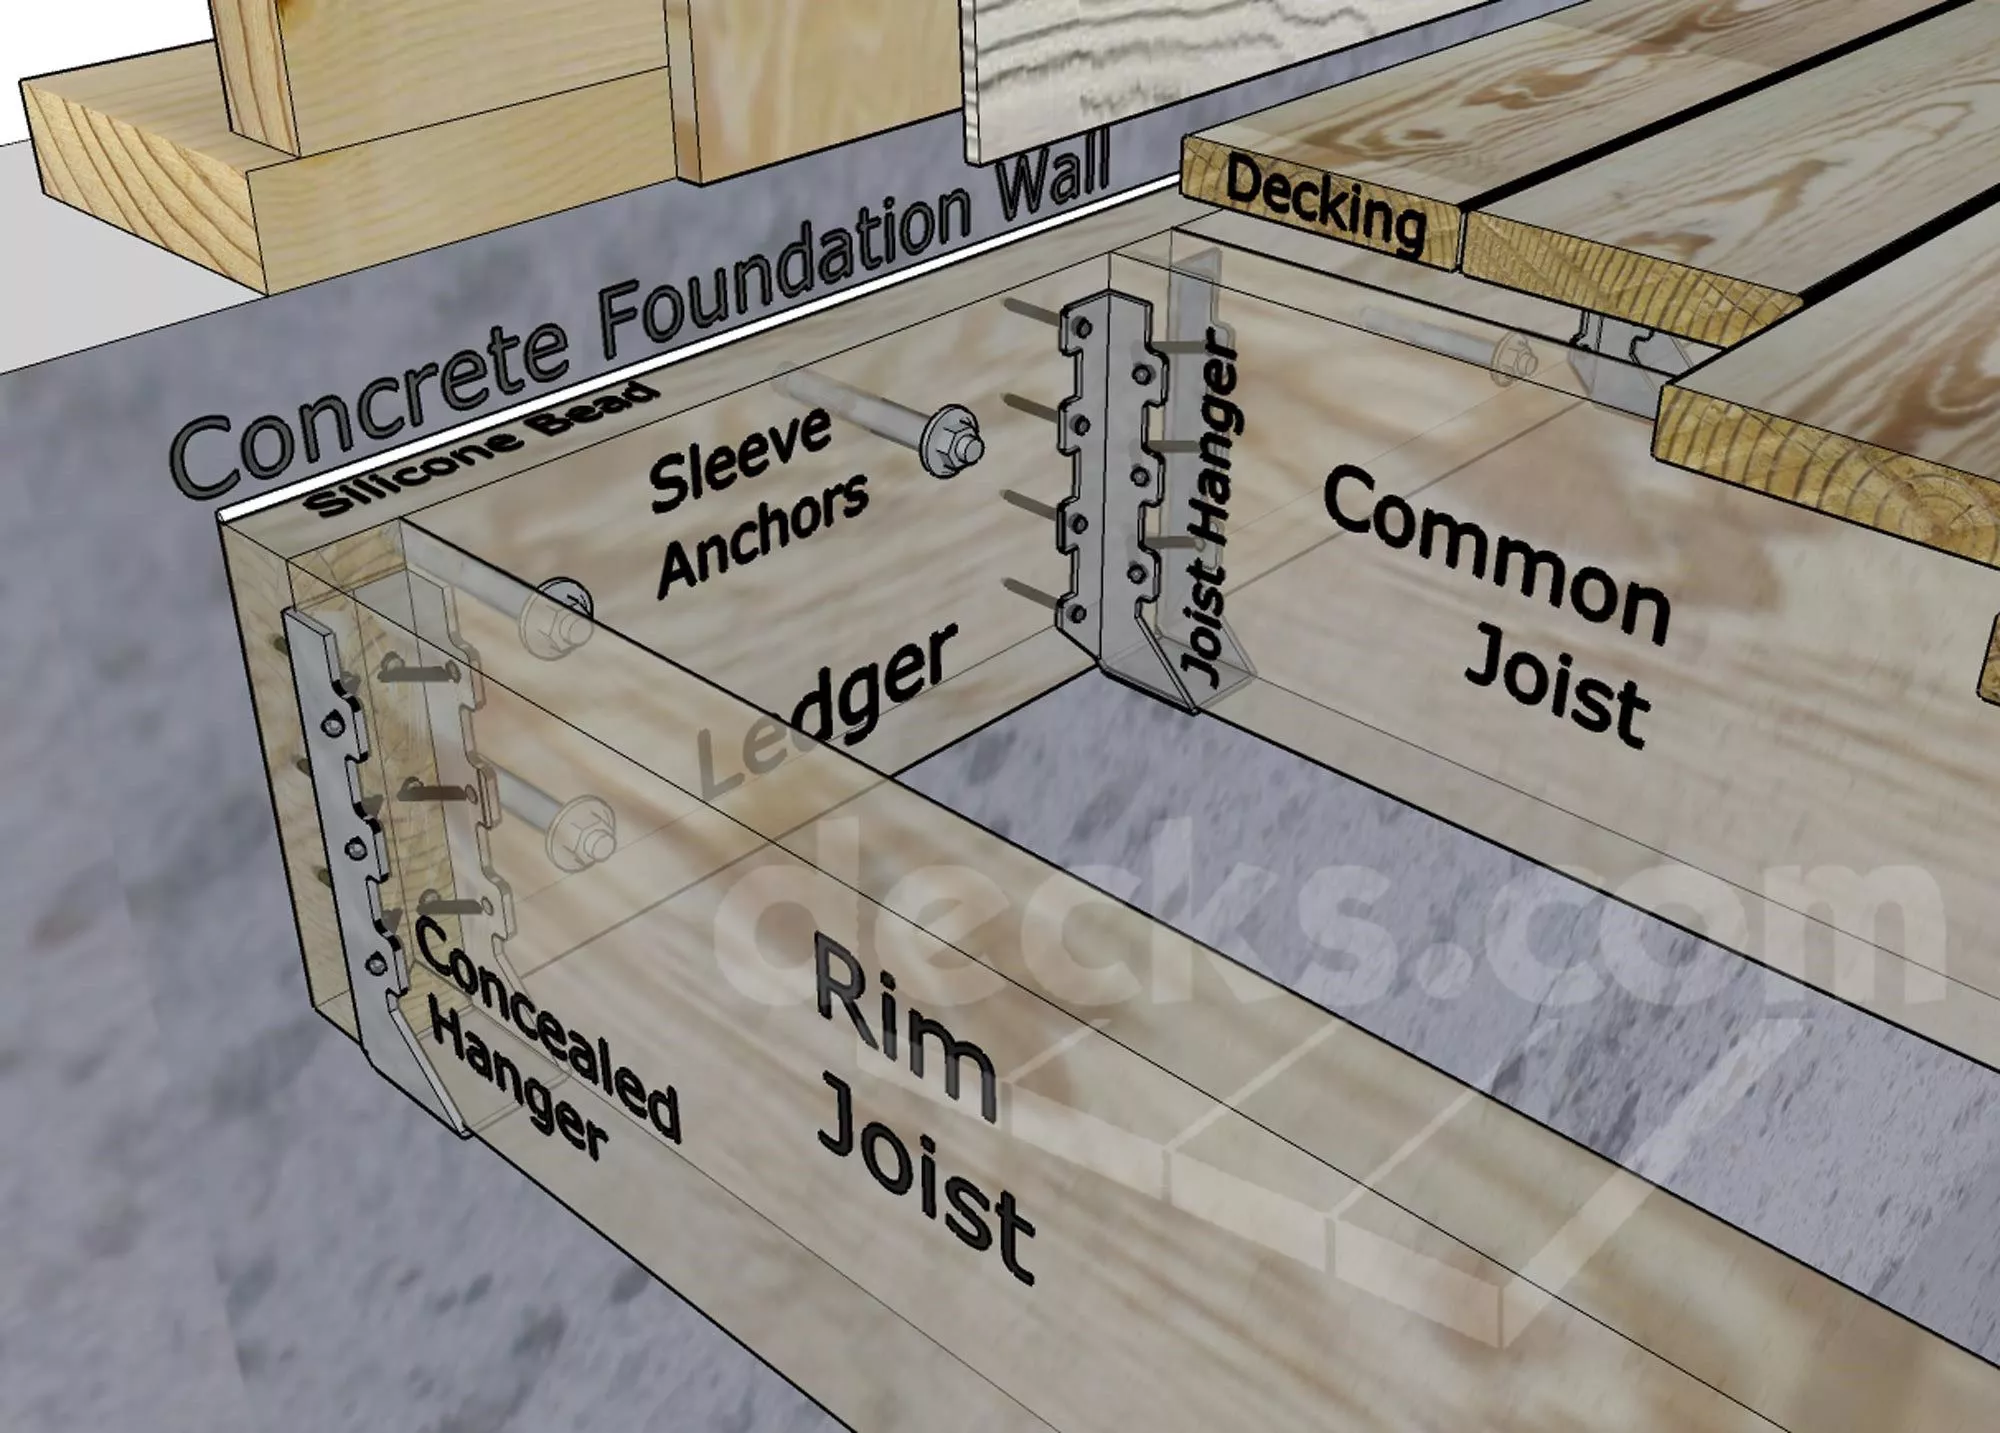
Credit: www.decks.com
Attaching Deck Joists
Attaching deck joists is a key step in securing your deck to a wall. Proper attachment keeps the deck stable and safe. The joists support the decking boards and carry the load. Follow clear steps for strong joist connections.
Aligning Joists With Ledger
Start by positioning the joists next to the ledger board on the wall. Make sure each joist is straight and evenly spaced. Use a tape measure and a level to check alignment. Proper alignment ensures the deck surface will be flat and sturdy.
Using Joist Hangers
Joist hangers provide strong support for each joist. Place a hanger on the ledger where each joist ends. Secure the hanger with nails or screws designed for this purpose. Joist hangers prevent joists from shifting or pulling away over time.
Fastening Joists Properly
Fasten the joists firmly into the hangers and ledger. Use galvanized nails or screws to avoid rust. Drive fasteners straight and deep to hold tight. Check all connections for solid fit. Proper fastening stops movement and keeps the deck safe.
Adding Decking Boards
Adding decking boards is a key step in building a sturdy deck attached to a wall. These boards form the surface you will walk on. Proper installation ensures the deck is safe and looks great. Follow clear steps to place the boards correctly and secure them well.
Spacing And Layout
Start by planning the layout of your decking boards. Leave small gaps between boards for water drainage. A 1/8 to 1/4 inch gap works well. This prevents wood from swelling and warping. Align boards straight and check for even spacing across the deck.
Arrange boards perpendicular to the joists for better strength. Stagger the board ends to avoid weak spots. Use a chalk line to keep boards straight during installation.
Securing Boards To Joists
Use corrosion-resistant screws or hidden fasteners to attach boards to joists. Drive screws at each joist to keep boards stable. Avoid nailing, as screws hold better over time. Countersink screws slightly to avoid splinters on the surface.
Keep screws flush with the board surface or just below. Check each board for movement and tighten screws if needed. Secure fasteners evenly to avoid board warping.
Finishing Touches
After all boards are installed, inspect the deck surface. Sand any rough edges or splinters gently. Clean the deck of dust and debris before sealing. Apply a wood sealant or stain to protect boards from weather.
Let the sealant dry fully before use. This step extends the life of your deck and keeps it looking good. Regular maintenance helps your deck stay safe and attractive for years.

Credit: www.youtube.com
Ensuring Long-term Stability
Ensuring long-term stability is key to a safe and durable deck. A well-anchored deck stays strong through weather and use. It prevents damage to your home and keeps everyone safe. Focus on protection, regular care, and fixing problems fast. These steps help your deck last for years.
Applying Weatherproofing
Weatherproofing protects wood from rain, sun, and snow. Use a good sealant or stain that repels water. Apply it evenly on all deck surfaces, including the anchor points. Repeat this every one to two years for best results. Weatherproofing stops wood from rotting and weakening.
Regular Inspection Tips
Check your deck and anchors often. Look for loose bolts, cracks, or rust on metal parts. Inspect the wood for signs of rot or insect damage. Tighten any loose fasteners immediately. Early checks catch small problems before they grow. Schedule inspections every six months or after storms.
Addressing Common Issues
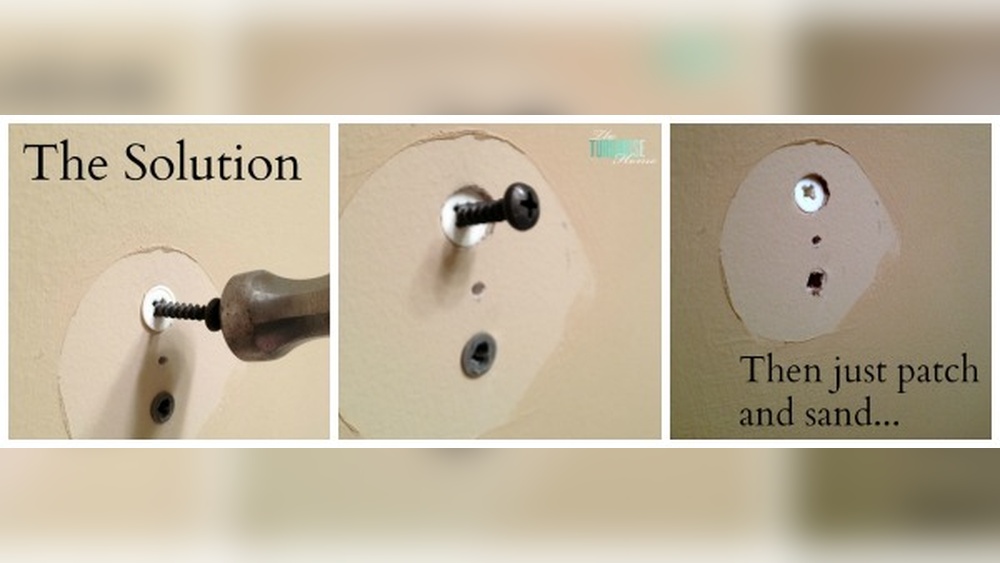
Fix loose anchors by tightening or replacing bolts. Treat any wood rot with a wood hardener or replace the affected board. Remove rust from metal parts and apply rust-proof paint. Clear debris and leaves to avoid moisture buildup. Quick repairs stop damage and keep your deck steady.
Frequently Asked Questions
How Do You Secure A Deck Ledger Board To A Wall?
Secure the ledger board using lag bolts or structural screws into wall studs or masonry. Ensure proper flashing to prevent water damage and use a level for accurate placement.
What Tools Are Needed To Anchor A Deck To A Wall?
Common tools include a drill, lag bolts, hammer drill (for masonry), level, tape measure, and wrench. These help ensure a strong and precise attachment to the wall.
Can You Anchor A Deck To A Brick Or Concrete Wall?
Yes, use masonry anchors or expansion bolts to attach the ledger board. Pre-drill holes with a hammer drill and use proper flashing to prevent moisture issues.
Why Is Flashing Important When Anchoring A Deck?
Flashing prevents water from seeping behind the ledger board. It protects the wall and framing from rot and structural damage, extending the deck’s lifespan.
Conclusion
Anchoring your deck to the wall keeps it safe and strong. Always use the right tools and follow steps carefully. Check your work to avoid mistakes and ensure stability. A well-anchored deck lasts longer and feels secure. Take your time and do the job right.
This small effort protects your home and family. Enjoy your deck with peace of mind.