Are you tired of struggling with weak wall anchors that just don’t hold up? Installing mushroom wall anchors could be the simple solution you need to secure your shelves, frames, or decorations firmly and safely.
Imagine hanging your favorite items without worrying about them falling or damaging your walls. In this guide, you’ll learn exactly how to install mushroom wall anchors step-by-step, saving you time and frustration. Keep reading, and soon you’ll have the confidence to tackle your next home project with ease.
Credit: seniena.lt
Choosing Mushroom Wall Anchors
Choosing the right mushroom wall anchors is key for a strong hold. The correct anchor keeps your items safe and stable on the wall. Consider the type, size, and material of the anchor. Match the anchor to your wall for best results.
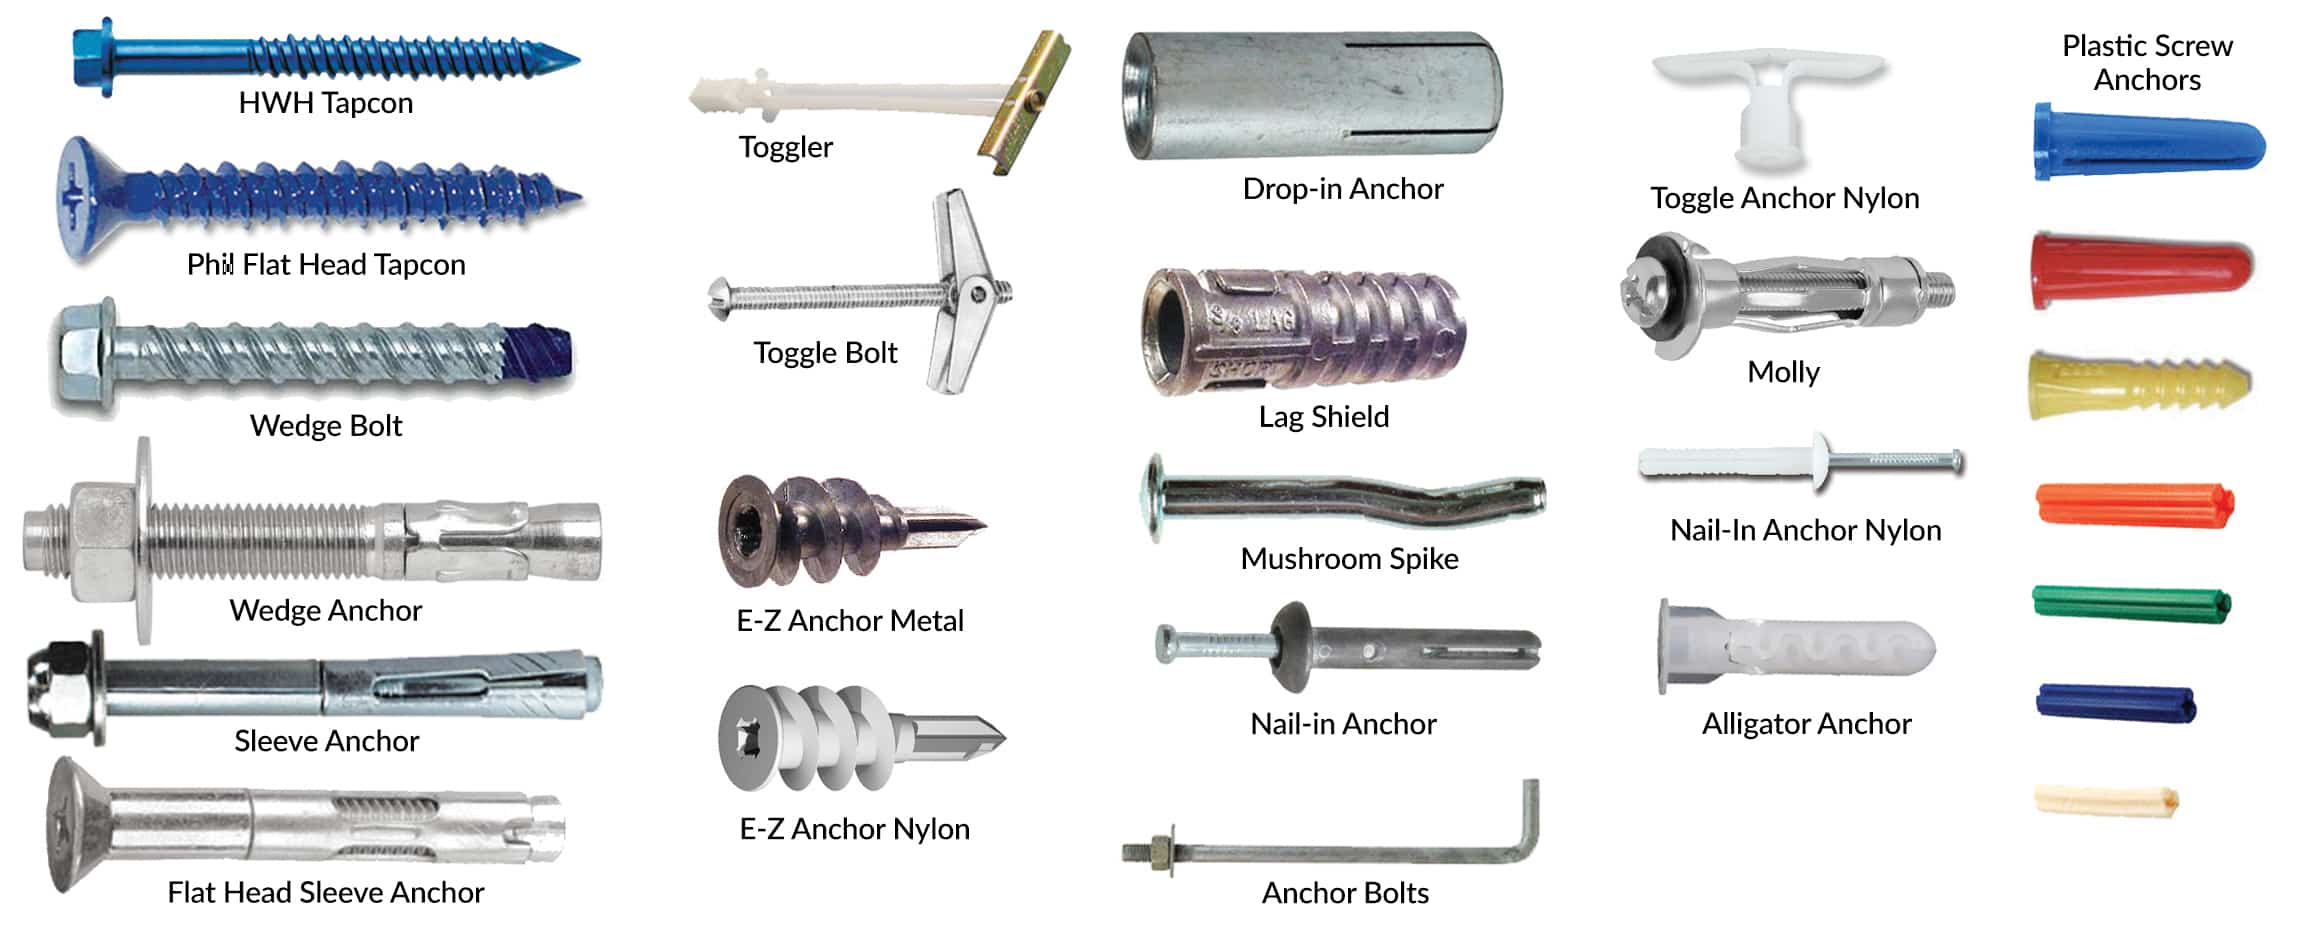
Types And Sizes
Mushroom wall anchors come in different types and sizes. Some have wide heads for heavy loads. Others are smaller for light objects. Pick a size that fits the weight of your item. The anchor should fit snugly in the wall hole.
Materials And Strength
Anchors are made from plastic, metal, or nylon. Plastic anchors suit light loads and drywall. Metal anchors hold heavier weights and are more durable. Nylon offers flexibility and strength. Choose material based on the weight and wall type.
Matching Anchors To Wall Types
Different walls need different anchors. Drywall uses plastic or nylon mushroom anchors. Concrete or brick walls require metal anchors. Hollow walls need anchors that expand inside the wall. Select an anchor made for your wall type to avoid damage.
Tools Needed For Installation
Installing mushroom wall anchors needs the right tools. Using proper tools makes the job easier and safer. Below are the basic tools required for a smooth installation process.
Drill And Drill Bits
A drill is essential for making holes in the wall. Choose drill bits that match the size of the anchor. Drill carefully to avoid damaging the wall. Use a clean, steady hand for accuracy.
Screwdrivers And Screws
Screwdrivers help to insert screws into the anchors. Use a screwdriver that fits the screw head. Different screws may need a flathead or a Phillips screwdriver. Tighten screws firmly but do not over-tighten.
Measuring And Marking Tools
Measuring tools ensure anchors go in the right spot. A tape measure or ruler works well for this. Mark the spots with a pencil before drilling. Accurate marks prevent mistakes and uneven placement.
Preparing The Wall Surface
Preparing the wall surface is the first step to install mushroom wall anchors securely. A clean and clear wall ensures strong holding power. The surface must be ready before drilling or inserting anchors. Take your time to prepare well. This makes the installation easier and safer.
Locating Studs And Avoiding Obstacles
Find the studs behind the wall using a stud finder. Studs give extra support for heavy items. Avoid electrical wires and plumbing pipes that may be hidden. Mark the spots clearly where you want to place the anchors. This prevents damage and ensures the anchors hold tight.
Cleaning The Installation Area
Wipe the wall surface to remove dust and dirt. Use a dry cloth or a mild cleaner if needed. A clean area helps the anchors stick better and keeps the wall from crumbling. Make sure the wall is dry before starting the installation. Clean surfaces improve the anchor’s grip and durability.
Drilling The Pilot Hole
Drilling the pilot hole is a key step for installing mushroom wall anchors. It creates the right space in the wall for the anchor to fit tightly. A well-drilled hole prevents damage and ensures the anchor holds strong. Proper drilling means the anchor will expand correctly inside the wall, giving the best support for your items.
Choosing The Right Drill Bit Size
Select a drill bit that matches the mushroom anchor’s diameter. The hole should be slightly smaller or equal to the anchor size. This fit helps the anchor grip the wall firmly. Using a drill bit too large will make the anchor loose. Too small, and the anchor won’t fit or may break.
Drilling At Correct Depth And Angle
Drill straight into the wall at a 90-degree angle. This angle ensures the anchor sits flush and stable. Measure the anchor length and drill a hole slightly deeper. This depth allows the anchor to fit fully without pushing against the wall surface. Avoid drilling too deep to keep the anchor secure.
Installing The Mushroom Anchor
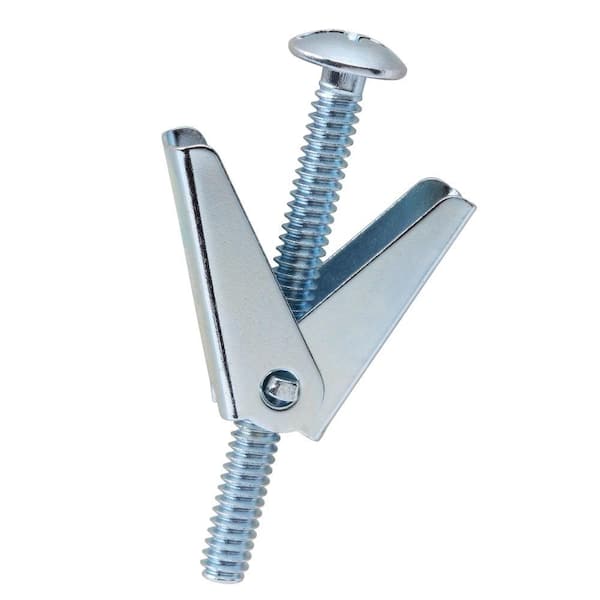
Installing the mushroom wall anchor is a simple process that helps secure objects to hollow walls. These anchors expand behind the wall, creating a strong hold. Follow the steps carefully for a safe and firm installation.
Inserting The Anchor Properly
Start by drilling a hole in the wall that matches the anchor size. Clean the hole to remove dust or debris. Hold the mushroom anchor by its head and push it straight into the hole. Tap gently with a hammer if needed. Make sure the anchor sits flush with the wall surface.
Ensuring A Secure Fit
Once inside, the mushroom anchor opens behind the wall. Pull the anchor slightly to check if it grips the back surface. Tighten the screw slowly to expand the anchor fully. Avoid over-tightening to prevent wall damage. The anchor should feel firm and stable before mounting any object.
Credit: www.homedepot.com
Securing The Fixture
Securing the fixture properly is key to a strong hold with mushroom wall anchors. The right screws and careful tightening keep your items safe and stable. This step ensures the anchor grips well inside the wall, giving your fixture firm support.
Selecting Appropriate Screws
Choose screws that fit the mushroom wall anchor size. Screws too long or short can cause poor hold or damage. Use screws made of rust-resistant metal for durability. Check the screw thread matches the anchor’s design. This makes the fixture secure and long-lasting.
Tightening Without Damaging
Turn screws slowly to avoid cracking the wall or anchor. Tighten just enough for a firm grip without overdoing it. Use a screwdriver, not a power drill, for better control. Stop when you feel resistance, signaling a secure fit. This protects both the fixture and wall surface.
Testing Anchor Strength
Testing the strength of mushroom wall anchors is important. It ensures the anchors hold well and keep your items safe. You can check their strength by applying a controlled load and watching for any movement or weakness. This step helps avoid damage or accidents later.
Applying Load Safely
Start by adding weight gradually. Use a light object or a small bag of sand. Attach it to the anchor and increase the weight slowly. Watch the anchor closely for any signs of slipping or movement. Stop if you see any issues. This method protects your wall and the anchor.
Checking For Stability
After applying the load, test the anchor’s stability. Gently wiggle the item or the anchor itself. Look for any shifts or looseness. A stable anchor will not move or bend. Check the wall around the anchor for cracks or damage. Stable anchors keep your wall and hanging items secure.
Troubleshooting Common Issues
Installing mushroom wall anchors can sometimes cause small problems. These issues may stop your project from being strong and safe. Knowing how to fix common troubles helps you save time and effort. This guide covers key problems and easy fixes. Keep your wall anchors secure and your walls intact.
Loose Anchors
Loose anchors do not hold objects well. This happens when the anchor is too small for the hole. Use a bigger anchor or make a new hole. Push the anchor fully into the wall. Tighten the screw slowly. Check if the anchor stays tight. If loose, remove and try again with a larger size.
Cracked Walls
Cracks around anchors weaken the hold. Cracks happen if the drill bit is too large or the wall is fragile. Use a smaller drill bit next time. Fill cracks with wall putty before installing anchors again. Avoid forcing the anchor into the hole. Gentle pressure protects your wall from damage.
Misaligned Holes
Misaligned holes make mounting difficult. Measure twice before drilling to avoid this. Use a level or template for accuracy. If holes are off, try filling and patching them. Drill new holes carefully at the right spots. Proper alignment keeps your items steady and looking good.
Maintenance Tips For Long-lasting Support
Maintaining mushroom wall anchors ensures they hold strong for years. Simple care steps keep the anchors secure and prevent damage. Proper upkeep saves time and money on repairs.
Regular Inspections
Check the anchors often for signs of wear or looseness. Look for cracks in the wall around the anchor. Test by gently tugging to see if it stays firm. Early detection stops bigger problems from forming.
Avoiding Overloading
Do not hang items heavier than the anchor’s weight limit. Too much weight causes the anchor to fail or damage the wall. Spread out heavy items across several anchors. This keeps the wall and anchors safe and strong.

Credit: www.shopterrain.com
Frequently Asked Questions
What Tools Are Needed For Mushroom Wall Anchor Installation?
You need a drill, screwdriver, hammer, and measuring tape for installation. These tools ensure accurate and secure placement of mushroom wall anchors.
How Do Mushroom Wall Anchors Work In Drywall?
Mushroom wall anchors expand behind the drywall when inserted. This creates a strong grip, preventing items from falling or loosening over time.
Can Mushroom Wall Anchors Hold Heavy Objects?
Yes, mushroom wall anchors can support medium to heavy loads. Always check the anchor’s weight rating before use to ensure safety.
Are Mushroom Wall Anchors Reusable After Removal?
No, mushroom wall anchors typically cannot be reused. Removing them damages their structure, reducing holding strength and reliability.
Conclusion
Installing mushroom wall anchors is simple with the right steps. Start by drilling a hole in the wall. Push the anchor in until it fits snugly. Then, screw in your fixture firmly. These anchors hold weight well and prevent damage.
Take your time to measure and align properly. This method saves time and keeps walls safe. Practice once, and it becomes easy. Now, you can hang shelves, pictures, or decorations securely. Trust the process and enjoy your sturdy walls.