Have you ever wanted to control a single light from two different switches? Maybe a switch at the top and bottom of your stairs or one at each end of a hallway?
It sounds tricky, but once you understand the simple wiring behind it, you can easily set it up yourself. Imagine the convenience of turning your lights on or off from multiple spots in your home. Keep reading, and you’ll discover step-by-step how to make this smart switch setup work perfectly for you.
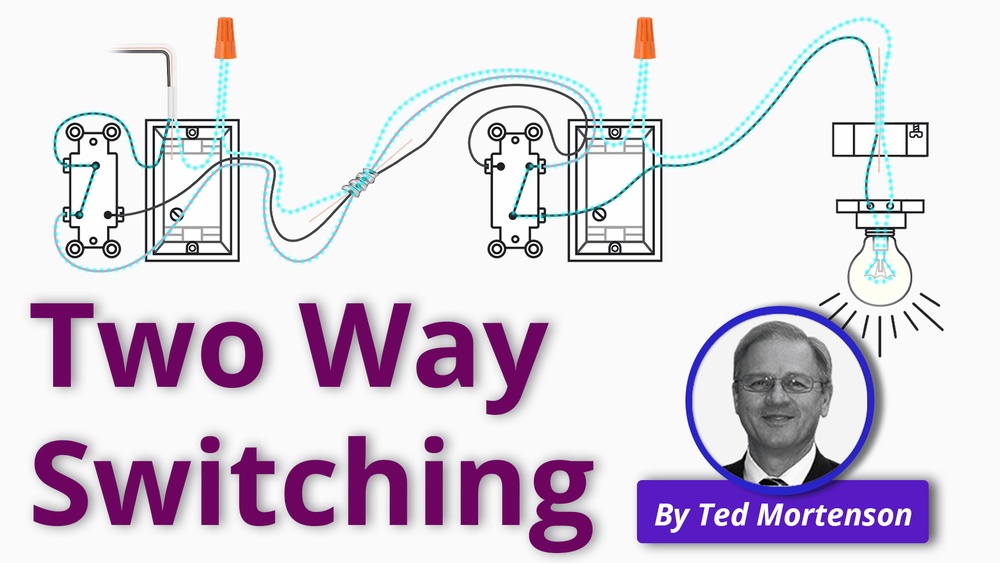
Credit: www.youtube.com
Basics Of Two-switch Lighting
Two-switch lighting allows you to control one light from two different places. This setup makes it easier to turn lights on or off in large rooms or hallways. It adds convenience and saves time.
Understanding how two switches work together helps with installation and troubleshooting. The system uses special wiring to connect the switches to the light. Each switch can change the light’s state independently.
How Two Switches Work Together
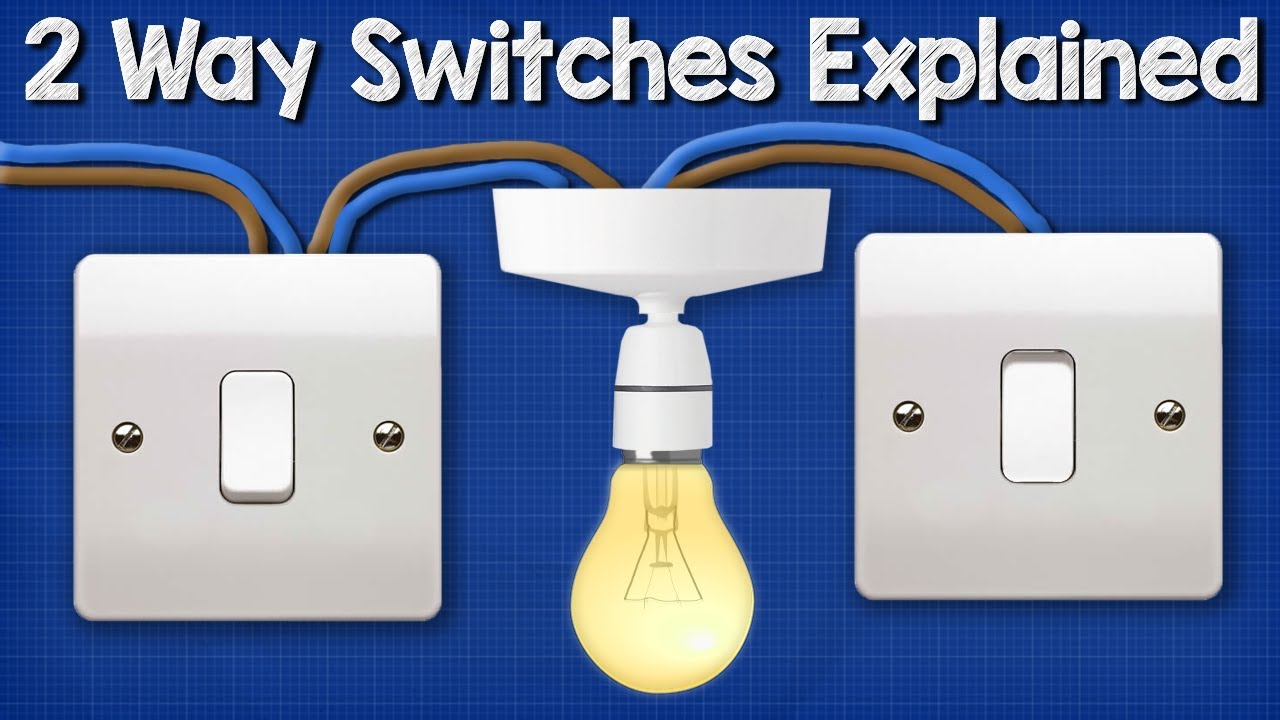
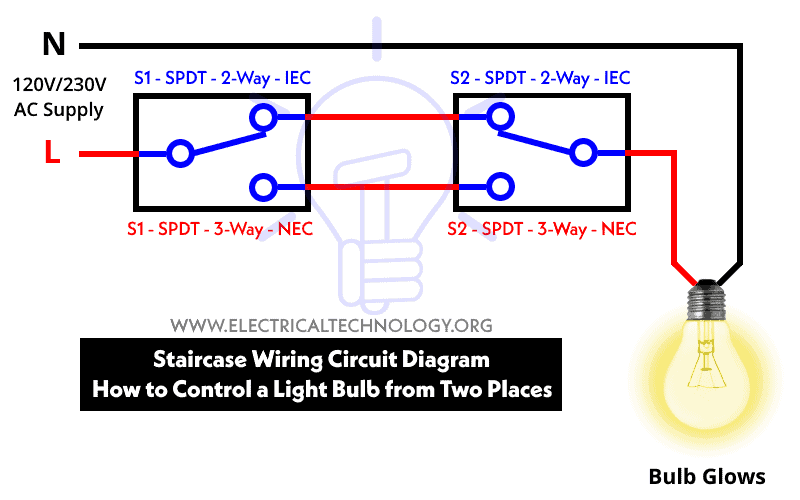
Two switches are linked by traveler wires. These wires carry electricity between the switches. Each switch has three terminals: one common and two travelers.
Flipping either switch changes the path of electricity. This action turns the light on or off. The switches do not need to be in the same room.
Common Uses For Two-switch Setups
Two-switch setups often appear in staircases and long hallways. They allow lighting control from both ends. This setup also works well in large rooms with multiple entrances.
These switches improve safety and comfort. You can turn the light on before entering or off after leaving. This setup reduces the need to walk in darkness.
Credit: www.electricaltechnology.org
Tools And Materials Needed
Controlling a light with two switches needs some specific tools and materials. These items help you work safely and get the job done right. Knowing what you need before starting saves time and avoids mistakes. This section lists the essential tools and electrical parts for your project.
Essential Tools
- Voltage tester to check power flow
- Wire stripper for removing insulation
- Screwdrivers, both flathead and Phillips
- Needle-nose pliers for gripping wires
- Electrical tape to cover wire connections
- Wire nuts to secure wire ends
- Drill with bits for mounting switches
Required Electrical Components
- Two 3-way switches for dual control
- Electrical wire: usually 14/3 or 12/3 gauge
- Light fixture suited to your room
- Electrical box to house each switch
- Wire connectors for joining cables
- Switch plates to cover installed switches
Safety Precautions
Safety is the most important part of controlling a light with two switches. Electricity can be dangerous. Taking the right safety steps protects you from shocks and injuries. Follow these precautions carefully before starting any electrical work.
Working without safety can cause serious harm. Always prepare well to keep yourself safe.
Power Shutdown Steps
Turn off the main power supply at the circuit breaker. This stops electricity from flowing to the switches. Use a voltage tester to check that the wires are not live. Do not trust the switch position alone. Confirm that the power is off to avoid accidents.
Work only when you are sure no electricity is running through the wires. This simple step prevents electric shocks and burns.
Protective Gear To Use
Wear rubber gloves to protect your hands from electric shocks. Use safety glasses to shield your eyes from sparks or debris. Avoid loose clothing or jewelry that could catch on wires.
Use insulated tools made for electrical work. This lowers the risk of accidental shocks. Proper gear makes your work safer and easier.
Wiring The Switches
Wiring the switches is the key step in controlling a light from two different places. This setup uses two special switches called three-way switches. Each switch connects to wires that carry electricity to the light and between the switches. Correct wiring makes the switches work together smoothly.
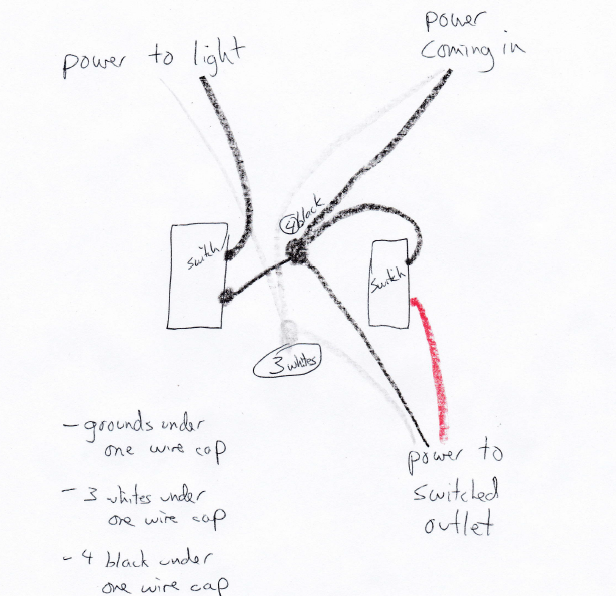
Identifying Wires
First, find the different wires inside the switch box. Usually, there is a black wire, called the hot wire, and a white wire, called the neutral wire. There are also two traveler wires, often red and black or red and white. These traveler wires connect the two switches. Finally, a bare or green wire is the ground wire for safety.
Connecting The First Switch
Start by connecting the hot black wire to the common terminal on the first switch. The common terminal is usually a different color screw, often black or dark bronze. Then, attach the two traveler wires to the remaining terminals. Tighten the screws firmly. Connect the ground wire to the green screw for safety.
Connecting The Second Switch
At the second switch, connect the traveler wires to the traveler terminals. Match the wires from the first switch to the same terminals here. Attach the wire going to the light to the common terminal. Finally, connect the ground wire to the green screw. This setup lets both switches control the light.
Testing Your Setup
Testing your setup is an important step after wiring two switches to control a light. It ensures everything works safely and correctly. This process helps find any wiring mistakes or issues before using the switches daily.
Careful testing avoids electrical problems and keeps your home safe. Follow each step to check your connections and fix common problems.
Checking Connections
Start by turning off the power at the circuit breaker. Use a voltage tester to confirm no electricity flows in the wires. Next, inspect each wire connection at both switches. Make sure wires are tight and properly attached to the terminals. Loose wires can cause the switches to fail or spark. Check that the traveler wires connect between the two switches correctly. Finally, turn the power back on and test the switches. The light should turn on or off from both switch locations.
Troubleshooting Common Issues
If the light does not work, recheck the wire connections. Look for swapped traveler wires or loose terminals. Use a continuity tester to verify the traveler wires are connected. Make sure the light bulb is not burned out. Check that the circuit breaker has not tripped. If the light flickers or acts strangely, wiring may be incorrect or damaged. Tighten all connections and replace any faulty wires. Testing each switch separately helps find the problem. Repeat the testing until the light turns on and off smoothly.
Tips For Maintenance
Maintaining the switches that control your light ensures they work safely and last longer. Regular care prevents common problems like flickering or failure. Simple checks help spot issues early. This saves time and money on repairs.
Keep switches clean and dry. Avoid force when using them. These small habits improve performance and safety.
Regular Inspection
Check switches often for signs of wear or damage. Look for loose parts, cracks, or discoloration. Test if the switches operate smoothly. Listen for unusual sounds like buzzing or clicking. These signs indicate a need for attention.
Turn off power before inspecting. Use a flashlight to see inside switch plates. Tighten screws gently if loose. Keep the area around switches free of dust and moisture.
When To Call A Professional
Call an electrician if switches feel hot or sparks appear. Avoid fixing electrical issues alone. Complex wiring or frequent failures need expert care. Professionals ensure safety and proper repair.
Seek help if lights flicker or switches do not respond. Electrical problems can cause fires if ignored. A professional will diagnose and fix the root cause quickly.
Credit: diy.stackexchange.com
Frequently Asked Questions
How Do Two Switches Control One Light?
Two switches use a 3-way wiring setup. This lets either switch turn the light on or off independently, providing convenient control from two locations.
What Wiring Is Needed For Two-switch Light Control?
You need a 3-way switch wiring system. It includes two 3-way switches and traveler wires that connect them to the light fixture.
Can I Install Two Switches For One Light Myself?
Yes, if you understand electrical wiring and safety. Always turn off power and follow local codes. Otherwise, hire a licensed electrician.
Why Use Two Switches For A Single Light?
Two switches add convenience by controlling one light from two locations, like at staircases or large rooms, improving accessibility and usability.
Conclusion
Controlling a light with two switches is simple and useful. You can turn the light on or off from different places. This setup works well in long hallways or big rooms. Follow the steps carefully to stay safe. Using the right tools makes the job easier.
Try it yourself and see how it changes your space. Small changes can bring big convenience. Enjoy the control and comfort this wiring gives you.