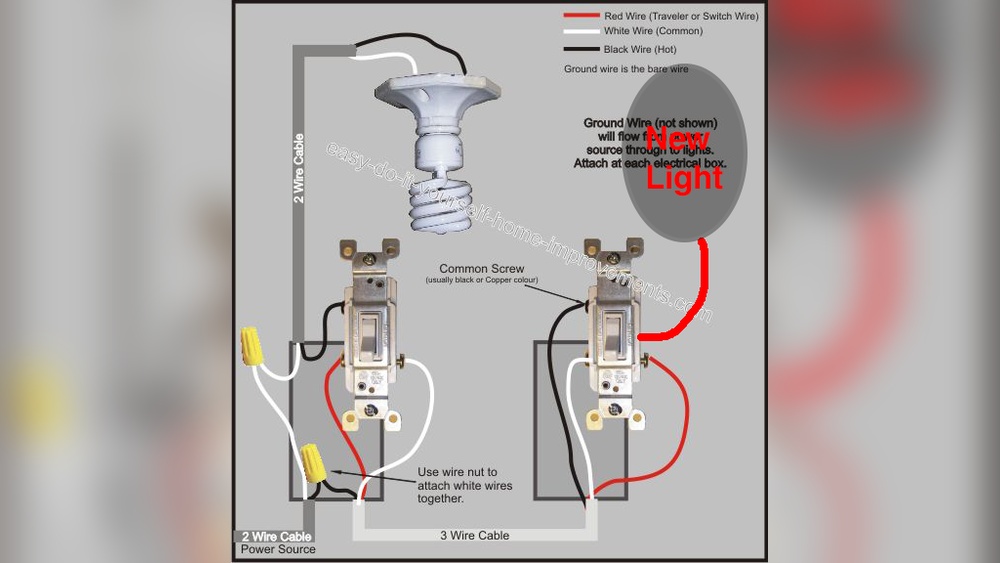
Are you looking to control a light from two different switches? Knowing how to connect a light switch two way can make your home more convenient and efficient.
Imagine turning your lights on or off from either side of a room or hallway without any hassle. In this guide, you’ll discover simple steps to set up a two-way light switch, even if you’re not an expert. Stick with me, and by the end, you’ll have the confidence to improve your lighting setup and enjoy greater control every day.
Let’s get started!
Basics Of Two-way Light Switch
Understanding the basics of a two-way light switch helps you control lights from two places. It is useful in many rooms and hallways. This system makes turning lights on or off easy and convenient.
Two-way switches work together to control one light or set of lights. They allow you to operate lighting from different locations. This setup improves comfort and safety in your home.
What Is A Two-way Switch
A two-way switch is a type of light switch. It connects two switches to one light. Both switches can turn the light on or off. This means you do not need to walk to just one switch.
These switches have three terminals. Two of them connect to the other switch. The third terminal connects to the light or power source. This wiring lets the switches work together.
Where To Use Two-way Switching
Two-way switches are useful in places with two entry points. Hallways and staircases often use this setup. You can turn lights on or off at either end.
Large rooms with multiple doors also benefit. It adds convenience and saves energy. You do not need to walk across the room to switch off the lights.
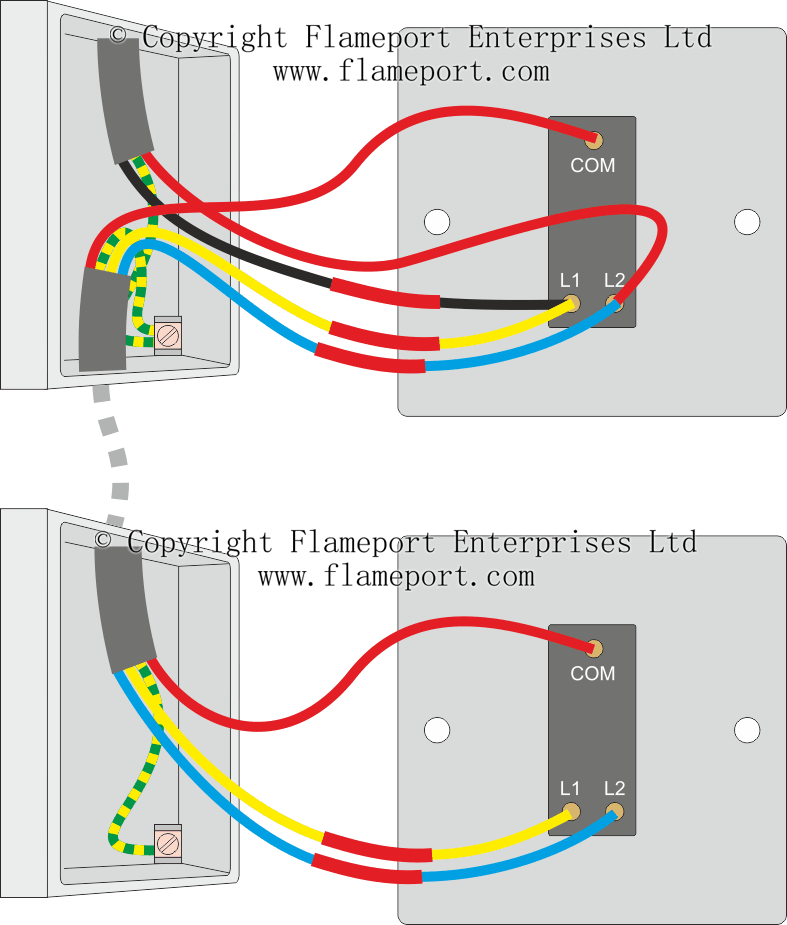
Credit: flameport.com
Tools And Materials Needed
Before starting to connect a light switch two way, gather all tools and materials. Having the right items makes the job easier and safer. Prepare your workspace and get everything ready.
Essential Tools
- Screwdriver (flathead and Phillips)
- Wire stripper
- Voltage tester
- Needle-nose pliers
- Electrical tape
- Drill (optional for mounting)
- Multimeter (for checking connections)
- Wire cutter
Required Materials
- Two-way light switches (2 units)
- Electrical wires (live, neutral, and earth)
- Wire connectors or terminal blocks
- Switch boxes
- Wall plates
- Screws for mounting
- Insulation sleeves (optional)
Safety Precautions
Working with electrical wiring requires great care. Safety is the top priority when connecting a two-way light switch. Even a small mistake can cause shocks or fire. Follow safety steps carefully to protect yourself and others.
Power Off Procedures
Always turn off the main power before starting. Use the circuit breaker to cut power to the switch circuit. Double-check by testing the switch with a voltage tester. Never trust the switch position alone. Confirm no electricity flows to the wires before touching them.
Using Insulated Tools
Use tools with insulated handles to avoid electric shocks. Insulated tools block electricity from reaching your hands. Choose screwdrivers and pliers with rubber grips. These tools add a layer of protection while working on wires. Avoid using metal tools without insulation around live wires.
Wiring Setup Explained
Connecting a two-way light switch requires a clear wiring setup. Understanding the wires and switch terminals is key. This guide breaks down the basics to help you wire safely and correctly.
Follow the steps carefully to avoid mistakes. Knowing the role of each wire and terminal makes the process easier.
Identifying Wires
Start by finding the live wire. It usually carries power to the switch. The live wire is often red or brown in color.
Next, locate the neutral wire. It completes the circuit and is usually blue or black. Then, find the two traveler wires. These connect the two switches and are often red or brown as well.
Use a tester to confirm each wire’s function. Labeling wires helps avoid confusion during installation.
Understanding Switch Terminals
Two-way switches have three terminals: common, L1, and L2. The common terminal connects to the live wire or the load.
L1 and L2 are traveler terminals. They connect the two switches together. The position of the switch changes the path of electricity.
Correctly attaching wires to terminals is crucial. Loose or wrong connections can cause the switch to fail.
Step-by-step Connection Process
Connecting a two-way light switch is easier than it seems. This process allows you to control one light from two locations. Follow these clear steps to complete the wiring safely and correctly. Understanding each part helps avoid mistakes and keeps the setup safe.
Prepare The Switches
Turn off power at the breaker before starting. Remove the old switches if needed. Check that you have two two-way switches. Strip about half an inch of insulation from each wire end. Use a voltage tester to confirm no current flows.
Connect The Common Terminal
Identify the common terminal on each switch. It is usually marked or a different color. Connect the live wire from the power source to the first switch’s common terminal. Connect the wire going to the light fixture to the second switch’s common terminal. Tighten the screws securely to hold the wires.
Wire The Travelers
Two traveler wires link the two switches. Connect these wires to the traveler terminals on the first switch. Attach the other ends to the traveler terminals on the second switch. Make sure the wires are firmly attached and not loose. These wires carry current between switches.
Secure Ground Wires
Locate the ground wire, usually green or bare copper. Connect the ground wire to the ground terminal on both switches. Use a wire connector if grounding wires from both switches join together. Proper grounding protects against electrical shocks and fire risks.
Testing The Connection
Testing the connection is a key step after wiring a two-way light switch. It ensures the switches work correctly and the light turns on and off from both points. This step helps avoid future issues and confirms the job is done right.
Restore Power Safely
First, turn the power back on at the circuit breaker. Be careful and avoid touching wires directly. Use a voltage tester to confirm power is flowing safely. Keep hands dry and stand on a dry surface. Safety comes first during this step.
Check Switch Functionality
Flip each switch to test the light. The light should turn on or off from both switches. Test multiple times to ensure consistent operation. If the light does not respond, check the wiring again. Proper function means your two-way switch is ready to use.
Common Issues And Fixes
Connecting a two-way light switch can sometimes lead to common problems. Knowing these issues helps fix the switch quickly. This section covers frequent problems and their solutions. It makes your two-way switch work perfectly.
Switch Not Working Correctly
A switch that does not work right often means wiring issues. The switch may not turn the light on or off as expected. Sometimes, the switch clicks but the light does not respond. This happens when wires are not connected properly or damaged.
Check if the switch terminals are tight and wires are in the correct place. Replace any worn-out switch. Testing the switch with a multimeter can find faults. Ensure power is off before inspecting the switch to avoid shocks.
Troubleshooting Loose Connections
Loose connections cause flickering lights or no light at all. Wires may have become loose over time or after installation. Look for any wires that move easily or have exposed copper. Loose wires create poor contact and stop the switch from working well.
Turn off the power. Tighten all terminal screws firmly. Use wire strippers to remove old insulation if needed. Make sure wires are connected under the screw heads, not wrapped around. Test the switch after fixing connections to confirm the problem is solved.

Credit: www.realpars.com

Credit: www.youtube.com
Frequently Asked Questions
What Is A Two-way Light Switch Connection?
A two-way switch lets you control one light from two locations. It uses two switches connected by traveler wires. This setup is common in hallways or large rooms for convenience and flexibility.
How Do I Wire A Two-way Light Switch?
Connect the live wire to the common terminal on the first switch. Use traveler wires between both switches’ traveler terminals. Finally, connect the light to the common terminal of the second switch.
Can I Use A Two-way Switch With Led Lights?
Yes, two-way switches work with LED lights. Ensure your LED bulbs are compatible with the switch type. Using dimmable LEDs with compatible dimmer switches improves functionality.
What Tools Do I Need To Connect A Two-way Switch?
You need a screwdriver, wire stripper, voltage tester, and electrical tape. A circuit tester ensures power is off before you start. Always follow safety precautions when working with electricity.
Conclusion
Connecting a two-way light switch is simpler than it seems. Follow each step carefully and stay safe. Double-check your wiring before turning the power back on. This setup lets you control lights from two places. It works well in hallways or large rooms.
Take your time and use the right tools. Practice helps build confidence and skill. Soon, you can fix similar electrical tasks yourself. Enjoy the convenience of two-way lighting in your home.