Is your brake light staying on, or not lighting up when you press the pedal? This common problem can be both annoying and dangerous.
The good news is, you don’t always need a mechanic to fix it. Adjusting your brake light switch on the brake pedal is a simple task that you can handle yourself. In this guide, you’ll learn exactly how to make the right adjustments quickly and safely.
Keep reading, and by the end, you’ll have the confidence to solve this issue and keep your car running smoothly.

Credit: forums.pelicanparts.com
Brake Light Switch Basics
The brake light switch is a small but important part of your vehicle. It controls the brake lights that alert drivers behind you. Understanding its basics helps keep your car safe and functional. This section explains the switch’s role, types, and signs of failure.
Function Of The Brake Light Switch
The brake light switch activates the brake lights. It turns on the lights when you press the brake pedal. This warns other drivers that you are slowing down or stopping. The switch also helps control some vehicle systems, like cruise control.
Common Switch Types
There are mainly two types of brake light switches. Mechanical switches use a small button pressed by the pedal. Electronic switches use sensors to detect pedal movement. Both types perform the same task but work differently.
Signs Of A Faulty Switch
Brake lights not turning on is a clear sign of a bad switch. Lights that stay on even without pressing the pedal also show a problem. Other signs include cruise control issues or warning lights on the dashboard. Checking the switch can solve these problems.
Tools Needed For Adjustment
Adjusting the brake light switch on the brake pedal requires certain tools. Using the right tools makes the job easier and safer. This section lists the essential tools and safety gear needed for the task.
Basic Tools Checklist
Start with a set of screwdrivers. Both flathead and Phillips types may be needed. A wrench or socket set helps loosen bolts. A flashlight is useful for better visibility. Pliers can assist in handling small parts. Keep a multimeter handy for electrical testing. These tools cover most adjustment tasks.
Safety Equipment
Wear safety gloves to protect your hands. Use safety glasses to shield your eyes. Ensure the car is parked on a flat surface. Use wheel chocks to prevent movement. Avoid working under the car without proper support. These safety steps keep you safe during the adjustment.
Locate The Brake Light Switch
Before adjusting the brake light switch, you need to find its exact location. This part controls the brake lights, turning them on and off as you press the pedal. Knowing where the switch sits helps you adjust it quickly and safely.
Position On The Brake Pedal
The brake light switch is usually near the top of the brake pedal arm. It sits close to the pedal bracket or firewall. This spot lets the switch detect pedal movement easily. When the pedal is pressed, the switch activates the brake lights.
Accessing The Switch Area
To reach the switch, look under the dashboard on the driver’s side. You may need to remove a panel or cover. Use a flashlight to see clearly in this space. The switch is often small and cylindrical with wires attached. Handle carefully to avoid damaging it.
Step-by-step Adjustment Process
Adjusting the brake light switch on the brake pedal is a simple task. It helps ensure your brake lights work correctly. Follow these steps carefully to fix or adjust the switch.
Prepare The Vehicle
Park the vehicle on a flat surface. Turn off the engine and remove the keys. Open the driver’s side door to access the brake pedal. Make sure the area under the dashboard is clear. Keep a flashlight handy if needed for better visibility.
Loosen The Switch
Locate the brake light switch near the brake pedal. It is usually attached to a bracket or clip. Use a wrench or screwdriver to loosen the switch mounting nut. Do not remove the switch completely. Loosen it just enough to move it by hand.
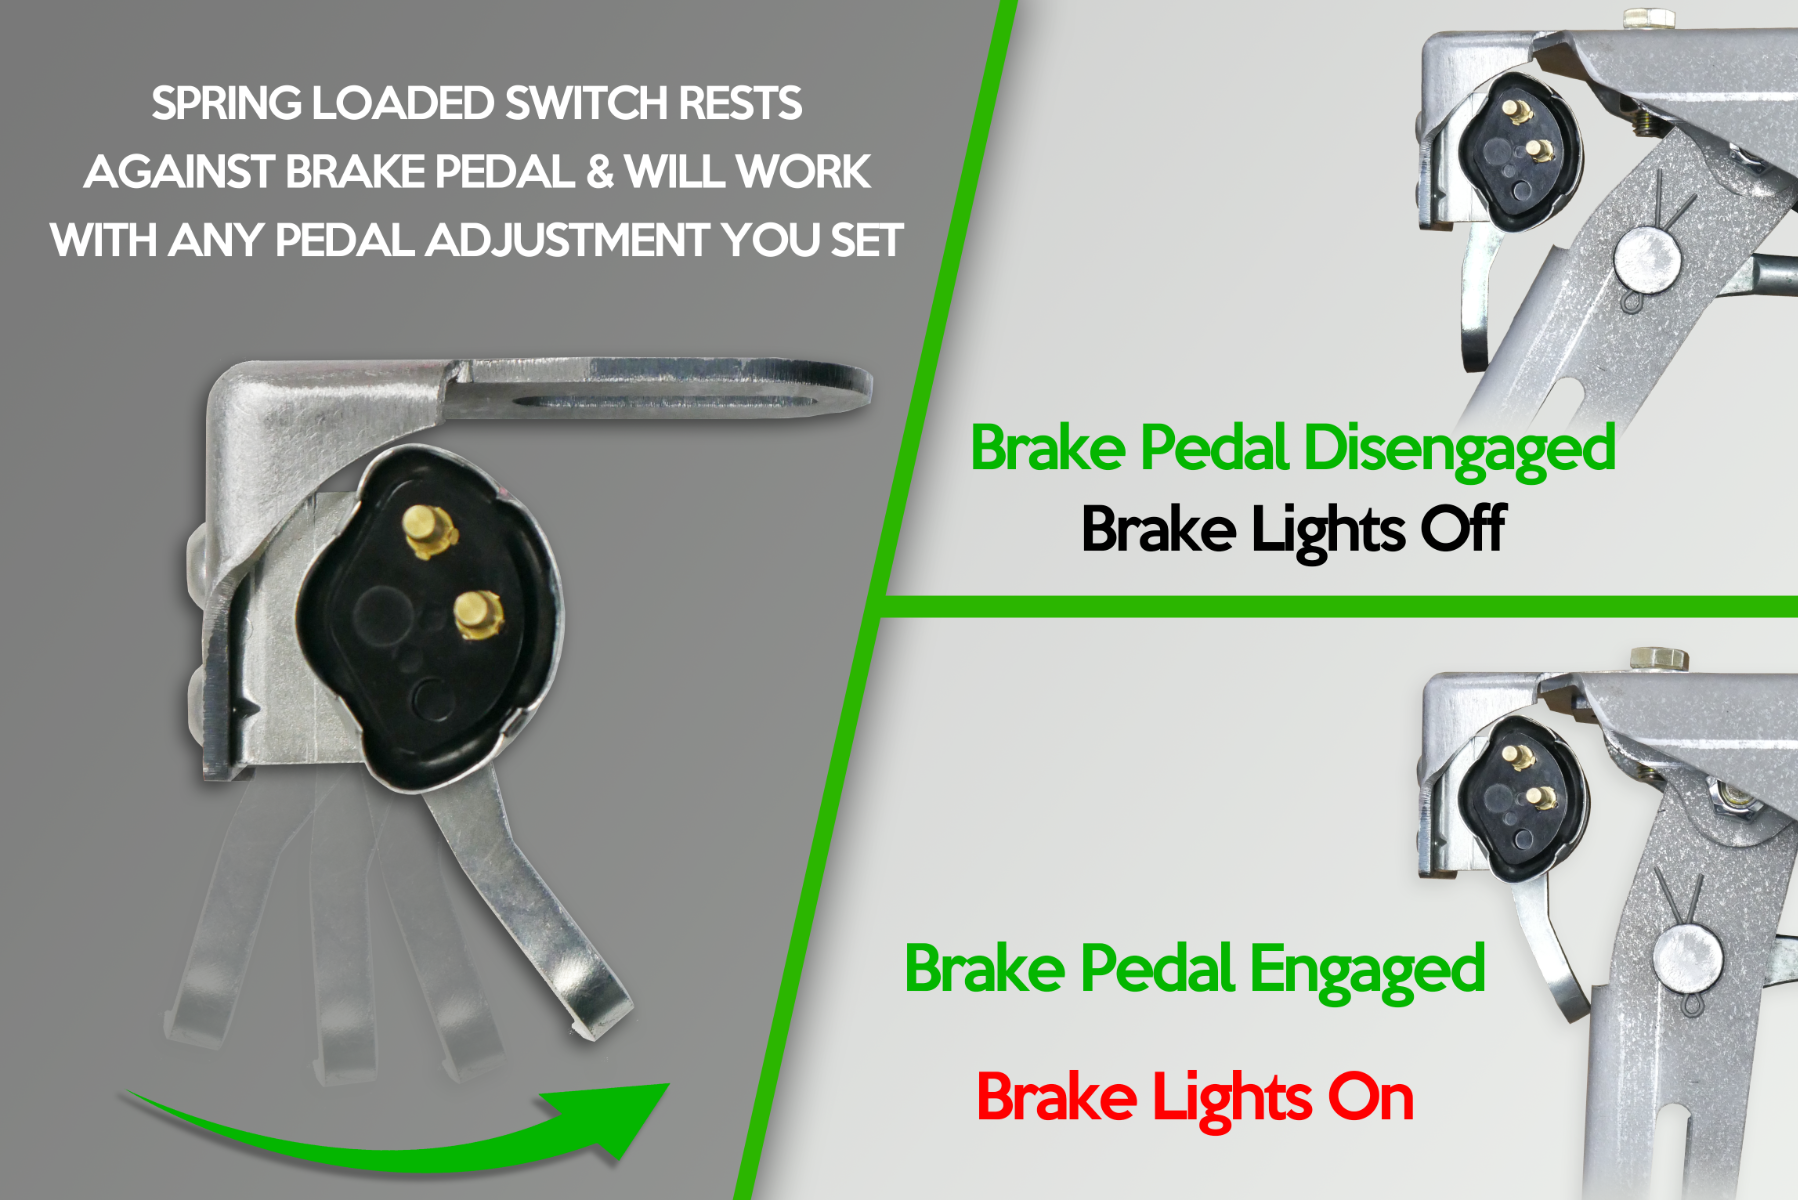
Adjust The Switch Position
Gently push or pull the switch to adjust its position. The switch should activate when the brake pedal is slightly pressed. Ensure the switch plunger touches the pedal arm. Avoid pressing it too hard or leaving a big gap. Adjust it until the brake lights respond correctly.
Test The Brake Lights
Ask someone to watch the rear of the vehicle. Press the brake pedal slowly and release it. Check if the brake lights turn on and off properly. Repeat the process a few times to confirm the switch works well. Make small adjustments if needed.
Secure The Switch
Once the switch works correctly, tighten the mounting nut. Ensure the switch does not move or slip out of place. Double-check the brake lights again. Close the driver’s door and remove any tools. Your brake light switch is now properly adjusted.
Troubleshooting Common Issues
Troubleshooting common issues with the brake light switch is important for safety. Many drivers face problems with their brake lights not working right. These issues can cause confusion on the road and increase the risk of accidents. Learning to identify and fix these problems saves time and money. The following sections explain how to handle common brake light switch problems.
Brake Lights Not Turning Off
Brake lights that stay on can drain your car battery. The switch might be stuck or out of position. Check if the switch plunger is pressed correctly by the brake pedal. Adjust the switch so it releases fully when the pedal is up. Also, inspect the wiring for damage or shorts that cause the lights to stay on.
Brake Lights Not Turning On
Lights that do not turn on can cause accidents. Start by checking the brake light switch connection. It may be loose or broken. Make sure the switch activates when the pedal is pressed. Test the brake light bulbs and replace any that are burnt out. If the switch is faulty, replace it with a new one.
Intermittent Light Problems
Brake lights that flicker or work only sometimes need careful inspection. Loose wiring or connectors often cause this. Clean and tighten all connections near the switch. Check for corrosion or dirt that blocks the signal. Adjust the switch position so it triggers consistently each time the pedal is pressed.
Credit: www.wideopendesign.com
Maintenance Tips
Proper maintenance of the brake light switch is essential for safe driving. Regular care helps keep the brake system functioning well. Small checks can prevent bigger problems later. Follow these maintenance tips to ensure your brake light switch works correctly.
Regular Inspection
Check the brake light switch every few months. Look for signs of wear or damage. Make sure the switch is clean and free of dirt. Test the brake lights by pressing the pedal. The lights should turn on immediately. If they delay or don’t work, the switch may need adjustment.
When To Replace The Switch
Replace the brake light switch if it fails to respond properly. Common signs include brake lights staying on or not lighting up. Also, if the switch looks corroded or broken, replacement is necessary. Using a faulty switch can cause safety issues on the road. Changing it promptly keeps your brake system safe and reliable.

Credit: www.youtube.com
Frequently Asked Questions
How Do I Know If My Brake Light Switch Needs Adjustment?
If brake lights stay on or don’t light up, the switch may need adjustment. Check for delayed or inconsistent light response.
What Tools Are Needed To Adjust The Brake Light Switch?
Typically, you need a wrench, screwdriver, and sometimes pliers to adjust the brake light switch on the pedal.
How Long Does It Take To Adjust The Brake Light Switch?
Adjusting a brake light switch usually takes 10 to 20 minutes, depending on vehicle model and switch type.
Can I Adjust The Brake Light Switch Myself Safely?
Yes, adjusting the brake light switch is safe if you follow the vehicle manual and disconnect the battery first.
Conclusion
Adjusting your brake light switch keeps your car safe and working well. A simple fix can stop brake light problems fast. Check the switch regularly to avoid bigger issues later. Follow the steps carefully for best results. Taking a little time now saves money and trouble.
Keep your brake lights bright and your drives secure. Your car and safety both thank you.