Have you ever wished your lights could turn on or off automatically without you lifting a finger? Connecting a timer to your light switch can make that happen—and it’s easier than you might think.
Imagine saving energy, boosting security, and adding convenience all with a simple device. You’ll discover step-by-step how to connect a timer to your light switch safely and effectively. By the end, you’ll have the confidence to upgrade your home lighting and enjoy smarter control every day.
Keep reading to unlock the secret to effortless lighting!
Credit: mydome.co.uk
Choosing The Right Timer
Choosing the right timer is important for connecting it to a light switch. The timer controls when the light turns on and off. Picking the wrong timer may cause problems or waste energy. This section explains how to select a timer that fits your needs and works well with your light switch.
Types Of Timers
Mechanical timers use a dial and gears. They are simple and easy to use. Digital timers have a screen and buttons. They offer more precise control and programs. Smart timers connect to Wi-Fi. You can control them with a phone app. Choose a timer type that suits your lifestyle.
Compatibility With Light Switches
Check if the timer fits your light switch style. Some timers work only with toggle switches. Others fit rocker or push-button switches. Also, confirm if the timer supports single-pole or three-way switches. Proper compatibility ensures smooth installation and function.
Power Requirements
Timers need power to run. Some use batteries, while others need a neutral wire connection. Verify your electrical setup before buying a timer. Using the wrong power type can cause the timer to fail. Always match the timer’s power needs with your home’s wiring.
Gathering Necessary Tools
Gathering the right tools is the first step to connect a timer to a light switch. Using proper tools makes the job easier and safer. Having everything ready helps to avoid delays and mistakes.
This section lists all the tools and safety gear you need. Prepare well for a smooth installation.
Essential Tools List
- Screwdriver set (flathead and Phillips)
- Wire stripper
- Voltage tester
- Needle-nose pliers
- Electrical tape
- Wire nuts
- Drill (optional for mounting)
- Timer switch kit
Safety Equipment
- Insulated gloves to protect from shocks
- Safety glasses to protect your eyes
- Rubber-soled shoes for insulation
- Flashlight for better visibility
- Lockout/tagout kit to prevent accidental power
Preparing For Installation
Preparing for installation is the first step to connect a timer to your light switch. This stage ensures your safety and makes the process smooth. Follow each step carefully before starting the installation.
Turning Off Power
Always turn off the power at the circuit breaker. This stops electricity from flowing to the switch. Use the main switch to cut power for the room where you work. Double-check to be sure the power is off before touching any wires.
Testing For Live Wires
Use a voltage tester to check if wires carry electricity. Touch the tester to each wire carefully. If the tester lights up or beeps, the wire is live. Make sure no wires are live before proceeding to avoid shocks.
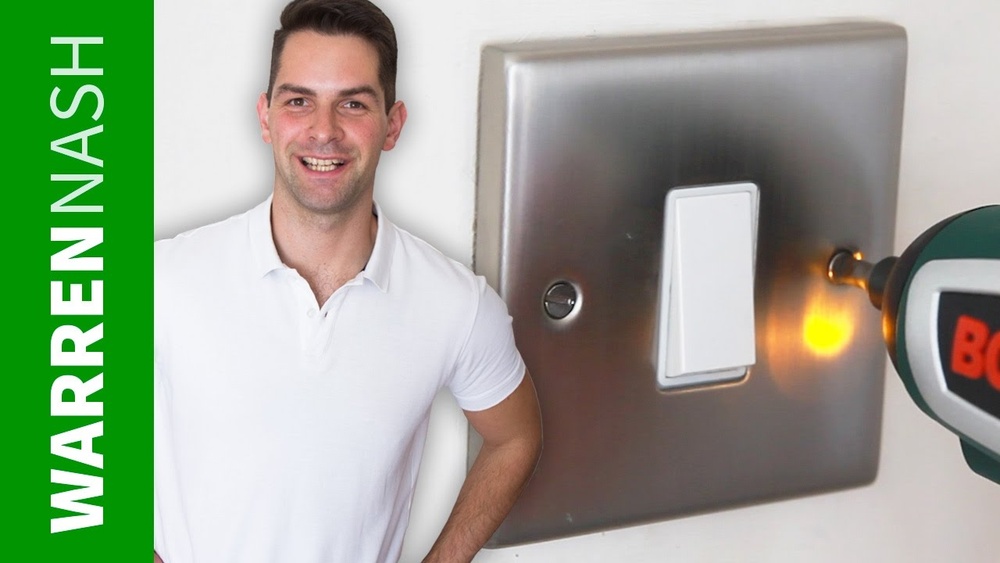
Removing The Existing Switch
Unscrew the cover plate from the switch. Remove the screws holding the switch in place. Gently pull the switch out from the wall box. Take note of how the wires are connected before disconnecting them. This helps when connecting the timer later.

Credit: mydome.co.uk
Wiring The Timer
Wiring the timer is a key step to control your lights automatically. This process involves connecting the timer to your existing light switch wires. Doing this correctly ensures your timer works safely and effectively. Follow simple steps to identify wires, connect the timer, and secure all connections tightly.
Identifying Wires
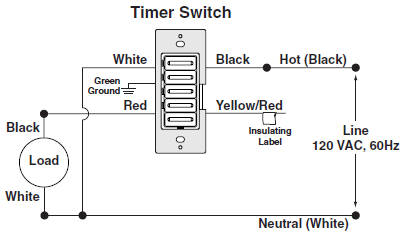
Turn off power at the circuit breaker before starting. Look inside the switch box to see the wires. Usually, you will find a live wire, a neutral wire, and a load wire. The live wire brings power from the panel. The load wire goes to the light fixture. The neutral wire completes the circuit. Use a voltage tester to confirm which wire is live. Label each wire with tape for easy reference.
Connecting Timer Wires
Match the timer wires with the switch wires you identified. Connect the timer’s live wire to the live wire in the box. Attach the timer’s load wire to the load wire going to the light. Connect the timer’s neutral wire to the neutral wire bundle in the box. Some timers also have a ground wire. Attach this to the grounding wire or screw in the box. Follow the timer’s manual for exact wire colors and placement.
Securing Connections
Use wire nuts to twist wires together firmly. Make sure no bare wire shows outside the nuts. Wrap connections with electrical tape for extra safety. Push all wires back into the box gently. Screw the timer securely into the switch box. Restore power and test the timer operation. Tight connections prevent shorts and ensure long-lasting performance.
Mounting The Timer
Mounting the timer is the next step after wiring it to the light switch. This step secures the timer in place and makes sure it works well. Proper mounting also keeps the timer safe from damage and helps it look neat on the wall.
Fitting The Timer To The Wall
Start by positioning the timer over the switch box. Align the holes on the timer with the screw holes in the box. Use a screwdriver to tighten the screws gently. Do not over-tighten, or you might crack the timer. The timer should sit flat against the wall with no gaps.
Replacing The Faceplate
After fitting the timer, place the faceplate back on. The faceplate covers the timer and wires. Snap or screw it into place, depending on your model. Check that the faceplate fits tightly and looks even. This step completes the mounting and keeps everything secure.

Credit: www.ifixit.com
Testing The Setup
Testing the setup after connecting a timer to a light switch is essential. This step ensures everything works safely and correctly. Take your time to check each part carefully. A proper test helps avoid mistakes and saves trouble later.
Restoring Power
Turn the main power back on at the circuit breaker. Check the light switch to see if it has power. Use a voltage tester if needed to confirm power is live. Never skip this step for safety reasons.
Setting The Timer
Adjust the timer settings according to your needs. Set the current time on the timer dial. Program the on and off times clearly. Use the manual for exact instructions on your timer model.
Verifying Operation
Test the timer by watching the light switch during set times. The light should turn on and off as programmed. If it does not, recheck your wiring and timer settings. Repeat the test until the operation is smooth and reliable.
Troubleshooting Common Issues
Connecting a timer to a light switch is helpful for saving energy and adding convenience. Sometimes, issues occur after installation. Troubleshooting common problems can quickly fix these issues. Understanding basic problems helps you keep your timer and light working well.
Timer Not Turning On
Check if the timer is properly connected to power. Loose wires can stop the timer from turning on. Make sure the circuit breaker is not tripped. Verify the timer’s batteries if it uses any. Replace batteries with fresh ones to test. Reset the timer according to the manual instructions.
Light Flickering
Flickering lights may mean a loose connection. Tighten all wire connections at the switch and timer. Check the bulb type. Some timers do not work well with certain bulbs like LEDs. Replace the bulb with a compatible one. Inspect the timer for damage or wear that causes flickering.
Timer Not Keeping Time
The timer may lose time if batteries are weak. Replace the batteries with new ones. Check if the timer is correctly set to the current time. Electrical interference can cause time loss. Try moving the timer away from other devices. If problems continue, consider replacing the timer.
Safety Tips And Best Practices
Connecting a timer to a light switch improves convenience and saves energy. Safety is key during installation and use. Follow simple rules to avoid accidents and keep your system working well.
These safety tips and best practices help protect you and your home. Learn how to avoid hazards, maintain your timer, and know when to seek expert help.
Avoiding Electrical Hazards
Always turn off power at the breaker before starting any work. Use a voltage tester to confirm the power is off. Wear insulated gloves and use tools with insulated handles. Avoid touching wires with wet hands. Keep the work area dry and clear. Never bypass safety devices or use damaged equipment. Follow the timer and switch instructions carefully to ensure safe installation.
Regular Maintenance
Check the timer and switch regularly for signs of wear or damage. Clean dust and dirt from the switch and timer with a dry cloth. Test the timer function monthly to ensure it works correctly. Replace batteries if your timer uses them. Tighten any loose screws or connections to prevent sparks. Proper maintenance extends the life of your timer and switch.
When To Call A Professional
Call an electrician if you feel unsure about installation. Seek help if you notice flickering lights or unusual sounds. Contact a professional if the timer or switch overheats. Do not attempt to fix complex wiring problems yourself. A licensed electrician can ensure safety and proper function. Professional help prevents damage and injury.
Frequently Asked Questions
How Do I Connect A Timer To A Light Switch?
Turn off power first. Connect timer wires to the switch and power supply. Follow the timer’s wiring diagram carefully. Secure all connections and test the timer by turning power back on.
What Tools Are Needed To Install A Timer Switch?
You need a screwdriver, wire stripper, voltage tester, and electrical tape. These tools help safely and effectively connect the timer to the light switch wiring.
Can I Install A Timer Switch Myself Safely?
Yes, if you follow safety guidelines and instructions. Always turn off power before starting. If unsure, consult a professional electrician for safe installation.
Will A Timer Switch Work With Led Lights?
Most modern timer switches are compatible with LED lights. Check the timer’s specifications to ensure it supports low-wattage LED bulbs for proper operation.
Conclusion
Connecting a timer to a light switch saves energy and adds convenience. It controls lights automatically, so you don’t forget to turn them off. The process is simple with the right tools and steps. Always make sure to turn off the power before starting.
Double-check all connections for safety. Once installed, enjoy hands-free lighting control every day. This small change makes your home smarter and more efficient. Give it a try to see how easy it can be.