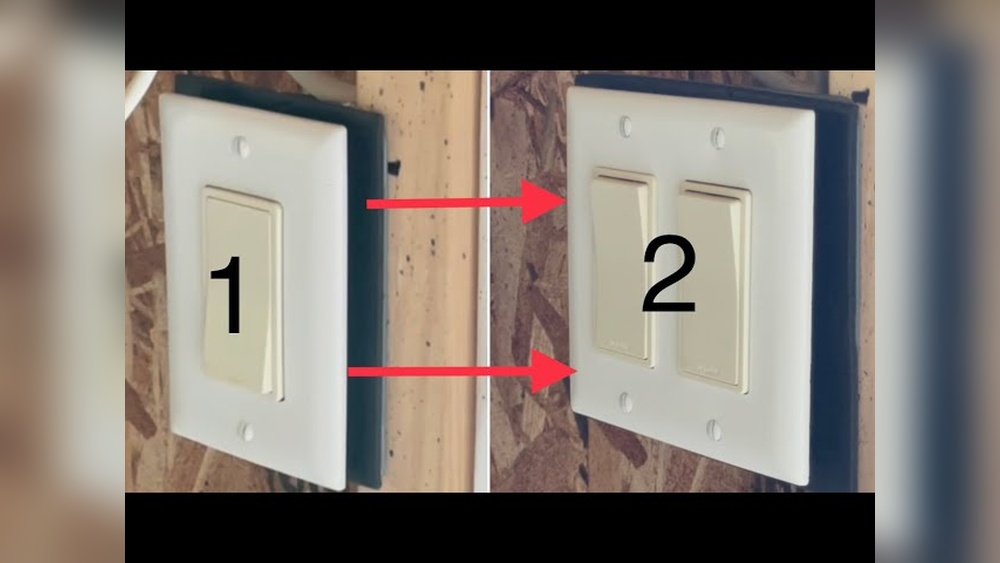
Have you ever wished you could control two lights from the same spot instead of just one? Converting a single light switch to a double switch can give you exactly that—more convenience and better control over your lighting.
If you’re thinking this sounds complicated or expensive, don’t worry. You can do it yourself with the right guidance. You’ll discover simple, clear steps to make the switch upgrade safely and quickly. By the end, you’ll have the confidence to improve your home lighting without calling a pro.
Ready to take control of your lights? Let’s get started!

Credit: www.reddit.com
Tools And Materials Needed
Before changing a single light switch to a double, gather all tools and materials. This step saves time and keeps the work safe. Using the right tools makes the process smooth and easy.
Below is a list of essential items needed for this project. Each tool and material plays a key role in a successful switch upgrade.
Basic Tools Required
- Screwdriver set (flathead and Phillips)
- Wire stripper
- Voltage tester
- Needle-nose pliers
- Electrical tape
- Utility knife
- Flashlight or headlamp
Materials Needed
- Double light switch
- Electrical box (if the current one is too small)
- Wire nuts
- 14/2 or 14/3 electrical wire (check local codes)
- Wall plate for double switch
Safety Equipment
- Insulated gloves
- Safety goggles
- Non-contact voltage tester
Having these items ready ensures safety and efficiency. Do not skip safety gear. It protects you during electrical work.
Safety Precautions
Safety is the top priority when changing a single light switch to a double. Electrical work can be risky without the right steps. Taking simple safety measures can prevent accidents and injuries.
Always prepare and protect yourself before starting the project. Knowing the basics keeps you safe and confident during the work.
Turn Off The Power
Switch off the power at the circuit breaker panel. This stops electricity from flowing to the switch. Double-check by using a voltage tester on the switch wires. Never trust just the switch position.
Use The Right Tools
Pick tools made for electrical work. Insulated screwdrivers and wire strippers reduce shock risk. Avoid using damaged or worn-out tools. Keep your tools organized and within reach.
Wear Protective Gear
Wear rubber-soled shoes to avoid electric shocks. Use safety glasses to protect your eyes from sparks or debris. Gloves provide extra protection for your hands. Never work barefoot or with wet hands.
Check For Proper Wiring
Inspect the wires for damage or wear before touching them. Old or frayed wires can cause shorts or fires. Replace any damaged wires before installing the new switch. Follow wiring diagrams closely for correct connections.
Work In A Well-lit Area
Good lighting helps you see wires and tools clearly. It reduces mistakes and improves safety. Use a portable work light if necessary. Avoid working in dark or cluttered spaces.
Identifying Your Existing Wiring
Identifying your existing wiring is the first step in converting a single light switch to a double. This step helps you understand what wires you have and how they work. Knowing this prevents mistakes and keeps you safe.
Before touching any wires, always turn off the power at the breaker box. Use a voltage tester to make sure no electricity flows through the wires. Safety first.
Locate The Switch Box
Remove the switch cover plate carefully. Use a screwdriver to take out the screws. Pull the switch out gently to see the wires behind it. Note how many wires are connected and where.
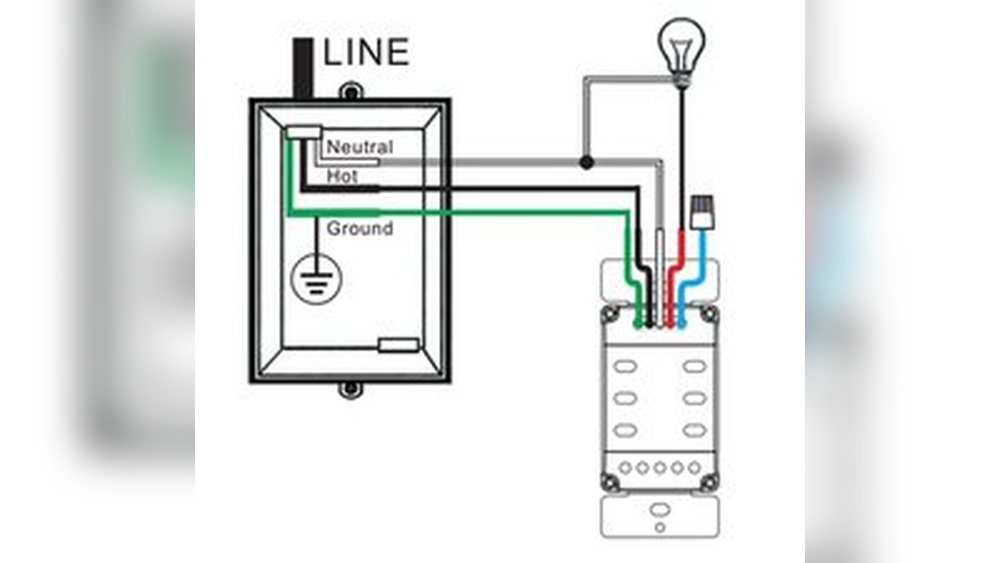
Identify Wire Types
Look for black (hot), white (neutral), and green or bare copper (ground) wires. The black wire carries electricity to the switch. The white wire returns electricity to the panel. The ground wire protects against shocks.
Check Wire Connections
Notice if wires are connected with wire nuts or attached directly to switch terminals. Single switches often have one hot wire and one load wire. A double switch may need more wires to control two lights.
Look For Additional Wires
Extra wires may indicate the box supports a double switch. Sometimes wires are tucked behind the box or hidden in the wall. Carefully pull wires out to see all connections clearly.

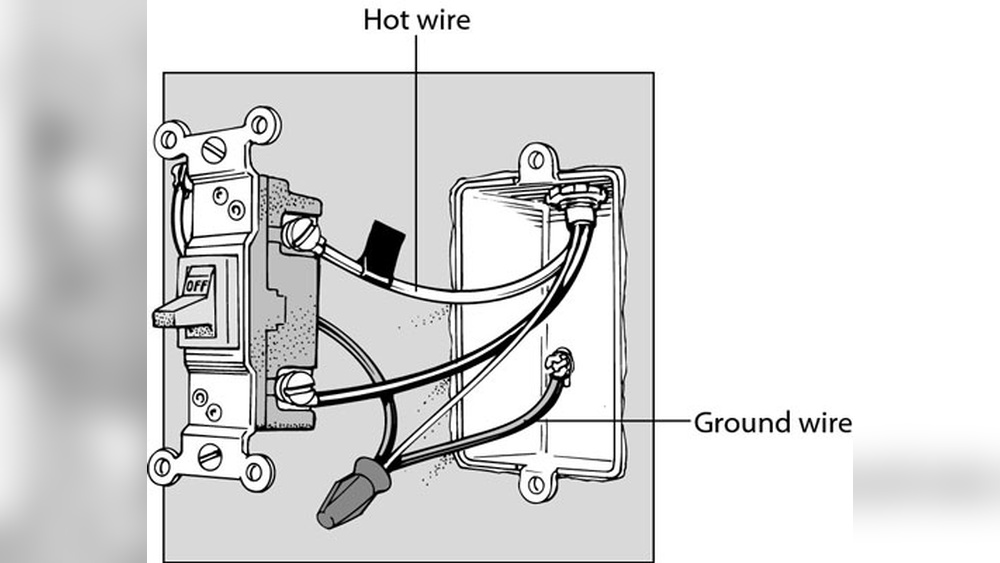
Credit: diy.stackexchange.com
Turning Off Power Safely
Turning off the power is the first and most important step before changing a light switch. It protects you from electric shocks. It also stops damage to your home’s wiring. Follow these steps carefully to ensure safety.
Locate The Correct Circuit Breaker
Find your home’s circuit breaker box. Look for the label that matches the light switch you want to change. If labels are missing, turn off breakers one by one and test the switch. This helps find the right breaker.
Switch Off The Power
Flip the correct circuit breaker to the off position. This stops electricity from flowing to the switch. Double-check by flipping the light switch. The light should not turn on.
Use A Voltage Tester
Before touching wires, use a voltage tester on the switch. It confirms no electricity is running through the wires. This step is crucial for your safety.
Double-check Power Is Off
Test the switch again after using the voltage tester. Make sure the light does not come on. Only start working if the power is definitely off.
Removing The Old Switch
Start by turning off the power at the breaker to stay safe. Remove the switch cover and unscrew the old switch carefully. Gently pull it out to access the wires for the new double switch.
Turn Off The Power
Start by switching off the power to the light switch at the breaker box. This step is important for safety. Use a voltage tester to confirm no electricity flows to the switch. Never skip this step.
Remove The Switch Cover Plate
Use a screwdriver to take off the screws holding the cover plate. Gently pull the plate away from the wall. This exposes the switch and wiring behind it.
Unscrew The Old Switch
Locate the screws that hold the switch to the electrical box. Remove these screws carefully. Pull the switch out slightly to access the wires.
Disconnect The Wires
Note the position of each wire before disconnecting. Use a screwdriver or your fingers to loosen the terminal screws. Remove the wires from the old switch. Keep the wires straight and untangled.
Preparing The Wall Box
Preparing the wall box is a key step in converting a single light switch to a double. It ensures the new switch fits securely and works safely. Proper preparation prevents electrical problems and makes the installation smoother.
Start by turning off the power at the circuit breaker. This stops any chance of electric shock. Always double-check that the power is off before touching wires.
Remove The Existing Switch And Cover Plate
Unscrew the cover plate from the wall box. Carefully pull out the single switch. Take note of how the wires are connected. This helps during reinstallation of the double switch.
Inspect The Wall Box Size And Condition
Check the wall box to see if it is large enough for a double switch. Standard boxes may be too small. If needed, replace it with a deeper or wider box for extra space.
Organize And Label The Wires
Separate the wires inside the box. Use labels to mark each wire’s function. Organized wires reduce confusion and make the new connections easier.
Clear The Wall Box For New Wiring
Remove any old wire nuts or debris. Straighten the wires for a neat setup. This gives a clean space to work and helps avoid shorts or loose connections.
Installing The Double Switch
Installing a double switch requires careful steps for safety and function. This process changes a single switch setup to control two lights or devices.
Follow these clear instructions to install the double switch correctly. It ensures your new switch works well and looks neat.
Turn Off Power And Remove Old Switch
Start by turning off the power at the breaker box. This stops any risk of electric shock during work.
Use a screwdriver to remove the switch cover plate. Then, unscrew the old single switch from the wall box.
Carefully pull the switch out to expose the wiring behind it.
Identify And Prepare Wires
Look at the wires connected to the old switch. Usually, there are one or two black wires and a ground wire.
Use a voltage tester to make sure no wires are live. This step keeps you safe while handling wires.
Label the wires or take a photo to remember their positions before disconnecting.
Connect Wires To The Double Switch
Check the new double switch terminals. One side is for the common wire, the others for separate loads.
Attach the black wire from the power source to the common terminal. Then connect the load wires to each switch terminal.
Secure the ground wire to the green screw on the switch for safety grounding.
Mount The Double Switch And Restore Power
Push the wires back into the wall box carefully. Align the double switch and screw it into place.
Replace the switch cover plate over the new switch. Tighten the screws without cracking the plate.
Turn the power back on at the breaker. Test both switches to ensure they operate their lights or devices.
Connecting The Wires
Connecting the wires is a key step in changing a single light switch to a double. It controls how power moves to each light or device. Careful wire connections keep the switch safe and working well.
Before starting, turn off the power at the breaker. Use a voltage tester to check no current flows. This step prevents electric shocks and accidents.
Identify The Wires
Look inside the switch box. You will find three main wires: the live wire, the neutral wire, and the ground wire. The live wire usually carries power from the breaker.
The neutral wire completes the circuit and returns current. The ground wire is for safety. It stops shocks by directing electricity to the earth.
Disconnect The Old Switch
Remove the screws holding the single switch. Gently pull it out to see the wires attached. Loosen the terminal screws and disconnect the wires carefully.
Note which wire connects to which terminal. This helps connect the new double switch correctly.
Connect The Double Switch Wires
Attach the live wire to the common terminal on the double switch. Connect the two load wires to the other terminals. These wires control the two separate lights or devices.
Connect the ground wire to the green screw or ground terminal. Neutral wires usually stay connected in the back of the box with a wire nut.
Secure And Test The Connections
Tighten all terminal screws firmly. Push the wires back into the box carefully. Screw the double switch into place.
Turn the power back on. Test both switches to ensure they control the lights properly. No flickering or buzzing means correct wiring.
Testing The New Switch
Testing the new switch is a key step after installation. It ensures everything works safely and correctly. This stage helps catch wiring mistakes early. A faulty switch can cause problems or even hazards. Follow each step carefully to confirm the switch operates as expected.
Turn The Power Back On
Before testing, restore power at the circuit breaker. This allows the switch to receive electricity. Never test a switch without power on. Use caution and make sure hands are dry. Safety first to avoid electric shock.
Check Each Switch Toggle
Flip each toggle on the double switch slowly. Listen for clicks or feel resistance. Each toggle should control a separate light or device. Make sure both toggles respond without sticking. Smooth movement signals correct wiring.
Verify Light Operation
Look at the connected lights after toggling switches. Lights should turn on and off properly. Test both lights or devices controlled by the new switch. No flickering or dimming means good connection. This confirms successful conversion.
Use A Voltage Tester
Use a voltage tester to check power flow. Test terminals on the switch for live current. This tool confirms the electrical circuit is complete. It also ensures no dangerous voltage leaks. Testing with a voltage tester adds safety.
Inspect For Heat Or Smell
After testing, touch the switch plate carefully. It should not feel hot. A burning smell or heat signals a wiring problem. Turn off power and recheck connections if detected. Proper functioning switch stays cool during use.
Credit: www.reddit.com
Troubleshooting Common Issues
Troubleshooting is key when converting a single light switch to a double. Small mistakes can cause big problems. It helps to check each step carefully. This section covers common issues and how to fix them quickly.
Incorrect Wiring Connections
Wrong wires cause the new switch to fail. Confirm which wire is live, neutral, and ground. Use a voltage tester to check wires safely. Connect wires to the correct terminals on the double switch. Labeling wires before disconnecting makes this easier.
Switch Not Controlling Both Lights
Sometimes, one switch works but the other does not. Check if both light fixtures have power. Ensure wires from both lights connect properly to the switch. Loose wires or poor contacts can stop one switch from working. Tighten all connections firmly.
Switch Feels Hot Or Sparks
A hot switch or sparks signal a serious issue. Turn off power immediately. Inspect for damaged wires or short circuits. Replace any faulty parts before continuing. Use a switch rated for the circuit’s amperage to avoid overheating.
Lights Flicker Or Dim When Switched
Flickering lights mean poor power flow. Check for loose or corroded wire connections. Make sure the switch is fully on or off. Old wiring may need replacement for stable performance. Consider consulting an electrician if problems persist.
Tips For A Professional Finish
Getting a clean, professional look after converting a single light switch to a double switch is very important. A neat finish not only improves safety but also enhances the room’s appearance. Simple steps can make a big difference in the final look.
Taking care of details helps create a smooth and tidy installation. This section shares easy tips to get a polished result that lasts.
Use The Right Tools
Select proper tools before starting the job. A screwdriver set, wire stripper, voltage tester, and electrical tape are must-haves. Using the right tools makes the work safer and faster. It also helps avoid damage to wires or the switch box.
Turn Off Power Safely
Always cut the power at the circuit breaker before touching wires. Test the wires with a voltage tester to confirm no current flows. This step protects you from electric shock and prevents accidental short circuits.
Keep Wires Neat And Organized
Arrange wires carefully inside the switch box. Use wire nuts and electrical tape to secure wire connections. Avoid crowding wires to reduce fire risks. Neat wiring also helps if future repairs or upgrades are needed.
Choose A Matching Switch Plate
Select a switch plate that fits the new double switch perfectly. The plate should cover the box fully without gaps. Choose a color that matches the wall or decor for a seamless look.
Check For A Tight Fit
Ensure the switch and plate fit snugly without wobbling. Tighten screws evenly, but do not over-tighten to avoid cracking the plate. A tight fit keeps dust out and improves the switch’s lifespan.
Frequently Asked Questions
How Do I Convert A Single Switch To A Double Switch?
To convert a single switch to a double, turn off power first. Replace the single switch with a double switch. Connect wires to the new switch terminals correctly. Secure the switch and restore power. Test both switches for proper operation.
What Tools Are Needed For Switch Conversion?
You need a screwdriver, wire stripper, voltage tester, and a double switch. Electrical tape and wire nuts are also useful. Always ensure power is off before starting. Using the right tools ensures a safe and smooth conversion process.
Can I Convert A Single Switch Myself Safely?
Yes, if you follow safety steps and understand wiring basics. Always turn off power at the breaker. Use a voltage tester to confirm no live current. If unsure, consult a professional electrician to avoid hazards.
What Type Of Double Switch Should I Buy?
Choose a double switch compatible with your home’s wiring and load. Look for switches rated for your electrical circuit amperage. Consider switch style and finish to match your decor. Quality switches ensure safety and durability.
Conclusion
Converting a single light switch to a double switch can improve your home’s lighting control. It gives you the power to manage two lights separately. The process is simple if you follow the right steps carefully. Always turn off the power before starting any electrical work.
Use the proper tools and check your wiring twice. Taking your time helps avoid mistakes and keeps you safe. Now, enjoy better lighting control with your new double switch. A small change can make a big difference in your daily life.