Have you ever wished you could control the brightness of your lights with just a simple twist or slide? Changing your regular light switch to a dimmer switch can instantly transform the mood in any room, save energy, and extend the life of your bulbs.
If you’re wondering how to make this upgrade yourself, you’re in the right place. This guide will walk you through the easy steps to convert your light switch to a dimmer—no special skills needed. Keep reading, and you’ll learn how to bring a whole new level of comfort and style to your home lighting.

Credit: www.youtube.com
Tools And Materials Needed
Converting a light switch to a dimmer is a simple project. It needs some basic tools and materials. Having the right items makes the job easier and safer. Here is a list of what you need before starting.
Tools Needed
- Screwdriver (flathead and Phillips)
- Wire stripper
- Voltage tester
- Needle-nose pliers
- Electrical tape
Materials Needed
- Dimmer switch compatible with your bulbs
- Wire nuts
- Wall plate for dimmer switch
- Optional: New light bulbs (dimmable type)
Check the dimmer switch package for compatibility details. Choose tools that fit your comfort and skill level. Safety gear like gloves or goggles can protect you during work.

Credit: www.youtube.com
Choosing The Right Dimmer Switch
Choosing the right dimmer switch is important for a smooth lighting experience. It affects how well you can control your light’s brightness. The right choice also protects your bulbs and wiring. Let’s explore the types of dimmer switches and their bulb compatibility. This helps you pick the best one for your home.
Types Of Dimmer Switches
There are several types of dimmer switches to consider. The common ones include rotary, slide, and touch dimmers. Rotary dimmers turn like a knob to adjust light levels. Slide dimmers use a lever that moves up and down. Touch dimmers work by tapping the panel to change brightness.
Some dimmers are digital and can be controlled by apps or remotes. Others are simple and manual. Choose a type that fits your style and needs. Check the installation type too, such as single-pole or three-way switches.
Compatibility With Bulbs
Not all dimmer switches work with every bulb type. Incandescent and halogen bulbs usually work with most dimmers. LED and CFL bulbs need special dimmers designed for them. Using the wrong dimmer can cause flickering or buzzing.
Look at the dimmer’s package to see which bulbs it supports. Some dimmers list compatible bulb brands and wattage limits. Matching dimmers with bulbs ensures smooth dimming and longer bulb life.
Safety Precautions
Safety is the top priority when changing a light switch to a dimmer. Electricity can be dangerous if handled wrongly. Taking the right safety steps protects you and your home. Follow these precautions closely to avoid accidents and damage.
Turn Off Power At The Circuit Breaker
Always shut off power before starting. Find your home’s circuit breaker panel. Switch off the breaker that controls the light switch. Double-check by flipping the light switch to see if it works. No power means it is safe to work.
Use A Voltage Tester
Test the wires with a voltage tester. This tool ensures no electricity flows through the wires. Touch the tester to each wire after the breaker is off. No light or sound means the wires are safe. Do not skip this step.
Wear Protective Gear
Wear safety gloves and glasses. Gloves protect your hands from shocks and cuts. Glasses shield your eyes from dust and debris. Proper gear helps avoid injuries during installation.
Follow Manufacturer Instructions
Read the dimmer switch manual carefully. Every model has specific installation steps. Following instructions ensures safe and correct setup. Do not guess or skip any steps.
Keep Work Area Dry
Make sure the area is dry before starting. Water and electricity do not mix. Avoid working in damp or wet places. This reduces the risk of electric shocks.
Turning Off The Power
Turning off the power is the first and most important step before converting a light switch to a dimmer. This step protects you from electric shocks and prevents damage to your electrical system.
Never start any electrical work without making sure the power is completely off. This keeps you safe and makes the process easier.
Locate The Circuit Breaker
Find your home’s main electrical panel. Look for the circuit breaker that controls the light switch you want to change. It is usually labeled with the room or area name.
Switch Off The Correct Breaker
Flip the breaker to the OFF position. This stops electricity from flowing to the light switch. Double-check by trying to turn on the light.
Test The Light Switch
Use a non-contact voltage tester to check for power. Hold it near the wires connected to the switch. If the tester does not light up or beep, the power is off.
Use A Safety Sign
Place a sign or tape on the breaker to warn others not to turn it on. This prevents accidents while you work on the switch.
Removing The Existing Switch
Removing the existing light switch is the first step to install a dimmer. This part needs care and attention. Safety is the top priority. You must turn off the power to avoid electric shocks. Use a circuit breaker or fuse box to cut power.
After cutting power, check the switch to confirm no electricity flows. Use a voltage tester for this check. A safe work area helps avoid accidents. Keep tools and materials nearby for easy access.
Gather Necessary Tools
Prepare tools before starting. You need a screwdriver, voltage tester, and wire stripper. A flashlight helps if the area is dark. Organize all items to work smoothly.
Turn Off Power Supply
Switch off power at the circuit breaker. Confirm the power is off with a voltage tester. Never skip this step. It prevents dangerous electric shocks.
Remove Switch Cover Plate
Use a screwdriver to remove screws on the cover plate. Take off the plate gently. Keep screws safe for reassembly. Check the switch box for any damage.
Unscrew And Pull Out Switch
Unscrew the switch from the electrical box. Pull the switch out carefully. Avoid pulling wires hard. Note the wire positions for the new dimmer.
Disconnect Wires Safely
Loosen screws holding the wires on the switch. Disconnect wires one by one. Do not let wires touch each other. Use electrical tape if needed to cover wire ends.
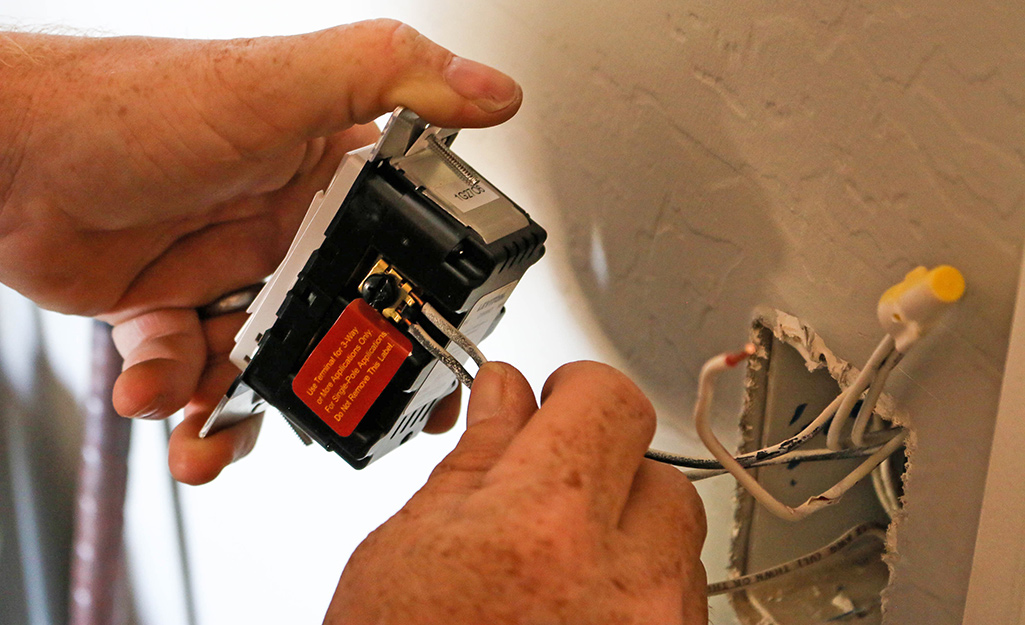
Wiring The Dimmer Switch
Wiring the dimmer switch is a key step in converting your light switch to a dimmer. Proper wiring ensures the dimmer works safely and correctly. Take your time to follow the steps carefully. Turn off the power at the breaker before starting any work. Use a voltage tester to confirm the wires are not live.
Identifying Wires
Remove the old switch cover plate. Pull the switch gently from the wall box. Look at the wires connected to the switch.
Most switches have three types of wires: live (hot), neutral, and ground. The live wire carries electricity from the power source. The neutral wire completes the circuit. The ground wire is for safety and is usually green or bare copper.
Check the color of each wire. Black or red wires are usually live. White wires are neutral. Green or bare wires are ground. Note how each wire connects to the old switch. Take a photo for reference.
Connecting Wires Correctly
Connect the ground wire first. Attach it to the green screw or wire on the dimmer. Next, connect the live wires. The dimmer usually has two black wires. Connect these to the live and load wires in the wall box.
Use wire nuts to twist wires together securely. Wrap electrical tape around wire nuts for extra safety. Do not connect the neutral wire to the dimmer unless the instructions say so. Check the dimmer’s manual for exact wiring details.
Push the wires carefully back into the wall box. Screw the dimmer switch to the wall. Attach the cover plate. Turn the power back on at the breaker and test the dimmer switch.
Mounting The Dimmer Switch
Mounting the dimmer switch is a key step in changing your light control. It ensures the switch fits safely and works well. Proper mounting helps avoid loose connections and switch damage. Take your time to mount the switch correctly. This part is simple if you follow the right steps.
Turn Off Power At The Circuit Breaker
Safety comes first. Switch off the power to the light switch at the circuit breaker. Use a voltage tester to double-check the power is off. This prevents electrical shock during installation.
Remove The Old Switch And Prepare The Box
Unscrew the old switch from the wall. Pull it out gently to access the wires. Check the electrical box for space. Clear any debris and make sure the wires are straight and untangled.
Connect The Dimmer Switch Wires
Match the dimmer wires to your house wires. Usually, black to black, white to white, and green to ground. Twist the wires together and secure with wire nuts. Firm connections avoid flickering lights.
Secure The Dimmer Switch In The Wall Box
Push the wires back into the box carefully. Align the dimmer switch with the screw holes. Use a screwdriver to fix the switch firmly. Check that it sits flush with the wall.
Attach The Wall Plate
Place the wall plate over the dimmer switch. Screw it in place with the small screws provided. The plate should be tight and even. This finishes the installation and gives a neat look.
Testing The Dimmer Function
Testing the dimmer function is a key step after installing a dimmer switch. It ensures the switch works properly and controls the light smoothly. This step helps avoid issues like flickering or no response. Follow these simple checks to confirm your dimmer operates correctly.
Check The Power Supply
Turn the circuit breaker back on to restore power. Flip the dimmer switch slowly from off to on. Notice if the light turns on without delay. A steady light means the power supply is good.
Adjust The Brightness Level
Slide or twist the dimmer control to change light brightness. Watch the light dim smoothly from bright to dim. The dimmer should allow gradual brightness changes. No sudden jumps or flickers are signs of proper function.
Listen For Unusual Sounds
Pay attention to sounds near the dimmer switch. Buzzing or humming noises may signal a problem. A quiet dimmer means it is working well. If you hear noise, check the compatibility with your bulbs.
Test With Different Bulbs
Try using LED, incandescent, or CFL bulbs in the dimmer circuit. Some dimmers work best with specific bulb types. Observe how each bulb responds to dimming. This test helps find the right bulb for your dimmer.
Troubleshooting Common Issues
Troubleshooting is a key part of converting a light switch to a dimmer. Sometimes, issues arise after installation. These problems can affect the dimmer’s performance and your lighting experience. Understanding common issues helps fix them quickly and safely.
Many problems have simple solutions. You do not need to be an expert electrician to solve them. This section covers common issues and how to deal with each one effectively.
Incorrect Wiring Connections
Incorrect wiring is a frequent cause of dimmer problems. Make sure the wires connect to the right terminals. Turn off power before checking wires. Use the dimmer’s manual to identify correct wiring. Loose or swapped wires can stop the dimmer from working.
Dimmer Not Controlling Light Properly
Sometimes the dimmer does not adjust the light smoothly. Flickering or uneven brightness occurs. Check if the dimmer matches the type of light bulb used. LED bulbs need compatible dimmers. Using the wrong dimmer causes poor performance.
Dimmer Switch Feels Warm Or Hot
It is normal for dimmers to get slightly warm. But a very hot dimmer is unsafe. Overheating may mean the dimmer is overloaded. Check the total wattage of bulbs. Make sure it does not exceed the dimmer’s limit. Replace the dimmer if it gets too hot.
Light Flickers Or Buzzes
Flickering or buzzing sounds are common complaints. This often happens with LED or CFL bulbs. Use bulbs labeled as dimmable. Check for loose wiring or poor connections. Sometimes changing the bulb brand solves the issue.
Dimmer Switch Does Not Turn Off Light Fully
Some dimmers leave a small glow when off. This happens with LED bulbs. It is called ghosting. Use a dimmer designed for LED lights. Adding a small load resistor can also help stop the glow.
Tips For Enhancing Lighting Ambiance
Lighting sets the mood in any room. Changing a light switch to a dimmer helps control brightness. This control enhances comfort and style. It makes spaces feel cozy or lively.
Small changes improve lighting ambiance greatly. These tips help you get the best effect from your dimmer switch.
Choose The Right Bulbs
Use dimmable bulbs only. Standard bulbs may flicker or not dim well. LED bulbs save energy and last longer. Warm white bulbs create a soft, inviting glow.
Match Dimmer Type To Bulbs
Check if your dimmer fits your bulb type. Some dimmers work better with LEDs, others with incandescent bulbs. Using the correct dimmer ensures smooth lighting changes.
Layer Your Lighting
Combine dimmed ceiling lights with lamps or wall lights. Layered lighting adds depth and flexibility. Adjust layers separately for different moods.
Place Dimmer Switch Conveniently
Install the dimmer where it is easy to reach. Near doors or seating areas works well. Convenience encourages frequent use of dimmer settings.
Adjust Brightness Gradually
Turn the dimmer slowly to avoid sudden changes. Gradual dimming creates a smooth transition. It also protects bulb life and reduces eye strain.
Credit: www.homedepot.com
Frequently Asked Questions
What Tools Do I Need To Convert A Light Switch To A Dimmer?
You need a screwdriver, voltage tester, wire stripper, and a compatible dimmer switch. Safety gear like gloves helps. Always turn off power before starting.
Can I Install A Dimmer Switch Myself Safely?
Yes, with basic electrical knowledge and safety precautions, you can install a dimmer switch. Follow instructions carefully and turn off power.
Will A Dimmer Switch Work With All Types Of Bulbs?
Dimmer switches work best with incandescent and dimmable LED bulbs. Check bulb compatibility before installation to avoid flickering or damage.
How Do I Know If My Wiring Supports A Dimmer Switch?
Most standard wiring supports dimmers. Use a voltage tester to verify. Consult an electrician if unsure about wiring compatibility.
Conclusion
Converting a light switch to a dimmer brings more control to your lighting. It helps create the right mood for any room. The process is simple with the right tools and steps. Always turn off the power before starting the work.
Choose a dimmer that fits your light bulbs and switch type. Taking safety seriously makes the job easier and safer. Enjoy softer or brighter lights with just a turn. Small changes like this improve your home’s comfort and style. Give it a try and see the difference today.