Is your brake light not working right? That small light at the back of your car is more important than you might think.
It tells drivers behind you when you’re slowing down or stopping. If it’s not working, you could be putting yourself and others at risk. The problem might be a faulty brake light switch. Don’t worry—you don’t have to be a mechanic to fix it.
In this guide, you’ll learn step-by-step how to replace your brake light switch quickly and easily. Keep reading, and you’ll have your brake lights shining bright again in no time.

Credit: www.youtube.com
Signs Of A Faulty Brake Light Switch
The brake light switch plays a key role in vehicle safety. It signals to drivers behind when you press the brake pedal. A faulty switch can cause serious problems. Recognizing signs of a bad brake light switch helps avoid risks. Pay attention to these common issues.
Brake Lights Not Illuminating
One clear sign of a faulty brake light switch is brake lights that do not turn on. This means other drivers cannot see when you slow down or stop. This problem increases the chance of rear-end collisions. Check your brake lights often to spot this issue early.
Cruise Control Issues
The brake light switch also affects the cruise control system. A bad switch may cause the cruise control to stop working or to turn off unexpectedly. This happens because the system cannot detect when the brakes are applied. Notice any unusual cruise control behavior as a warning sign.
Brake Pedal Problems
A faulty brake light switch can cause the brake pedal to feel different. It might feel loose or harder to press. Sometimes, the pedal may not respond correctly. These changes affect your control over the car. Have a mechanic inspect the brake pedal if you feel anything unusual.

Credit: www.yourmechanic.com
Tools And Materials Needed
Replacing a brake light switch requires a few key tools and materials. Having the right items makes the job faster and safer. Prepare everything before starting to avoid delays or mistakes.
Basic Hand Tools
You need a set of screwdrivers, both flathead and Phillips. A socket wrench with different sizes helps remove bolts easily. Needle-nose pliers come in handy for handling small clips or connectors. Keep a flashlight nearby to see in tight spots.
Replacement Switch
Choose a brake light switch that fits your vehicle model. Check the part number to match your car’s make and year. Using the correct switch ensures proper function and safety.
Safety Equipment
Wear safety glasses to protect your eyes from dust and debris. Gloves keep your hands clean and shielded from sharp edges. Use a car jack and stands if you need to lift the vehicle. Always work on a flat, stable surface to avoid accidents.
Locating The Brake Light Switch
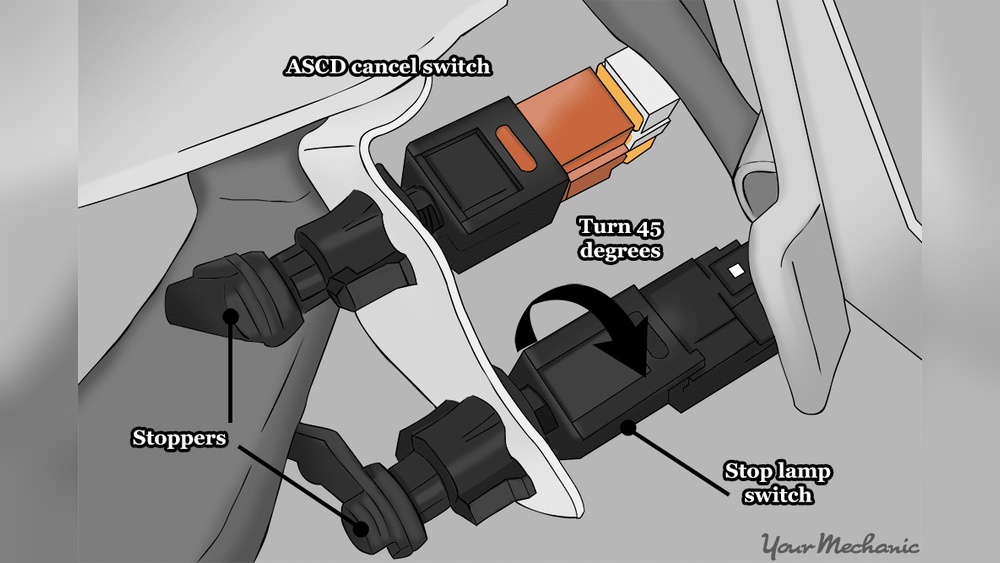
Finding the brake light switch is the first step in replacing it. This small part controls your brake lights. It sends a signal when you press the brake pedal. Knowing its exact location makes the job easier. The switch often hides in tight spots, near the brake pedal. Understanding common locations helps you spot it quickly.
Access to the switch area can be tricky. Some cars have easy access, while others need more effort. Clearing the space around the pedal often helps. This lets you reach the switch without trouble. Preparing the area before starting saves time and frustration.
Common Switch Locations
The brake light switch usually sits near the top of the brake pedal arm. You might find it attached to the brake pedal bracket. Look under the dashboard on the driver’s side. Some cars place it near the brake booster or master cylinder. Check these spots carefully; the switch often blends in.
Accessing The Switch Area
Clear space around the driver’s footwell first. Remove any floor mats or panels blocking access. Use a flashlight to see better in dark areas. Sometimes, lowering the steering column helps reach the switch. Be gentle to avoid breaking clips or parts around the switch.
Removing The Old Brake Light Switch
Removing the old brake light switch is the first step in this repair. It ensures safety and makes the replacement easier. The process involves simple tasks that anyone can do with basic tools.
Follow clear steps to avoid damage or injury. This guide breaks down the removal into three parts for smooth progress.
Disconnecting The Battery
Start by disconnecting the car battery. This prevents electrical shocks and short circuits. Use a wrench to loosen the negative terminal first. Then, remove the cable and keep it away from the battery. This step protects both you and the vehicle’s electrical system.
Unplugging Electrical Connectors
Locate the brake light switch near the brake pedal. Find the electrical connector attached to it. Press the tab or clip on the connector to unlock it. Gently pull the connector away from the switch. Do not pull on the wires to avoid damage.
Detaching The Switch
Check how the switch is fixed in place. Some switches twist out, while others hold with clips or screws. Use your hands or a small tool to release the switch. Carefully remove it from its position. Keep the old switch for comparison with the new one.
Installing The New Brake Light Switch
Installing the new brake light switch is a key step in restoring your vehicle’s safety. This part controls the brake lights, so placing it correctly is very important. Follow these simple steps to ensure the switch works properly and your brake lights function as they should.
Positioning The New Switch
Find the spot where the old switch was attached. It is usually near the brake pedal arm. Align the new switch so that the plunger touches the brake pedal. Check that the switch is straight and not tilted. Proper positioning ensures the switch activates the brake lights at the right time.
Securing The Switch
Use screws or clips to hold the switch in place. Tighten them gently but firmly. Avoid over-tightening to prevent damage. The switch must not move or wobble. A secure switch provides consistent brake light signals for safer driving.
Reconnecting Electrical Components
Attach the wiring connector to the new switch. Push the connector until it clicks into place. Ensure all wires are clean and undamaged. Loose or dirty connections can cause brake lights to fail. Test the brake lights by pressing the pedal before finishing the job.
Testing The New Brake Light Switch
Testing the new brake light switch is a vital step after installation. It ensures safety and proper vehicle function. This step confirms that the switch works as intended. Below are two simple tests to perform.
Checking Brake Light Functionality
Start by turning on the vehicle’s ignition. Press the brake pedal slowly. Watch the brake lights at the rear of the car. They should light up immediately and brightly. Release the pedal and check if the lights turn off. If the lights work correctly, the switch is good. If not, recheck the wiring or switch connection.
Verifying Cruise Control Operation
Many vehicles use the brake light switch to control cruise functions. Turn on the cruise control system. Accelerate to a steady speed. Press the brake pedal gently. The cruise control should disengage right away. If it does, the new switch works properly. If it does not, inspect the switch wiring again.
Troubleshooting Common Issues
Troubleshooting common issues with a brake light switch helps find problems fast. Many issues come from simple causes. Knowing these can save time and effort. This section covers two main problems: switch not engaging properly and electrical connection problems.
Switch Not Engaging Properly
The brake light switch must move smoothly. Dirt or wear can stop it from working right. Check if the switch moves when you press the brake pedal. Sometimes, the switch is too loose or too tight. Adjust the switch position to fix this.
Also, look for broken parts or damage. A worn spring inside the switch may cause it not to click. Replace the switch if it looks worn out or broken. A good switch should click when pressed and release when the pedal is up.
Electrical Connection Problems
Bad wiring can stop the brake lights from working. Check the wires connected to the switch. Look for loose, broken, or corroded wires. Clean the connectors to remove any rust or dirt.
Use a multimeter to test the switch’s electrical flow. No flow means a bad switch or a wiring problem. Fix loose wires or replace damaged ones. Secure all connections tightly for good contact.

Credit: www.youtube.com
Maintenance Tips For Brake Light Switch
Maintaining the brake light switch is key to safe driving. This small part controls the brake lights that alert other drivers. Proper care helps avoid accidents and costly repairs. Simple checks keep the switch working well.
Regular Inspections
Check the brake light switch regularly. Look for signs of wear or damage. Make sure the switch moves freely without sticking. Clean any dirt or dust around the switch area. Test the brake lights every few weeks to confirm they work. Early checks prevent bigger problems.
Signs To Watch For
Notice if brake lights stay on or don’t light up. This could mean the switch is faulty. Pay attention to brake pedal feel; it may feel different. Warning lights on the dashboard might appear. Strange noises when pressing the brake pedal also signal issues. Spotting these signs early saves time and money.
Frequently Asked Questions
What Is A Brake Light Switch And Its Function?
A brake light switch activates the brake lights when you press the pedal. It signals drivers behind you, enhancing safety and communication on the road.
How Do I Know If My Brake Light Switch Is Faulty?
Common signs include brake lights not turning on, staying on, or inconsistent lighting. Also, check if cruise control malfunctions, as it often depends on this switch.
What Tools Are Needed To Replace A Brake Light Switch?
You typically need a screwdriver, pliers, and sometimes a wrench. Always consult your car’s manual for specific tools and steps for your model.
How Long Does It Take To Replace A Brake Light Switch?
Replacing a brake light switch usually takes 15 to 30 minutes. It’s a simple task that most DIYers can complete quickly with basic tools.
Conclusion
Replacing a brake light switch is simple with the right steps. Take your time and follow each part carefully. Test the lights after installation to be sure they work well. This small fix keeps your car safe and legal. Regular checks help avoid bigger problems on the road.
Now, you can fix this issue yourself without extra help. Keep your vehicle in good shape with easy repairs like this.