Want to brighten up your room without rewiring your entire house? Adding another light to a switch might sound tricky, but it’s easier than you think.
Imagine controlling multiple lights with just one flick of your finger—saving you time and making your space more functional. In this guide, you’ll learn simple, step-by-step instructions that anyone can follow. By the end, you’ll have the confidence to upgrade your lighting setup yourself, without calling a pro.
Ready to see how you can transform your home lighting quickly and safely? Let’s get started!

Credit: diy.stackexchange.com
Tools And Materials Needed
Adding another light to a switch requires some basic tools and materials. Having these ready makes the job easier and safer. Use the right tools to avoid damage and ensure a smooth installation.
Essential Tools
- Screwdriver set (flat and Phillips)
- Wire stripper
- Voltage tester
- Needle-nose pliers
- Electrical tape
- Drill (optional, for new holes)
- Wire nuts
- Flashlight or portable light
Required Materials
- New light fixture
- Electrical wire (14/2 or 12/2 gauge)
- Light switch (if replacing or adding)
- Electrical box (if needed for new fixture)
- Wire connectors
- Mounting hardware
Safety Precautions
Adding another light to a switch can improve your room’s lighting and feel. Safety is the first step in this task. Handling electricity without caution can cause harm or damage. Follow clear safety rules to protect yourself and your home.
Power Off Procedures
Turn off the power from the main circuit breaker. This stops electricity flow to the switch and light wires. Use a label or tape to mark the breaker as off. Do not rely only on the switch being off. Check twice before starting any work.
Using A Voltage Tester
Use a voltage tester to confirm no power runs through the wires. Touch the tester to each wire in the switch box. The tester should show zero voltage. This step ensures safety before you handle wires. Never skip testing, even if the breaker is off.
Protective Gear
Wear insulated gloves to avoid electric shocks. Use safety glasses to protect your eyes from sparks or debris. Wear shoes with rubber soles for extra insulation. Avoid wearing metal jewelry or watches during work. These simple items add an important layer of safety.
Identifying Existing Wiring
Identifying existing wiring is the first step to add another light to a switch. This step helps you understand how the current setup works. Knowing the wiring type and layout keeps the job safe and efficient. It also avoids mistakes that can cause problems later.
Types Of Switches
There are different types of switches in homes. The most common is a single-pole switch. It controls one light from one spot. Another type is a three-way switch. It controls a light from two places. Knowing your switch type helps plan the new wiring.
Locating Wires
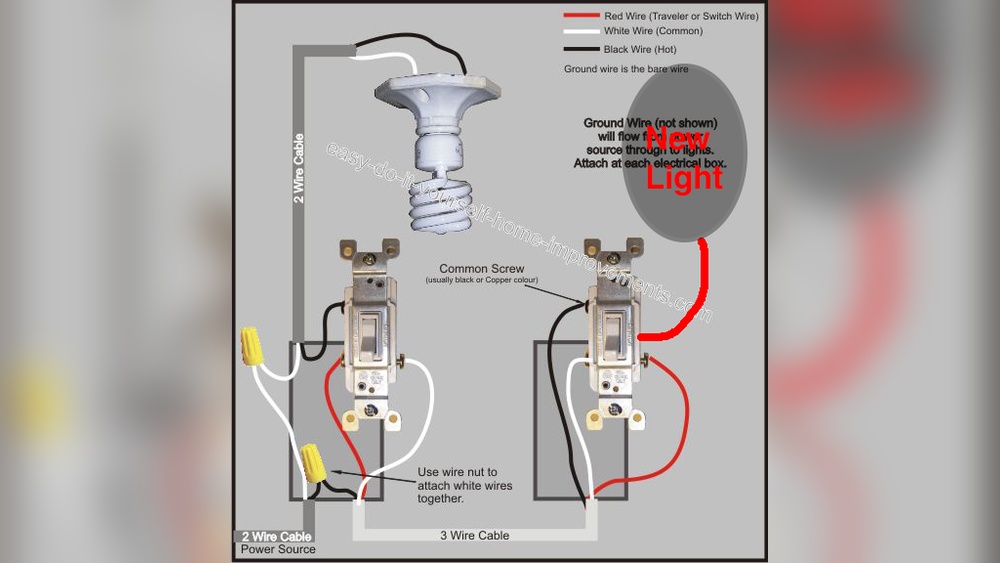
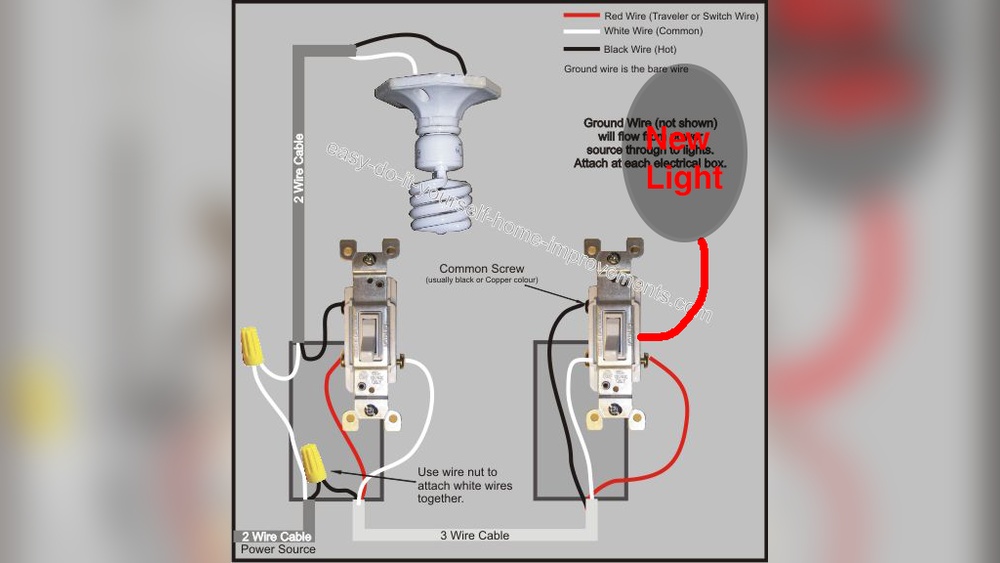
Turn off the power before checking wires. Remove the switch cover carefully. Look inside the switch box for wires. Usually, you see a few wires connected to the switch. Some may be black, white, or copper. Identify which wires connect to the switch terminals.
Wire Color Codes
Wire colors tell you their function. Black wires are usually hot or live wires. White wires are neutral and carry current back. Bare copper or green wires are ground wires. Ground wires protect you from shocks. Knowing these colors helps you connect the new light correctly.

Credit: www.youtube.com
Planning The Wiring Route
Planning the wiring route is the first step to add another light to a switch. It ensures safety and efficiency. A good plan saves time and prevents damage to walls and ceilings.
Think about where the cable will go from the switch to the new light. The path should be clear and easy to access. Careful planning helps avoid future problems and keeps the wiring neat.
Choosing Cable Path
Pick a path that follows existing wiring or wall studs. This makes the job easier and safer. Avoid running cables near water pipes or heating ducts. Use corners and edges to keep cables hidden and protected.
Measuring Cable Length
Measure the distance from the switch to the new light spot. Add extra length for turns and connections. Too short cables cause tension and damage. Longer cables give flexibility but keep them tidy to avoid clutter.
Avoiding Obstacles
Look for pipes, vents, and electrical boxes along the route. Avoid drilling into these to prevent damage. Use a stud finder to locate hidden obstacles inside walls. Plan a clear path that keeps cables safe and secure.
Wiring The New Light
Wiring the new light is a key step in adding another light to a switch. It involves connecting wires correctly to ensure safety and proper function. This process requires careful handling of electrical wires and following clear steps.
First, you will connect the new light to the switch. Then, you join the neutral and ground wires. Finally, you secure all wire connections to prevent loose contacts.
Connecting To The Switch
Start by turning off the power at the circuit breaker. Remove the switch cover and find the terminal screws. Connect the new light’s black wire to the switch’s load terminal. This is usually the screw where the original light is connected. Tighten the screw firmly to hold the wire. Do not connect the new light’s black wire to the line terminal. This step ensures the switch controls both lights together.
Joining Neutral And Ground Wires
The new light’s white wire connects to the neutral wires in the box. Use a wire connector to join the new wire with existing neutral wires. Next, connect the new light’s ground wire to the ground wires in the box. These wires are usually bare copper or green. Twist them together and secure with a wire nut. Proper grounding keeps the circuit safe and reduces shock risk.
Securing Wire Connections
Double-check all wire connections before closing the box. Use wire nuts that fit tightly on all wire ends. Tug gently on each wire to ensure it stays in place. Wrap electrical tape around wire nuts for extra security. Push the wires neatly into the electrical box. Replace the switch cover and tighten screws. This step prevents loose wires and possible shorts.
Testing The Setup
Testing the setup is an important step after adding another light to your switch. It ensures the new light works correctly and safely. This part checks if the wiring is done right and if the switch controls both lights as expected.
Careful testing helps avoid problems later. It saves time and effort by catching errors early. Follow these simple steps to test your setup.
Restoring Power
First, turn the power back on at the breaker. Make sure the main switch is off before this step. Use a voltage tester to confirm power is flowing to the switch. Never touch wires without checking power first.
Checking Light Operation
Flip the switch to see if both lights turn on. Test the switch several times to confirm both lights respond. Check each light bulb to ensure it is fully lit. If one light does not turn on, note which one.
Troubleshooting Common Issues
If a light does not work, check the bulb first. Replace any burnt-out bulbs. Look at the wiring connections to ensure they are tight. Loose wires can cause lights to fail. Make sure the switch is wired correctly. Reset the breaker if it trips. These steps fix most common problems quickly.
Tips For A Clean Finish
Achieving a clean finish is important when adding another light to a switch. It makes your work look neat and safe. A tidy setup also helps avoid problems later on. Follow these tips for a smooth and professional result.
Organizing Wires
Start by sorting the wires by color and function. Keep wires straight and untangled inside the box. Use cable ties or twist ties to bundle wires together. This keeps everything in place and easy to manage. Neat wires reduce the chance of shorts or damage.
Using Wire Nuts And Electrical Tape
Use wire nuts to connect wires securely. Choose the right size for each wire bundle. Twist wires together before placing the nut on top. Wrap electrical tape around wire nuts for extra safety. This prevents wires from loosening and keeps connections strong.
Mounting The Light Fixture
Attach the light fixture firmly to the ceiling or wall. Align screws carefully to avoid cracks or damage. Use a level to keep the fixture straight. Hide wiring inside the fixture or junction box. A secure mount makes the light stable and looks polished.

Credit: www.youtube.com
Frequently Asked Questions
How Do I Wire A Second Light To One Switch?
To wire a second light, connect its wires parallel to the first light’s wires at the switch or junction box. Ensure power is off before working. Use wire nuts to secure connections and test the setup after restoring power.
Can I Add Another Light Without Rewiring The Switch?
Yes, if the existing wiring supports it. Use a junction box near the first light to extend wiring to the new light. This avoids changing switch wiring but requires safe, code-compliant connections.
What Tools Are Needed To Add A Light To A Switch?
You need a screwdriver, wire stripper, voltage tester, wire nuts, electrical tape, and possibly a drill. These tools help safely connect the new light to the existing switch wiring.
Is It Safe To Add Another Light To A Single Switch?
Yes, if done correctly and following electrical codes. Always turn off power, use proper tools, and confirm connections are secure. If unsure, consult a licensed electrician to avoid hazards.
Conclusion
Adding another light to a switch can brighten your space easily. Follow the steps carefully to stay safe and avoid mistakes. Double-check all connections before turning the power back on. This simple task saves money and makes your home more functional.
Take your time and work with care for best results. You can enjoy better lighting without calling a professional. Small changes like this make a big difference in your home. Keep practicing and improving your DIY skills for future projects.