Are you trying to control two lights from one spot but don’t know where to start? Connecting two light switches in one box might seem tricky, but it’s easier than you think.
With the right steps, you can save space, simplify your wiring, and have full control over your lighting. Keep reading, and you’ll learn exactly how to do it safely and quickly—no electrician needed. By the end, you’ll feel confident making this simple upgrade yourself.
Let’s get started!

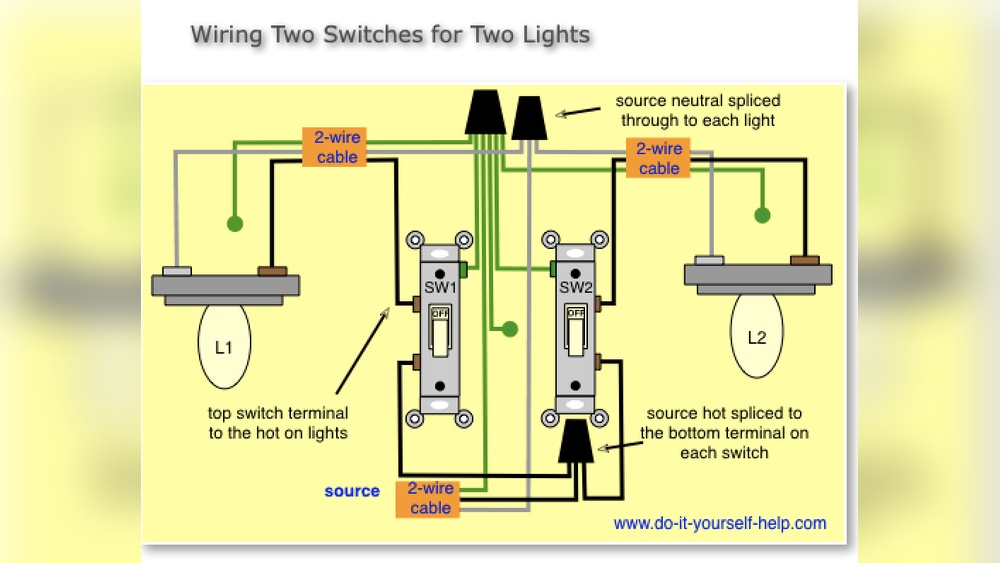
Credit: www.do-it-yourself-help.com
Tools And Materials Needed
Before connecting two light switches in one box, gather the right tools and materials. Having everything ready makes the task safer and faster. The right tools help you work with wires and switches correctly. The correct materials ensure the connection is secure and lasts long.
Essential Tools
- Voltage tester to check power is off
- Wire stripper to remove wire insulation
- Flathead and Phillips screwdrivers for screws
- Needle-nose pliers to bend and hold wires
- Electrical tape to insulate wire connections
- Wire nuts to join wires securely
- Flashlight for better visibility inside the box
- Drill with bits for mounting screws, if needed
Required Materials
- Two single-pole light switches
- Electrical box large enough for two switches
- Appropriate gauge electrical wire (usually 14 or 12 gauge)
- Wire connectors to join wires safely
- Switch cover plate designed for two switches
- Ground wire for proper grounding
- Wire labels or tape for marking wires

Credit: diy.stackexchange.com
Safety First
Working with electrical switches can be risky without proper care. Safety must be the top priority before starting any wiring task. Taking simple steps can prevent shocks and accidents. Always prepare your workspace carefully and follow safety rules.
Even if you have some experience, never skip safety checks. Electricity is powerful and dangerous. Protect yourself and others by working smart and safe. Here are the key steps to ensure safety when connecting two light switches in one box.
Turn Off Power
Before touching any wires, turn off the power at the circuit breaker. This cuts electricity to the switches. Double-check that the right breaker is off. Do not rely on the wall switch to cut power.
Use the breaker panel to switch off the correct circuit. This step stops electric current and keeps you safe from shocks. Never work on live wires. Always confirm power is off before starting.
Use A Voltage Tester
After turning off the breaker, test the wires with a voltage tester. This tool shows if electricity is still flowing. Touch the tester to each wire inside the switch box.
If the tester lights up or beeps, power is still on. Stop immediately. Recheck the breaker and test again. Only start wiring when the tester shows no voltage.
Using a voltage tester adds a second layer of safety. It helps avoid accidents and protects your life. Always keep a voltage tester handy for electrical work.
Types Of Light Switches
Understanding the types of light switches helps in connecting two switches in one box. Each switch type works differently. Knowing their functions makes installation easier and safer.
Single-pole Switch
A single-pole switch controls one light or fixture from one location. It has two terminals and a simple on/off function. This switch is the most common in homes.
Double-pole Switch
A double-pole switch controls two separate circuits. It has four terminals and can turn off both circuits at once. This switch is used for high-power devices or two lights at once.
Three-way Switch
A three-way switch controls one light from two different places. It has three terminals and works with another three-way switch. This setup is common in hallways and large rooms.
Wiring Basics
Understanding wiring basics is key to safely connect two light switches in one box. You need to know the types of wires and their roles. This knowledge helps prevent mistakes and ensures the switches work properly. Below, we break down the basics of identifying wires and what their colors mean.
Identify Wires
Inside the switch box, you usually find three main wires: hot, neutral, and ground. The hot wire carries electricity from the power source. The neutral wire completes the circuit by carrying electricity back. The ground wire provides safety by directing electricity away during faults. Always turn off power before touching wires. Use a voltage tester to confirm no current flows.
Color Codes Explained
Wire colors follow a standard code to help identify their functions. Black or red wires are hot wires. White wires are neutral. Green or bare copper wires are ground wires. Some older homes may have different colors, so check carefully. Correctly matching wire colors is important for safe, effective wiring. Always follow local electrical codes for color use.
Step-by-step Wiring Process
Connecting two light switches in one box may seem tricky. Follow this simple, step-by-step wiring process to do it safely and correctly. Each step ensures the switches work properly and prevent electrical problems. Take your time and check each connection carefully.
Prepare The Box
Turn off the power at the circuit breaker. Use a voltage tester to confirm no electricity flows. Remove the old switch and clear the box. Check the wires for damage and strip about half an inch of insulation from each wire end.
Connect Ground Wires
Find the bare copper or green ground wires. Twist them together with a wire nut. Attach a short ground wire to the switch’s green screw. This ensures the switch is grounded and safe to use.
Wire The Switches
Identify the hot (black) and neutral (white) wires. Connect the black wire from the power source to the first switch’s common terminal. Link the black wire from the first switch to the second switch’s common terminal. Attach the traveler wires between both switches’ traveler terminals. Connect the white neutral wires together with a wire nut, but do not connect to the switches.
Secure And Test
Carefully push the wires back into the box. Screw the switches into place. Attach the cover plate. Turn the power back on. Test both switches to ensure they control the lights properly.

Credit: www.youtube.com
Troubleshooting Tips
Troubleshooting is key when connecting two light switches in one box. It helps find and fix problems fast. This saves time and keeps your lights working well. Small mistakes can cause big issues. Knowing what to check can make the job easier and safer.
Common Wiring Mistakes
Mixing wires is a frequent problem. Each wire has a purpose. Connecting the wrong wires can stop the switch from working. Sometimes, the ground wire is not connected. This can cause safety issues. Loose connections can also cause lights to fail. Always double-check wire colors and connections.
Fixing Flickering Lights
Flickering lights often mean poor connections. Check if the wires are tight. Loose wires cause flickers. Another cause is a bad switch. Replacing the switch might fix the problem. Sometimes, the bulb is the issue. Test with a new bulb to be sure. Flickering can also come from the circuit. If unsure, consult an electrician.
When To Call A Professional
Connecting two light switches in one box may seem simple. Yet, some situations need expert help. Knowing when to call a professional saves time and avoids hazards. It ensures the job is done right and safe.
Complex Wiring Situations
Wiring is not always straightforward. Old homes often have outdated or tangled wires. Complex circuits with multiple switches or dimmers need special skills. Professionals understand wiring colors and codes. They can handle complicated setups without mistakes.
Improper wiring causes short circuits or fires. A pro can spot hidden problems inside the wall. They use tools to test electrical flow safely. This work requires training and experience. Avoid risks by letting experts manage complex wiring.
Safety Concerns
Electricity is dangerous. Even a small error can cause shocks or fires. Professionals follow safety rules strictly. They turn off power properly before working. They use insulated tools and protective gear.
DIY wiring mistakes may damage switches or wiring. Faulty connections can harm your home and family. Professionals ensure all connections are tight and secure. They check grounding and circuit breakers carefully. Safety is the top priority when working with electricity.
Frequently Asked Questions
How Do I Wire Two Switches In One Box Safely?
Turn off power before wiring. Connect black wires to switch terminals. Use wire nuts for neutral and ground. Follow local electrical codes for safety.
Can I Control One Light From Two Switches?
Yes, use a three-way switch setup. It allows two switches to control one light from different locations.
What Tools Are Needed For Two Switches Installation?
You need a screwdriver, wire stripper, voltage tester, wire nuts, and electrical tape for safe installation.
How To Identify The Common Wire In Switch Wiring?
The common wire is usually black or marked. Use a voltage tester to confirm before connecting.
Conclusion
Connecting two light switches in one box can save space and improve convenience. Follow safety rules carefully to avoid accidents. Use the right tools and check all wires before starting. Take your time and double-check connections for proper function. Ask an expert if unsure about any step.
This simple project can brighten your home and make lighting easier. Stay safe and enjoy your new setup.