Are you tired of fumbling for separate switches to control your fan and light? Imagine having one simple switch that handles both—making your life easier and your room more comfortable.
Connecting a fan to a light switch isn’t as complicated as it sounds, and you can do it yourself with just a few tools and clear steps. In this guide, you’ll discover exactly how to make the connection safely and efficiently.
Keep reading, and by the end, you’ll have the confidence to upgrade your home setup without calling a pro.

Credit: smafan.com
Tools And Materials Needed
Connecting a fan to a light switch needs some basic tools and materials. Having the right items makes the job easier and safer. Preparing well saves time and avoids mistakes.
Gather everything before starting. This way, the work flows smoothly without interruptions.
Essential Tools
- Screwdrivers (flathead and Phillips) for removing and securing screws
- Wire stripper to remove insulation from wires
- Voltage tester to check if wires carry electricity
- Pliers to bend and twist wires securely
- Electrical tape for insulating wire connections
- Drill (optional) for mounting the fan or switch
Required Materials
- Ceiling fan with mounting bracket and wiring
- Light switch compatible with fan control
- Electrical wires (usually 14/2 or 12/2 gauge)
- Wire nuts to connect wires safely
- Mounting screws and anchors
Safety Gear
- Insulated gloves to protect from shocks
- Safety goggles to shield eyes from debris
- Ladder or step stool for reaching the ceiling
Credit: www.protoolreviews.com
Safety Precautions
Identifying the existing wiring is the first step to connect a fan to a light switch. It helps you understand how wires are arranged. This knowledge prevents mistakes and keeps you safe.
Carefully checking the wiring inside the switch box and at the fan will guide your next steps. Pay close attention to wire colors and connections.
Locate The Light Switch Box
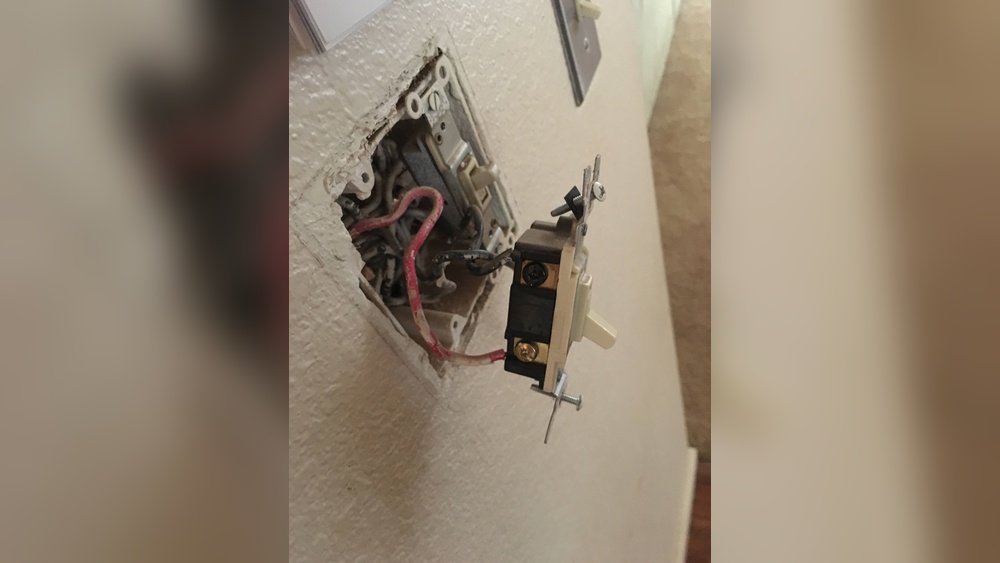
Start by finding the light switch box on the wall. Remove the switch cover carefully using a screwdriver. Look inside to see the wires connected to the switch.
Note the number of wires and their colors. Usually, black or red wires carry the power. White wires are neutral, and green or bare wires are ground. Take a photo for reference before touching anything.
Check The Fan Wiring
Next, go to the fan. Remove the fan canopy cover to see the wires. Identify the power, neutral, and ground wires. The fan might have separate wires for light and motor.
Compare the fan wires to those in the switch box. This helps you know which wires to connect. Make sure all wires are in good condition without damage.
Identify Existing Wiring
Turning off the power is the first and most important step before connecting a fan to a light switch. It keeps you safe from electric shocks. Always treat electricity with respect. Even a small mistake can cause injury or damage.
Before you start any electrical work, make sure the power is completely off. This step protects you and the devices you work on. Do not skip it.
Locate The Circuit Breaker
Find your home’s circuit breaker panel. It is usually in the basement, garage, or utility room. Look for the breaker that controls the room where you will work. It often has labels to help identify it.
Turn Off The Correct Breaker
Flip the switch for the correct circuit breaker to the off position. This stops electricity flow to the fan and light switch. Double-check by trying to turn on the light switch. It should not work.
Use A Voltage Tester
Use a voltage tester to make sure the power is off. Touch the tester to the wires in the switch box. The tester will show if electricity is still present. Only proceed if the tester shows no power.
Take Safety Precautions
Wear insulated gloves if available. Stand on a dry, non-conductive surface. Do not touch any metal parts while working. Safety first.
Credit: www.electricaltechnology.org
Turn Off Power
Disconnecting old wiring is a crucial step before installing a fan to a light switch. It ensures safety and prepares the setup for new wiring. Always turn off the power at the circuit breaker. Never work on live wires to avoid electric shock.
Carefully remove the switch cover plate. Use a voltage tester to double-check the power is off. This step confirms no electricity flows through the wires.
Remove The Switch
Unscrew the switch from the electrical box. Gently pull the switch out to expose the wires. Take note of how wires connect to the switch for reference.
Identify The Wiring
Look for the black (hot), white (neutral), and green or bare copper (ground) wires. Old wiring may be faded or damaged. Replace any wires that look worn or cracked.
Disconnect The Wires
Loosen the screws holding the wires on the switch terminals. Carefully detach each wire. Keep the wires separated to prevent contact.
Cap The Wires
Use wire nuts to cap each exposed wire end. This step prevents accidental contact and short circuits. Secure the wire nuts tightly.
Disconnect Old Wiring
Installing the fan control is an important step to manage your ceiling fan and light. This control lets you turn the fan on or off and adjust its speed. It also controls the light separately if your fan has one. Follow clear steps to install the fan control safely and correctly.
Turn Off The Power
Start by switching off the power at the circuit breaker. This step is crucial to avoid electric shock. Use a voltage tester to confirm no current flows in the wires.
Remove The Existing Switch
Take out the cover plate of the current light switch. Unscrew the switch from the wall box carefully. Pull the switch out gently to expose the wires behind it.
Identify The Wires
Check the wires connected to the switch. Typically, you will see a black (hot), white (neutral), and green or bare copper (ground) wire. Note which wire connects to which terminal on the old switch.
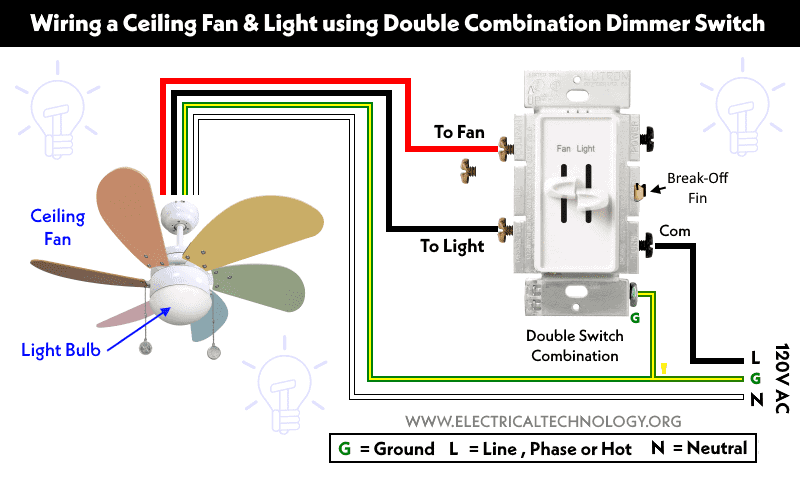
Connect The Fan Control Wires
Match the fan control wires with the wires in the wall box. Connect the black wire from the fan control to the black (hot) wire. Connect the white wires together for neutral. Attach the green or bare wire to the ground wire.
Secure The Fan Control Switch
Push the connected wires back into the wall box carefully. Screw the fan control switch into place. Attach the cover plate over the switch to finish.
Turn the power back on at the breaker. Test the fan control switch by turning the fan and light on and off. Adjust the fan speed to ensure the control works properly.
Connect Fan To Switch
Troubleshooting is key when connecting a fan to a light switch. Problems can stop your fan from working or cause safety issues. Knowing common issues helps you fix them fast. This keeps your fan safe and running well.
Fan Not Turning On
Check the power source first. Make sure the circuit breaker is on. Look for loose wires in the switch box. Tighten any loose connections. Test the fan with a different switch if possible. Faulty switches stop the fan from getting power. Also, inspect the fan’s internal wiring. Sometimes, the fan motor might be damaged. If unsure, ask a professional electrician to help.
Switch Sparks Or Buzzes
Sparking or buzzing means a poor connection or overload. Turn off the power before inspecting. Look for worn or damaged wires. Replace any frayed or burnt wires. Use a switch rated for your fan’s power. Buzzing often comes from a low-quality switch. Switching to a better one can solve this. Never ignore sparks, as they risk fire. Call an expert if the problem continues after fixes.
Frequently Asked Questions
How Do I Connect A Fan To A Light Switch Safely?
Turn off power at the circuit breaker first. Connect the fan’s hot wire to the switch’s output wire. Use wire nuts to secure connections. Follow local electrical codes and use insulated tools for safety.
Can I Control A Fan And Light With One Switch?
Yes, but only if the fan and light share the same power source. Use a dual switch or a fan control switch for independent control. This setup requires extra wiring and proper switch selection.
What Tools Do I Need To Connect Fan To Light Switch?
You will need a screwdriver, wire stripper, voltage tester, wire nuts, and electrical tape. These tools help ensure safe and secure wiring connections. Always check that power is off before working.
Is It Necessary To Hire An Electrician For Fan Installation?
Hiring an electrician is recommended if you lack wiring experience. Incorrect wiring can cause shorts, shocks, or fire hazards. Professionals ensure the installation meets safety codes and works properly.
Conclusion
Connecting a fan to a light switch can save space and add convenience. Follow safety rules and turn off power first. Use the right tools and check wiring carefully. Take your time to avoid mistakes or accidents. A properly connected fan and light switch work smoothly together.
Enjoy better control of your room’s air and light. Small effort brings big comfort at home. Try this simple upgrade to improve your living space today.