Are you ready to hang something heavy on your wall but worried it won’t hold? Installing an anchor in a wall stud is the key to making sure your pictures, shelves, or TVs stay secure.
You might think it’s tricky, but once you know the right steps, it becomes simple and stress-free. In this guide, you’ll learn exactly how to find the stud, choose the right anchor, and install it so your items stay firmly in place.
Keep reading, and by the end, you’ll have the confidence to tackle this project like a pro.

Credit: www.youtube.com
Choosing The Right Anchor
Choosing the right anchor is key to a strong and safe wall installation. Not all anchors work the same. Some anchors hold better in drywall, while others are meant for wall studs. Picking the right type helps your items stay secure and prevents damage to the wall.
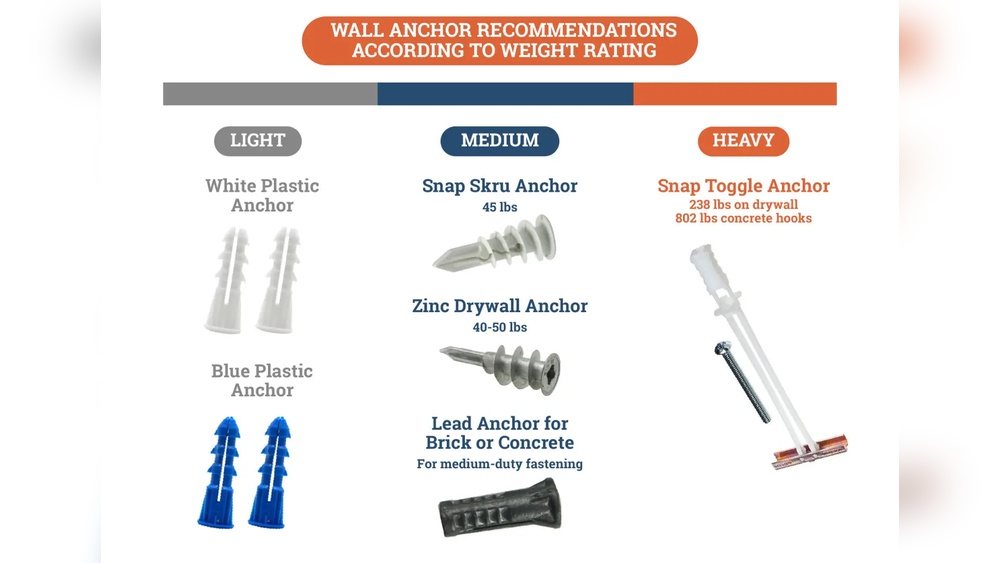
Types Of Wall Anchors
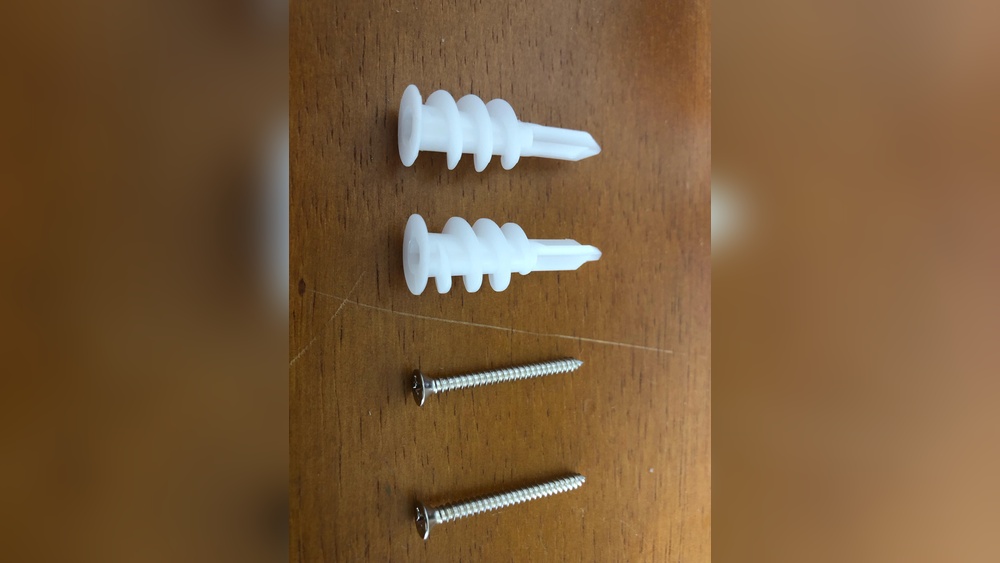
There are many types of wall anchors. Plastic expansion anchors are common for light loads. They expand when you screw into them. Toggle bolts have wings that open behind the wall for strong support. Molly bolts are metal and expand inside the wall for a firm grip. Threaded anchors screw directly into drywall without a drill.
Selecting Anchors For Studs
Studs are strong wood or metal behind the wall surface. Anchors designed for studs are often screws or lag bolts. These go directly into the stud for maximum hold. Avoid using plastic anchors in studs. Choose heavy-duty anchors for heavy items. Make sure the anchor length matches the stud depth. Proper selection keeps your installation safe and sturdy.

Credit: www.picturehangsolutions.com
Tools And Materials Needed
Installing an anchor in a wall stud requires specific tools and materials. Having the right equipment makes the job easier and safer. This section lists the essential tools and safety gear you need.
Essential Tools
- Drill with drill bits suited for wood
- Screwdriver or a drill driver bit
- Tape measure to find stud location
- Stud finder to locate the wall stud
- Level to keep the anchor straight
- Hammer, if needed for some anchors
- Pencil for marking the drilling spot
Safety Gear
- Safety glasses to protect your eyes
- Dust mask to avoid inhaling dust
- Work gloves to protect your hands
Locating The Wall Stud
Finding a wall stud is the first step to install an anchor securely. Wall studs are the vertical wooden beams inside the wall. Anchors must go into these studs for strong support. Without hitting a stud, anchors may fail and fall out. This section shows easy ways to locate a wall stud before drilling.
Using A Stud Finder
A stud finder is a small tool that detects wood behind the wall. Turn it on and slowly move it across the wall surface. The device beeps or lights up when it finds a stud. Mark the spot with a pencil. Scan a few times to confirm the stud’s position. Stud finders work well on drywall and plaster walls.
Alternative Methods
Not everyone has a stud finder. Use simple tricks instead. Tap the wall lightly with your knuckles. A hollow sound means no stud. A solid sound means a stud is behind. Look for electrical outlets or switches. They often attach to studs. Measure about 16 inches from these points. Studs usually space 16 or 24 inches apart. Use a small nail to test the spot. If it hits wood, you found a stud.

Credit: www.amazon.com
Preparing The Wall Surface
Preparing the wall surface is a key step before installing an anchor in a wall stud. It ensures the anchor fits well and holds firmly. Taking time to prepare helps avoid mistakes and damage to the wall. This section covers marking the spot and drilling pilot holes, two simple but important tasks.
Marking The Spot
Start by finding the exact location of the wall stud. Use a stud finder or tap the wall to hear a solid sound. Mark the spot lightly with a pencil. Double-check the mark to ensure accuracy. The anchor must go into the stud for strong support. A clear mark guides your drilling and keeps the work neat.
Drilling Pilot Holes
Choose a drill bit slightly smaller than the anchor’s diameter. This helps the anchor grip the wood tightly. Drill a straight pilot hole on the marked spot. Drill slowly to avoid splitting the stud. Clean out any dust or debris from the hole. A clean, precise hole makes the anchor installation easier and stronger.
Installing The Anchor
Installing the anchor in a wall stud is a key step for strong support. The anchor holds items firmly on the wall. Proper installation prevents damage and ensures safety. Follow clear steps to insert and secure the anchor correctly.
Inserting The Anchor
Start by drilling a hole in the wall stud. Use a drill bit that fits the anchor size. Keep the hole straight and clean for a tight fit. Gently push the anchor into the hole. Tap it lightly with a hammer if needed. Make sure the anchor sits flush with the wall surface.
Securing The Anchor
Insert the screw into the anchor slowly. Turn the screw clockwise using a screwdriver. The anchor expands inside the stud, locking it in place. Tighten the screw until it feels firm. Avoid over-tightening to prevent damage. The anchor now holds strong for hanging items safely.
Testing The Anchor
Testing the anchor is an important step after installation. It ensures the anchor holds firmly in the wall stud. This step helps avoid future damage or accidents. Testing also confirms the anchor supports the weight intended.
Checking Stability
Start by gently pulling the anchor outward. Use your hand or a small tool for this. Feel if the anchor moves or feels loose. A stable anchor will not shift or wiggle. Check the surrounding wall for cracks or damage. These signs indicate the anchor may not hold well.
Adjusting If Needed
If the anchor feels loose, try tightening it slightly. Use a screwdriver to turn the anchor clockwise. Avoid over-tightening as it may damage the wall stud. Remove the anchor and inspect for any debris. Clean the hole and reinsert the anchor carefully. Repeat the stability check after adjustments.
Tips For Heavy Loads
Installing anchors in wall studs for heavy loads needs extra care. The right choice and method keep your items secure. Use strong materials that hold well under weight. Simple steps make a big difference in safety and durability.
Choosing Stronger Anchors
Select anchors made for heavy weights. Metal anchors often hold better than plastic ones. Look for anchors labeled as heavy-duty or load-bearing. Size matters too; bigger anchors spread weight well. Check the weight limit on the package. Use anchors that match your wall stud type.
Using Multiple Anchors
Spread the weight with more than one anchor. Two or more anchors share the load evenly. Place them a few inches apart on the stud. This reduces stress on any single point. Multiple anchors add stability and reduce risk of damage. Make sure all anchors are installed firmly and straight.
Frequently Asked Questions
What Tools Do I Need To Install A Wall Stud Anchor?
You need a drill, drill bit, screwdriver, wall anchor, and screw. Use a stud finder to locate the stud. These tools ensure a secure and accurate installation.
How Do I Find A Stud Before Installing An Anchor?
Use a stud finder to locate wooden studs behind the drywall. Move it slowly until it signals a stud. Mark the spot to ensure proper anchor placement.
Can I Use Any Anchor In A Wall Stud?
No, use anchors designed for studs like wood screws or heavy-duty anchors. Drywall anchors are not suitable for studs and may fail under load.
How Deep Should I Drill For A Wall Stud Anchor?
Drill a pilot hole about 1 to 1. 5 inches deep into the stud. This depth ensures the screw fits securely without splitting the wood.
Conclusion
Installing an anchor in a wall stud is simple and effective. Follow the steps carefully for a strong hold. Use the right tools to avoid damage. Double-check the stud’s position before drilling. Secure anchors keep shelves and items safe. Practice makes the process easier and faster.
Take your time and stay patient. This skill helps with many home projects. Start small and build your confidence. A well-placed anchor supports heavy loads safely. You can do this with basic tools and clear instructions.