Are you ready to take control of your home’s lighting without calling an electrician? Learning how to assemble a light switch is easier than you think.
With just a few simple steps, you can save money, gain confidence, and add a personal touch to your space. This guide will walk you through the process clearly and safely, so you can switch on your skills and light up your room in no time.
Keep reading—you’re about to discover how straightforward it really is!
Credit: www.dummies.com
Tools And Materials Needed
Before starting to assemble a light switch, gather all the tools and materials. Having the right items makes the job faster and safer. Prepare everything in one place. This helps avoid interruptions and mistakes.
Essential Tools
Basic tools include a screwdriver, wire stripper, and voltage tester. A flathead and a Phillips screwdriver work best. Wire strippers help remove insulation without damaging wires. Voltage testers confirm power is off before working.
Types Of Light Switches
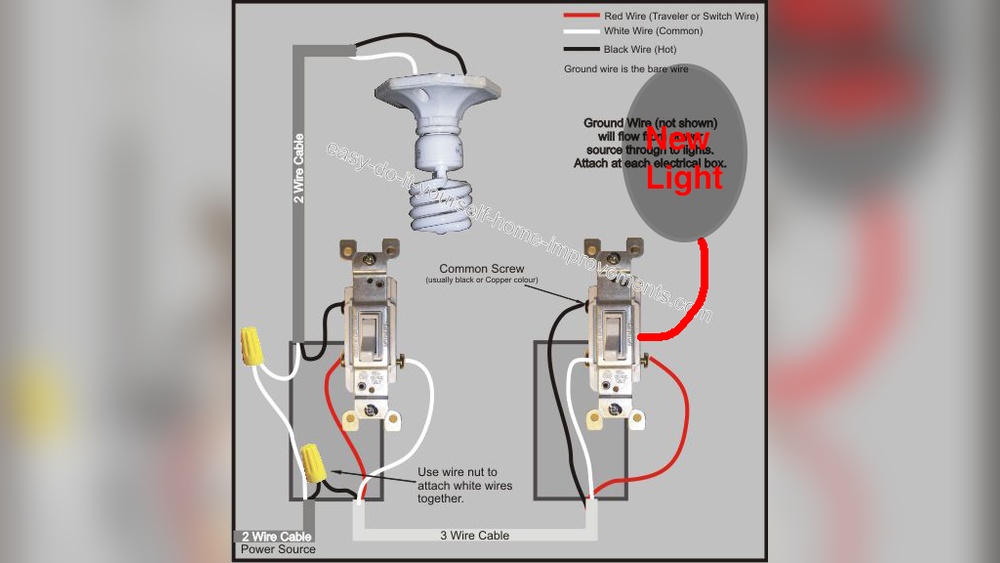
Know the switch type before buying or assembling. Common types are single-pole, three-way, and dimmer switches. Single-pole switches control one light from one place. Three-way switches control one light from two places. Dimmer switches adjust the light brightness.
Safety Gear
Wear safety gear to protect yourself during assembly. Use insulated gloves to avoid electric shocks. Safety glasses shield your eyes from dust and debris. Proper safety gear keeps you safe and confident.

Credit: www.dummies.com
Preparing The Work Area
Preparing the work area is the first step in assembling a light switch. This step ensures safety and makes your task easier. Taking time to prepare helps avoid mistakes and accidents. A clean, safe workspace helps you focus on the job.
Follow these simple actions before starting your work. They will keep you safe and save time.
Turning Off Power
Switch off the power at the main circuit breaker. This stops electricity from flowing to the switch. Never work on a live circuit. Use the breaker panel to find the correct switch. Turn it off to cut power completely.
Clearing The Space
Clear the area around the switch. Remove furniture or objects that block your access. A tidy workspace reduces risks of accidents. Make sure you have good light and enough room to work comfortably.
Testing For Live Wires
Use a voltage tester to check wires before touching them. This confirms the power is off. Test all wires in the switch box. If the tester shows a live wire, do not continue. Safety first.
Removing The Old Switch
Removing the old light switch is the first step in installing a new one. It helps to work carefully and safely. Turn off the power at the circuit breaker before you start. This prevents any chance of electric shock. Follow each step slowly to avoid mistakes.
Unscrewing The Faceplate
Start by unscrewing the faceplate covering the switch. Use a screwdriver that fits the screws well. Keep the screws safe for later use. Remove the faceplate gently to avoid breaking it. Set it aside on a clean surface.
Disconnecting Wires
Next, remove the screws holding the switch to the wall box. Pull the switch out carefully. Look at the wires attached to the switch. Use a screwdriver to loosen the screws holding the wires. Pull the wires free one by one. Note the position of each wire for reassembly.
Inspecting The Wiring
Check the wires for damage or wear. Look for frayed or broken insulation. Ensure the wires are clean and not corroded. If wires look damaged, replace them before installing a new switch. This step helps keep your wiring safe and functional.
Connecting The New Switch
Connecting the new switch is a key step in assembling a light switch. It involves working safely with electrical wires and making sure everything fits correctly. This part needs focus and care to avoid problems later. Follow these clear steps to connect your new switch with confidence and safety.
Identifying Wire Types
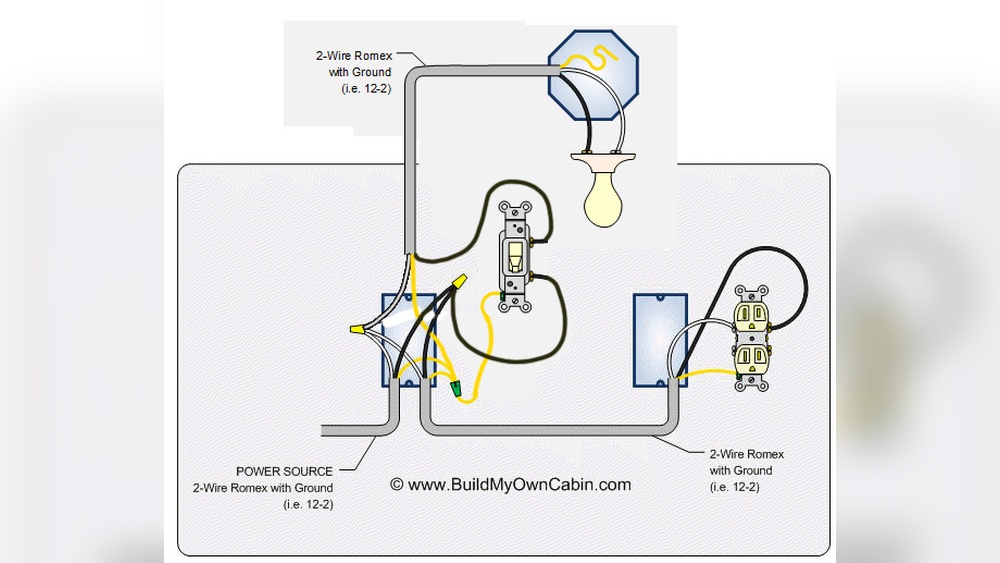
First, look at the wires coming from the wall. Usually, there are three types: live, neutral, and ground. The live wire carries electricity to the switch. The neutral wire completes the circuit back to the power source. The ground wire is for safety and prevents shocks. Each wire has a different color. Black or red is live, white is neutral, and green or bare copper is ground. Knowing these helps avoid mistakes.
Attaching Wires Correctly
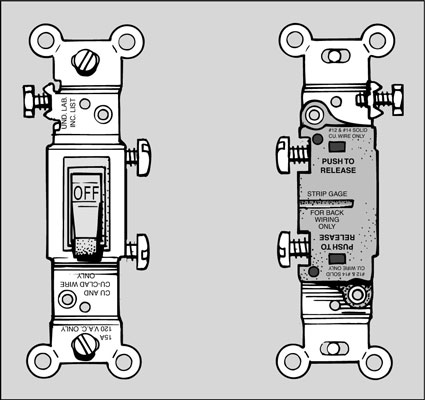
Next, connect the wires to the new switch. Loosen the screws on the switch terminals. Attach the live wire to the brass-colored screw. Connect the neutral wire to the silver-colored screw, if your switch uses it. Attach the ground wire to the green screw. Make sure wires are wrapped tightly around the screws. No loose ends or exposed wire should show. Tight connections prevent shorts and keep the switch working well.
Securing The Switch
After wiring, place the switch into the electrical box. Push wires gently inside to avoid damage. Use screws to fasten the switch firmly to the box. Check it is straight and tight. Loose switches can cause sparks or damage. Finally, attach the switch cover plate. This protects the wires and gives a clean look. Your new switch is now ready for use.
Finalizing Installation
After wiring the light switch, the last steps complete the installation. These steps ensure the switch looks good and works safely. Follow each step carefully to avoid problems.
Reattaching The Faceplate
First, place the faceplate over the switch. Align the holes in the faceplate with the screws on the switch. Use a screwdriver to tighten the screws. Do not overtighten. The faceplate should sit flush against the wall.
Turning On Power
Next, go back to the circuit breaker. Switch the power back on to the light switch. Be careful during this step. Make sure no wires are loose before restoring power. This step is important to test your work safely.
Testing The Switch
Press the switch to check if the light turns on. Flip it on and off a few times. The light should respond immediately without flickering. If it works well, the installation is complete. If not, turn off the power and check connections again.
Credit: www.youtube.com
Troubleshooting Common Issues
Troubleshooting common issues helps fix problems quickly. It saves time and keeps your light switch working well. Simple checks often solve most problems.
Understanding common problems guides you to the right fix. Keep safety first by turning off the power before any work.
Switch Not Working
Check if the power is on at the breaker. Sometimes the breaker trips and cuts power to the switch. Test the switch with a voltage tester to see if it gets power. Replace the switch if it feels loose or does not click.
Flickering Lights
Flickering means a bad connection or a weak bulb. Tighten the bulb in the socket first. Replace the bulb if flickering continues. Loose wiring inside the switch can also cause flickering. Inspect wiring carefully and tighten any loose wires.
Loose Connections
Loose wires cause poor contact and unsafe conditions. Turn off power, then remove the switch cover. Check each wire connection. Tighten screws holding the wires firmly. Use a wire stripper to expose clean wire if needed. Loose connections must be fixed to avoid sparks or shocks.
Tips For Safe Electrical Work
Working with electricity can be dangerous without the right care. Following safety tips helps prevent accidents. This section covers key advice for safe electrical work. It teaches how to avoid hazards and when to get help from experts.
Avoiding Electrical Hazards
Always turn off the power before starting any electrical work. Use a voltage tester to make sure the wires have no current. Wear rubber-soled shoes to reduce the risk of shock. Avoid working in wet areas or with wet hands. Use tools with insulated handles for extra safety. Never touch bare wires or metal parts with your bare hands. Keep your work area clear and well-lit to avoid mistakes.
When To Call A Professional
Complex wiring or damaged circuits need a licensed electrician. If you feel unsure about any step, stop and ask for help. Problems like flickering lights or burning smells are signs to call an expert. Never try to fix a breaker panel or main electrical box yourself. Getting professional help ensures the job is done safely and correctly. It also protects your home and family from electrical hazards.
Frequently Asked Questions
How Do I Safely Assemble A Light Switch?
Turn off the power at the circuit breaker first. Use a voltage tester to confirm no electricity flows. Follow wiring instructions carefully. Connect wires to correct terminals. Secure the switch to the wall box. Restore power and test the switch.
What Tools Are Needed To Assemble A Light Switch?
You need a screwdriver, wire stripper, voltage tester, and needle-nose pliers. These tools help remove the old switch, strip wires, and secure connections safely.
How Do I Identify Wires For Light Switch Assembly?
Typically, black or red wires are hot, white is neutral, and green or bare copper is ground. Use a voltage tester to confirm wire functions before connecting.
Can I Assemble A Light Switch Without Electrical Experience?
Basic electrical knowledge is helpful. If unsure, consult a professional electrician. Incorrect assembly risks electric shock or fire. Always prioritize safety and follow instructions closely.
Conclusion
Assembling a light switch is simple with clear steps. Always turn off the power before starting work. Take your time to connect wires carefully and securely. Double-check all connections before attaching the switch to the wall. Testing the switch ensures everything works safely and correctly.
With practice, this task becomes easier and less stressful. You can handle small electrical jobs with confidence and care. Stay safe and enjoy your newly installed light switch.