Changing a light switch in an old house might seem tricky, but you can do it yourself with the right steps. Maybe your switch feels loose, or it just doesn’t work like it used to.
Fixing it can save you money and give your home a fresher look. In this guide, you’ll find simple, clear instructions that anyone can follow—even if you’re not a pro. Keep reading, and by the end, you’ll have the confidence to update your old light switch safely and easily.

Credit: diy.stackexchange.com
Tools And Materials Needed
Changing a light switch in an old house needs the right tools and materials. Using proper items makes the job safe and easier. Gathering these before starting saves time and stress.
Basic Hand Tools
A screwdriver set is essential. Both flathead and Phillips screwdrivers are useful. Needle-nose pliers help handle wires in tight spaces. A voltage tester checks if wires carry current.
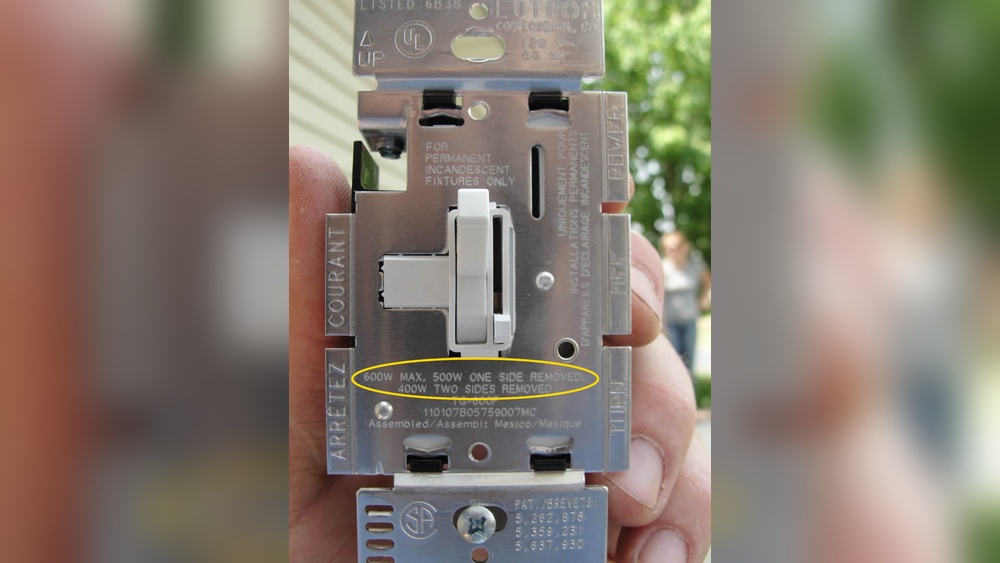
Replacement Switch
Choose a switch that matches the old one. Single-pole switches are common for most rooms. Make sure the new switch fits the wall box and matches your home’s voltage.
Electrical Tape And Wire Connectors
Electrical tape insulates exposed wires safely. Wire connectors join wires securely. They prevent loose connections that can cause hazards.
Safety Gear
Wear insulated gloves to avoid electric shocks. Safety glasses protect your eyes from dust and debris. Always turn off power before starting work.

Credit: www.youtube.com
Safety Precautions
Always turn off the power at the breaker before starting. Test the switch with a voltage tester to avoid shocks. Wear gloves and use insulated tools for extra safety.
Turn Off The Power
Always switch off the power at the circuit breaker before starting. This stops electricity flow and prevents shocks. Use a voltage tester to check if the wires are dead. Never trust the switch position alone.
Wear Protective Gear
Wear insulated gloves to protect your hands from electric shocks. Use safety glasses to guard your eyes from dust and debris. Proper gear lowers the risk of injury during the job.
Use The Right Tools
Use tools with insulated handles. Avoid metal tools without insulation. A screwdriver with a rubber grip is safer. This helps prevent accidental electric contact.
Work In A Dry Area
Make sure the work area is dry. Water and electricity create a dangerous mix. Avoid changing switches in damp or wet conditions. Dryness reduces the chance of electric shocks.
Label Wires Carefully
Label each wire before disconnecting. This helps you reconnect correctly later. Wrong connections can cause short circuits or fires. Clear labeling makes the process safer and easier.
Check Local Codes
Follow local electrical codes and rules. Some areas require permits or inspections. Compliance ensures safety and avoids fines. Check rules before starting your work.
Identifying The Switch Type
Identifying the switch type is the first step in changing a light switch in an old house. Different switches need different tools and steps. Knowing your switch type helps you avoid mistakes and work safely.
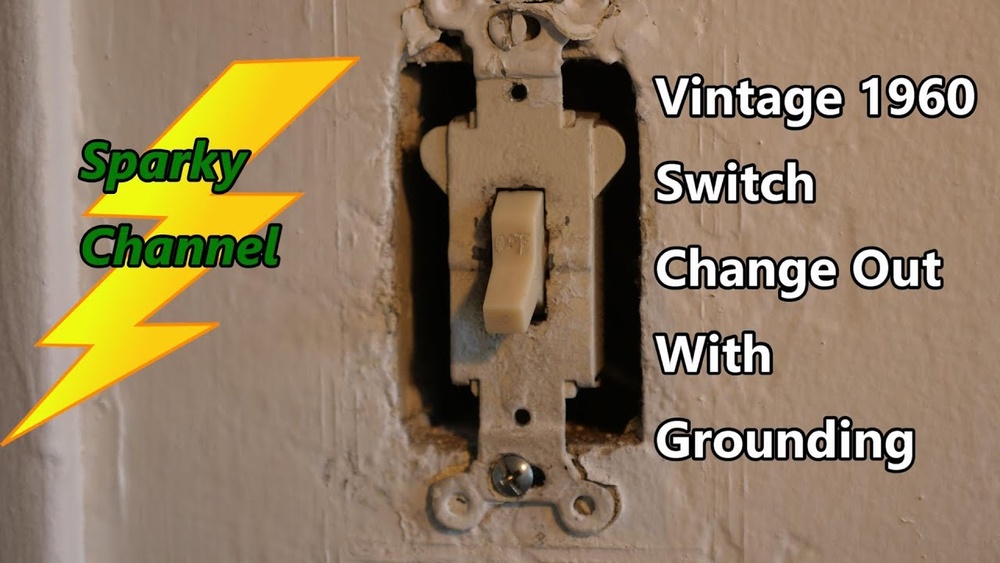
Old houses often have switches that look different from modern ones. Some switches may be worn or painted over. Take a close look to understand what kind you have before starting.
Single-pole Switch
A single-pole switch controls one light or set of lights from one place. It has two screw terminals and sometimes a ground screw. This switch type is the most common in old homes.
When you flip it, it either turns the light on or off. It does not control lights from multiple locations.
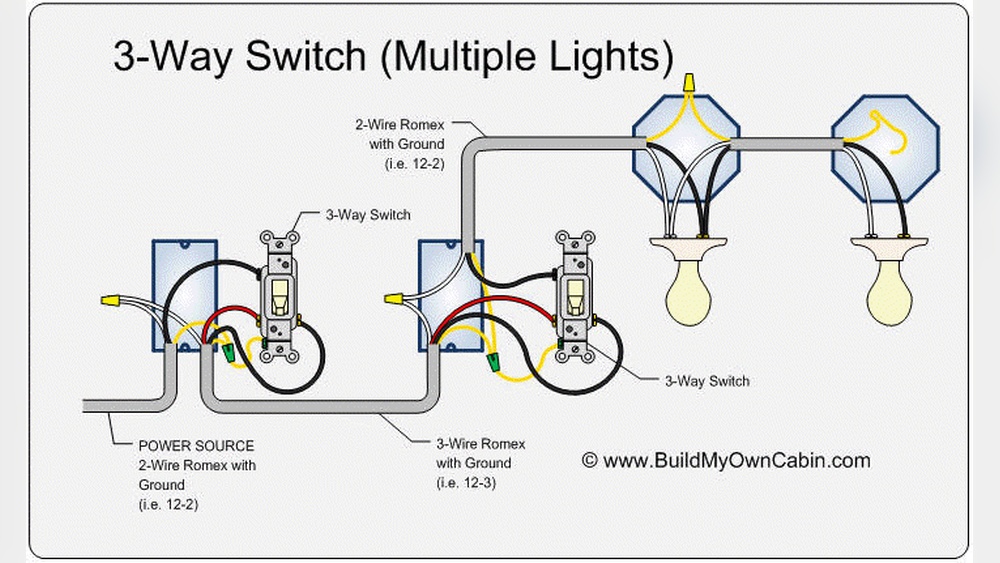
Three-way Switch
A three-way switch controls lights from two different locations. It has three screw terminals plus a ground screw. These switches are common in hallways or staircases.
You can turn lights on or off from two places. This switch type looks similar to single-pole but has one more terminal.
Toggle Vs. Push-button Switches
Toggle switches have a lever you flip up or down. They are easy to spot and common in old houses. Push-button switches have a button you press in or out.
Push-button switches often look vintage and can be harder to replace. Identify the switch style before buying a replacement.
Turning Off The Power
Turning off the power is the first step before changing a light switch in an old house. It keeps you safe from electric shocks. Old homes may have outdated wiring, so be very careful. Always make sure the electricity is completely off before you start working.
Locate The Main Circuit Breaker
Find the main circuit breaker box in your home. It is often in a basement, garage, or utility room. The box controls the power to the entire house. You will need to open it to turn off the right switch.
Identify The Correct Circuit
Look for the breaker that controls the light switch you want to replace. The breakers should be labeled, but labels may be old or missing. Turn off the breaker that controls the room with the switch.
Test For Power
Use a non-contact voltage tester or a simple tester to check the switch. Touch the tester to the wires or switch terminals. If the tester lights up or beeps, power is still on. Make sure it shows no power before touching anything.
Double-check Safety
Turn the light switch on and off to confirm no power. The light should not turn on. If it does, the power is still on. Double-check the breaker or try another one. Safety first—never skip this step.
Removing The Old Switch
Removing the old switch is the first step in changing a light switch in an old house. This task requires care and attention to avoid electrical hazards. Following the right steps will make the process safe and smooth.
Old houses often have outdated wiring and switches. Taking time to understand the setup helps prevent damage. Safety should always come first.
Turn Off The Power
Start by turning off the power to the switch. Use the circuit breaker to cut electricity. Double-check by flipping the switch to see if the light turns off. Use a voltage tester to be sure no current is flowing.
Remove The Switch Cover Plate
Unscrew the cover plate carefully. Old screws may be tight or rusty. Use the right screwdriver to avoid stripping the screws. Place the screws somewhere safe for reuse.
Unscrew The Old Switch
Next, remove the screws holding the switch in the box. Pull the switch out gently. Do not yank it hard; wires can break. Keep the switch steady as you work.
Note The Wiring Setup
Look closely at the wires connected to the switch. Take a picture or write down the wire positions. Knowing where each wire goes helps during installation. Old houses may have different wiring colors or layouts.
Disconnect The Wires
Loosen the terminal screws to free the wires. Pull wires out carefully. Avoid touching wire ends together. Keep wires separated to prevent shorts.
Inspecting Wiring Conditions
Before changing a light switch in an old house, checking the wiring is important. Old wiring may have problems that could cause safety issues or damage. A careful inspection helps find any trouble and keeps the work safe.
Look for signs of wear, damage, or outdated materials. Old wires may be brittle or have cracks in the insulation. This can cause shorts or shocks. Also, check if the wiring matches modern safety standards.
Turn Off Power And Remove Cover Plate
Always turn off power at the breaker before touching wires. Use a voltage tester to confirm no electricity flows. Remove the switch cover plate to see the wires clearly. This step avoids accidents and prepares for inspection.
Check Wire Insulation And Condition
Examine the insulation around each wire. It should be intact without cracks or breaks. Look for signs of burning or melting. Old cloth-covered wires may need replacement. Damaged insulation can be dangerous and cause fire.
Identify Wire Types And Connections
Note the types of wires used. Copper wires are common and safe if in good shape. Aluminum wires require special care. Check how wires connect to the switch. Loose or corroded connections need fixing or replacing.
Look For Grounding And Safety Features
Ground wires improve safety by preventing shocks. Make sure a ground wire is present and connected. Some old houses lack proper grounding. Adding grounding may require extra work but is important for safety.
Connecting The New Switch
Connecting the new switch is a key step in changing a light switch in an old house. This part ensures the switch works correctly and safely. It requires attention to detail and careful handling of wires.
Old houses might have different wiring setups. Take your time to match wires correctly. Make sure power is off before starting this step. Safety first.
Identify The Wires
Look for the black, white, and ground wires. The black wire is usually the hot wire. The white wire is neutral. The bare copper or green wire is the ground. Check each wire carefully before connecting.
Attach Wires To The Switch
Connect the black wire to the brass screw on the switch. Attach the white wire to the silver screw if the switch requires it. Fasten the ground wire to the green screw. Tighten all screws securely.
Double-check Connections
Inspect all wire connections. Make sure no wires are loose or touching each other. Loose wires can cause shorts or shocks. Use electrical tape for extra safety around screws.
Secure The Switch And Cover
Push the wires gently into the electrical box. Mount the switch with screws. Attach the switch cover plate. This keeps everything neat and safe.
Securing And Testing The Switch
Securing and testing the switch is a key step in changing a light switch. This step ensures safety and proper function.
After wiring, the switch must be firmly attached. Loose wiring or a poorly fixed switch can cause sparks or failure.
Testing confirms the switch works and the circuit is safe. It avoids future problems and keeps your home safe.
Securing The Switch Properly
Use screws to fix the switch tightly to the electrical box. Check that wires are not loose or exposed.
Push the wires back gently without bending or pinching. The switch should sit flat against the wall.
Make sure the switch does not move when you press it. A firm switch lasts longer and works better.
Turning The Power Back On Safely
Turn the circuit breaker back on. Do this only after the switch is secure and the cover plate is on.
Stand clear and avoid touching wires. Power should flow safely to the switch and light fixture.
Testing The Switch Function
Flip the switch up and down several times. The light should turn on and off smoothly each time.
Check for flickering or delays in the light. These signs mean the switch or wiring may need adjustment.
Use a voltage tester if available. It confirms power flows correctly and helps find wiring mistakes.
Troubleshooting Common Issues
Troubleshooting common issues is important when changing a light switch in an old house. Old wiring and worn-out parts can cause problems. Knowing how to fix these can save time and keep the job safe.
Some issues are easy to spot and fix. Others may need more care. This section covers simple steps to find and solve common problems.
Checking For Loose Wires
Loose wires cause switches to fail or flicker. Turn off the power before touching wires. Tighten any loose wire connections with a screwdriver. Make sure wires are wrapped around screws correctly. This keeps the switch working well.
Testing The Switch With A Voltage Tester
A voltage tester shows if power reaches the switch. Turn off the power and remove the switch cover. Turn the power back on carefully. Touch the tester to wires to check for current. No reading means no power or a broken wire.
Identifying A Faulty Switch
If the switch feels loose or does not click, it might be bad. Replace it with a new switch. This often fixes the problem quickly. Old switches wear out over time and stop working.
Dealing With Old Or Damaged Wiring
Wiring in old houses may be brittle or frayed. Look for cracked or bare wires. Replace damaged wires or call an electrician. Safety is key to avoid shocks or fires.
Fixing A Switch That Won’t Stay On
This problem may happen if the switch is faulty or wires are loose. Double-check all connections. Swap the switch if needed. A firm connection keeps the light on.

Credit: diy.stackexchange.com
When To Call A Professional
Changing a light switch in an old house can be tricky. Old wiring and outdated parts may cause unexpected problems. Knowing when to call a professional helps keep you safe and avoids damage.
Some situations require expert help. A professional electrician has the skills and tools to handle complex issues. They ensure the job is done correctly and safely.
Signs Of Old Or Damaged Wiring
Wiring in old houses may be brittle or cracked. If wires look damaged, do not touch them. Sparks, burning smells, or flickering lights mean wiring might be unsafe.
Calling a professional is best for inspecting and replacing old wiring safely.
When Electrical Codes Must Be Followed
Old houses may not meet current electrical codes. A professional knows the rules and ensures updates follow the law. This keeps your home safe and avoids fines.
Complex code requirements should be handled by licensed electricians only.
Complex Or Multiple Switches
Some light switches control more than one light or outlet. Three-way or four-way switches are harder to replace. Mistakes can cause shorts or failures.
Let an electrician handle complex switch setups to avoid issues.
Lack Of Proper Tools Or Knowledge
Changing a light switch needs the right tools and basic electrical knowledge. Without these, accidents can happen. Electric shocks or damage to wiring are risks.
Call a professional if you do not feel confident or prepared.
Frequently Asked Questions
How Do I Safely Turn Off Power Before Changing A Light Switch?
Always switch off the circuit breaker controlling the switch. Use a voltage tester to confirm no electricity flows. This step prevents electric shock and ensures your safety during the replacement process.
What Tools Are Needed To Change A Light Switch?
You will need a screwdriver, voltage tester, wire stripper, and electrical tape. These tools help remove the old switch and install the new one safely and effectively.
Can I Replace A Light Switch In An Old House Myself?
Yes, if you follow safety steps and understand wiring basics. However, consult a professional if you feel unsure or the wiring seems outdated or complex.
How Do I Identify The Correct Wires In An Old Switch Box?
Look for black (hot), white (neutral), and green or bare (ground) wires. Use a voltage tester to confirm live wires before disconnecting anything to avoid mistakes.
Conclusion
Changing a light switch in an old house can seem hard. Take your time and follow each step carefully. Always turn off the power before starting work. Use the right tools for safety and ease. Double-check your connections before restoring power.
A working switch improves your home’s comfort and safety. Small repairs like this save money and boost confidence. Try it yourself and enjoy the satisfaction of a job done well.