Have you ever wished you could control one light from two different switches? Maybe a hallway light or a stairway lamp that turns on or off no matter which switch you use.
Learning how to do a three way light switch can make this happen—and it’s easier than you think. In this guide, you’ll discover simple steps to take control of your lighting, save time, and add convenience to your home. Keep reading, and by the end, you’ll be ready to tackle this project with confidence.
Tools And Materials Needed
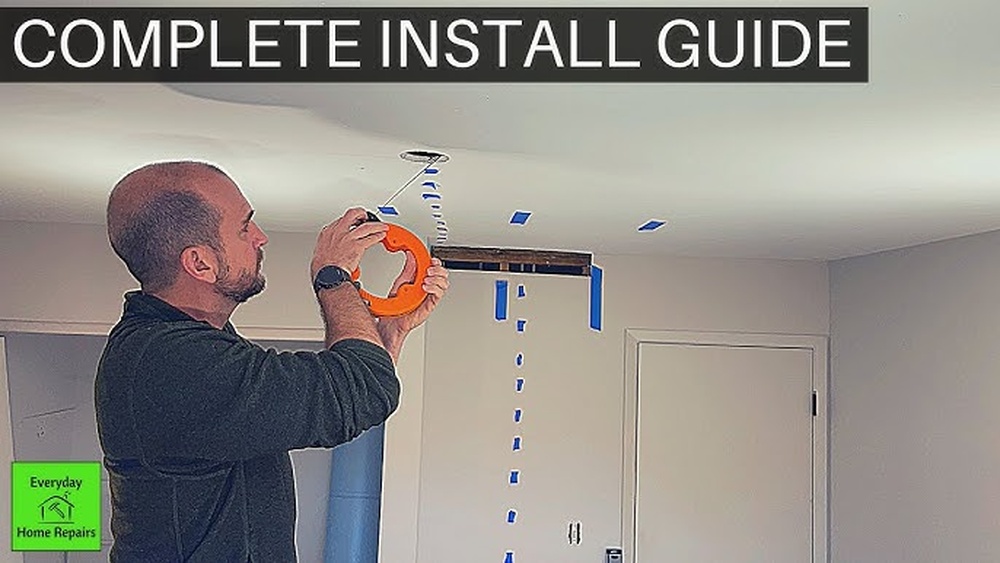
Before starting a three way light switch project, gather all tools and materials. This step saves time and avoids interruptions. Having the right items ensures safe and smooth work.
Essential Tools
- Screwdriver set (flathead and Phillips)
- Wire stripper
- Voltage tester
- Needle-nose pliers
- Electrical tape
- Drill (optional, for mounting)
- Flashlight or work light
Required Materials
- Two three way switches
- 14/3 or 12/3 electrical wire (with three conductors plus ground)
- Wire nuts
- Switch boxes
- Faceplates for switches
- Grounding wire
Credit: www.kennethballard.com
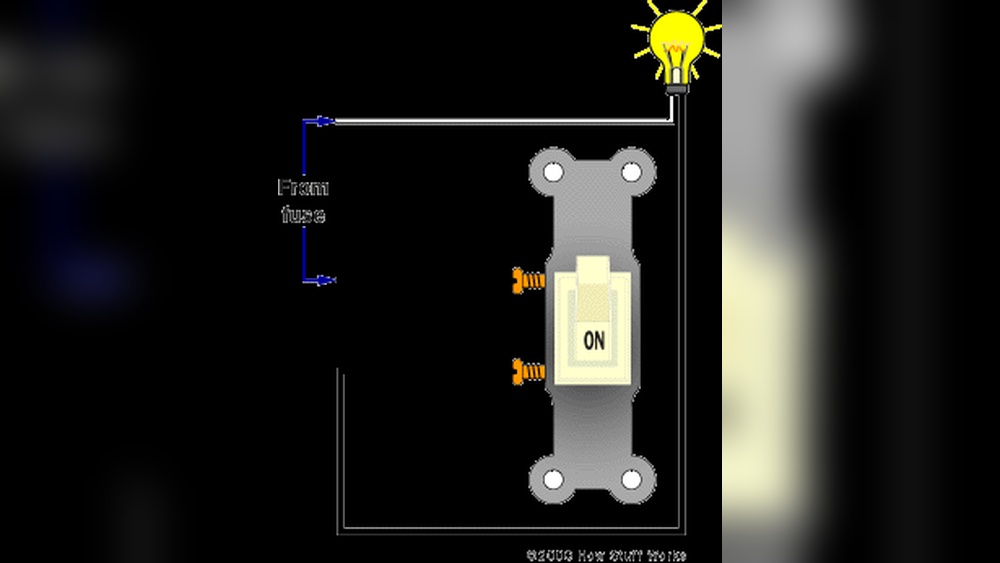
How A Three Way Switch Works
A three way light switch lets you control one light from two different places. This setup is common in hallways, stairs, or large rooms. It helps you turn lights on or off without walking back to the first switch. Understanding how it works makes installation easier and safer.
Basic Wiring Concept
A three way switch uses two switches and a special wiring setup. It has three terminals instead of two. The switches connect with traveler wires that carry current between them. One switch receives power from the source. The other switch connects to the light fixture. This wiring lets either switch control the light.
Switch Functionality
Each switch flips the current path inside it. When you flip one switch, it changes which traveler wire carries the power. The light turns on or off depending on the current path. Both switches work together to open or close the circuit. This design allows control from either location without complex wiring.
Safety Precautions
Always turn off power at the breaker before starting any wiring work. Use a voltage tester to confirm no electricity flows. Wear insulated gloves and follow all safety rules to avoid shocks.
Power Shutoff
Always turn off the power before starting any electrical work. Locate the correct circuit breaker and switch it off. Use a voltage tester to confirm no electricity flows to the switch. This step prevents electric shocks and injuries. Never skip this check. Safety starts with no live wires.
Proper Gear
Wear insulated gloves to protect your hands from electric shock. Use tools with rubber handles designed for electrical work. Safety glasses shield your eyes from sparks or debris. Avoid wearing metal jewelry that can conduct electricity. Proper gear keeps you safe and confident while working.
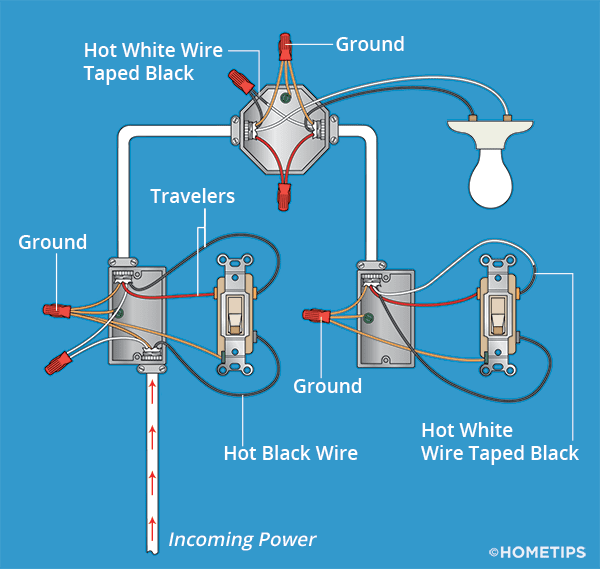
Step-by-step Wiring Guide
Wiring a three-way light switch can seem tricky. This guide breaks down the process into clear steps. Follow each part carefully for safe and effective wiring.
Understanding the wiring and connections is key. The right setup lets you control lights from two places.
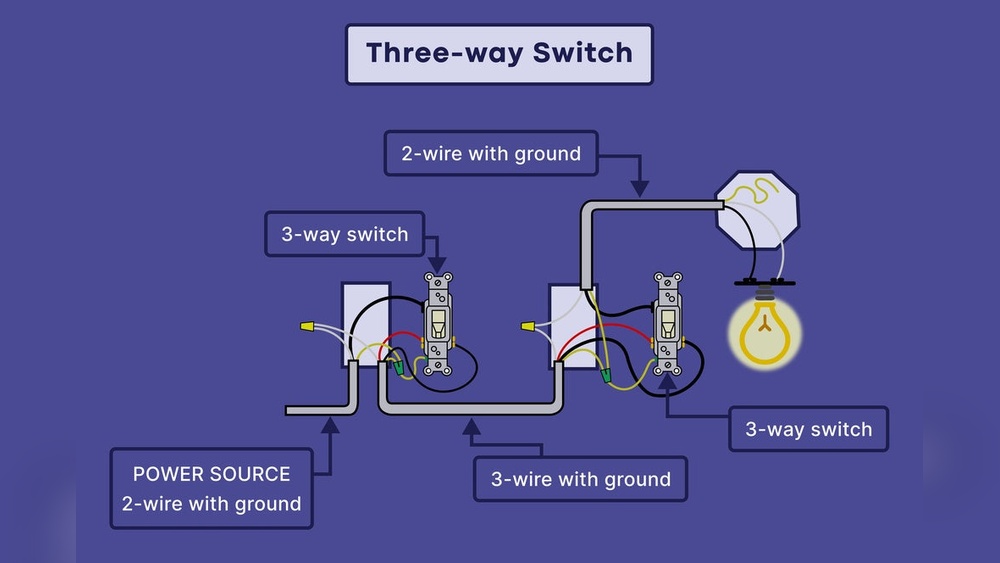
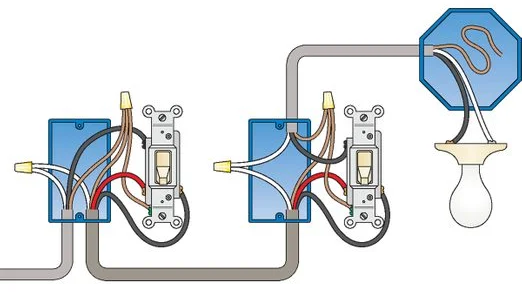
Identify Wiring Types
Start by recognizing your wires. Common wires include the ground, neutral, and traveler wires. The ground wire is usually green or bare copper. Neutral wires are white. Traveler wires can be red or black. Use a voltage tester to confirm wires before touching.
Connect The First Switch
Turn off power at the breaker box. Attach the ground wire to the green screw on the switch. Connect the common wire to the black screw. Then, attach the traveler wires to the remaining screws. Tighten all screws firmly to avoid loose connections.
Wire The Second Switch
At the second switch, connect the ground wire to the green screw. Attach the common wire to the black screw. Connect traveler wires to the other screws. Make sure wires are secure and not touching each other.
Attach The Light Fixture
Connect the fixture’s black wire to the common wire from the switch. Join the fixture’s white wire to the neutral wire. Attach the ground wire to the fixture’s grounding point. Use wire nuts to secure connections and wrap with electrical tape.
Test The Connections
Turn power back on at the breaker. Flip each switch to check the light’s operation. The light should turn on and off from both switches. If it does not, recheck your wiring connections. Safety first: always test with care.
Common Mistakes To Avoid
Installing a three-way light switch can be tricky for many people. Mistakes during wiring cause the switch to fail or create hazards. Avoiding common errors saves time and keeps your home safe. Pay close attention to wiring details and connections. Double-check every step before finishing the job.
Incorrect Wire Connections
Connecting the wrong wires is the most common mistake. Each wire has a specific role. Mixing traveler wires with common wires causes switches to malfunction. Always identify the common terminal on the switch. Use a voltage tester to find the live wire. Label wires during removal to avoid confusion. Connect traveler wires to traveler terminals only. Incorrect connections can cause flickering lights or no power at all.
Loose Wiring Issues
Loose wiring creates intermittent problems. Wires that are not tightly secured can disconnect. This causes the light switch to stop working randomly. Always strip the wire ends properly before attaching. Wrap wires firmly around screw terminals. Use wire nuts for wire-to-wire connections. Tug gently on wires after connecting to ensure tightness. Loose wiring can also lead to electrical shorts and fire risks.

Credit: mepacademy.com
Troubleshooting Tips
Troubleshooting a three-way light switch can be simple. Small errors often cause big problems. Understanding common issues saves time and effort. Here are some tips to fix typical problems quickly.
Switch Not Working
Check if power is off before touching wires. Loose connections cause switches to fail. Tighten all wire nuts and screws. Make sure wires connect to the right terminals. Test the switch with a voltage tester. Replace the switch if it feels warm or damaged. Sometimes, the problem is the light bulb, not the switch.
Light Flickering
Flickering lights often point to loose wiring. Inspect all connections in the switch box. Look for signs of wear or frayed wires. Tighten any loose screws or wire nuts. Use bulbs with the correct wattage for the fixture. Poor grounding can also cause flickering. Fix grounding issues to ensure steady light.
Upgrading To Smart Three Way Switches
Upgrading to smart three way switches offers modern control for your lighting. These switches bring convenience and energy savings to your home. You can control lights from your phone or voice assistant. They fit well with smart home systems and improve daily life.
Benefits Of Smart Switches
Smart switches allow remote control of lights from anywhere. You can set schedules to turn lights on and off automatically. These switches help save electricity by avoiding wasted light. Voice control adds hands-free convenience. They also offer dimming options for better mood lighting.
Installation Differences
Installing a smart three way switch needs a neutral wire in the wall box. This wire powers the smart switch electronics. Traditional switches may not have this wire. You replace one switch with a smart switch and pair it with a standard or smart companion switch. Some models connect via Wi-Fi or a hub. Follow manufacturer instructions carefully for safe installation.
Credit: www.hometips.com
Frequently Asked Questions
What Is A Three Way Light Switch?
A three way light switch allows control of one light from two locations. It uses two switches connected by traveler wires. This setup is ideal for hallways or large rooms. It improves convenience and flexibility in lighting control.
How Do You Wire A Three Way Switch?
To wire a three way switch, connect the common terminal to the power source or light. Then, connect traveler wires between the two switches. Finally, connect the neutral wires to complete the circuit. Always turn off power before wiring to ensure safety.
Can I Replace A Single Switch With A Three Way Switch?
Yes, you can replace a single switch with a three way switch. However, you need to install a second switch and run traveler wires between them. This allows control of the light from two points. Proper wiring knowledge is essential for this upgrade.
What Tools Are Needed For Installing A Three Way Switch?
You will need a voltage tester, wire stripper, screwdriver, electrical tape, and wire nuts. These tools help ensure safe and secure installation. Using the right tools makes wiring easier and reduces the risk of electrical hazards.
Conclusion
Wiring a three way light switch can seem tricky at first. Take your time and follow each step carefully. Double-check connections to avoid mistakes. Safety matters most—always turn off power before starting. With practice, this task becomes easier and more confident.
Now, you can control lights from two spots in your home. Simple tools and clear steps make the job doable. Try it yourself and enjoy the convenience it brings.