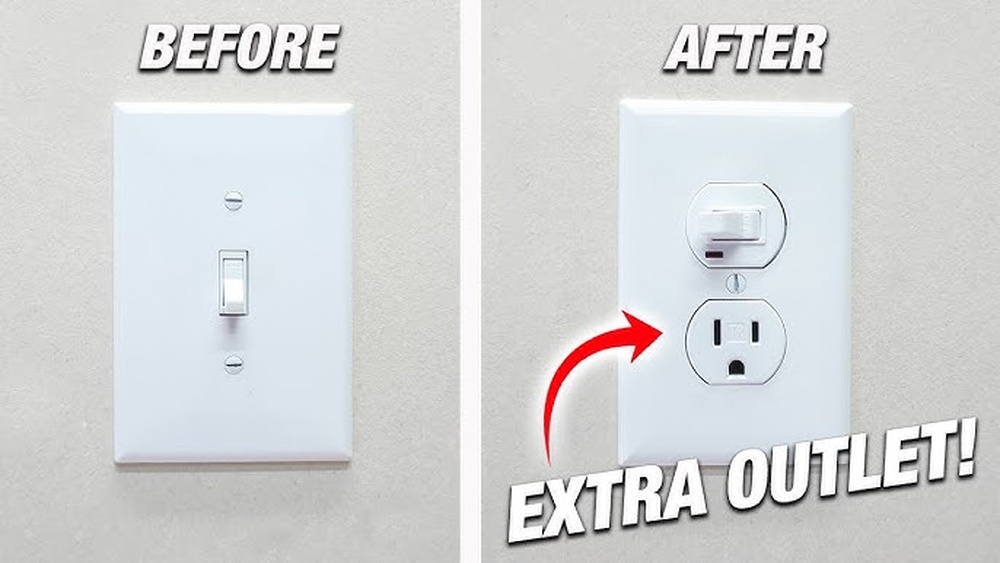
Are you looking to add an outlet from a light switch but don’t know where to start? You’re not alone.
Many homeowners want to make their spaces more functional without calling an electrician. Adding an outlet from a light switch can be a simple and cost-effective way to get extra power where you need it most. In this guide, you’ll discover step-by-step instructions that anyone can follow—even if you’re new to electrical work.
Keep reading, and you’ll soon have the skills to transform your room with an extra outlet, safely and confidently.

Credit: www.youtube.com
Tools And Materials Needed
Adding an outlet from a light switch needs the right tools and materials. This ensures the job is safe and done well. Using proper tools makes the work easier and faster. Having all materials ready prevents delays during the project.
Essential Tools
- Screwdriver set (flathead and Phillips)
- Wire stripper
- Voltage tester
- Needle-nose pliers
- Utility knife
- Drill with bits
- Measuring tape
- Electrical tape
- Flashlight or work light
Required Materials
- Electrical outlet (matching your home’s standard)
- Outlet box
- Electrical wire (14/2 or 12/2 gauge, depending on circuit)
- Wire nuts
- Outlet cover plate
- Wire connectors
- Grounding wire (if not included in cable)
Safety Precautions
Working with electrical wiring needs careful attention to safety. Taking the right precautions helps prevent accidents and injuries. Before adding an outlet from a light switch, follow these safety steps closely.
Power Shutoff
Always turn off the power at the circuit breaker. Do not rely on the light switch alone. Use a voltage tester to confirm no electricity flows. Double-checking avoids shocks and serious harm.
Protective Gear
Wear insulated gloves to protect your hands. Use safety goggles to guard your eyes from debris. Avoid loose clothing that can catch on wires. Good gear keeps you safe during every step.
Planning The Wiring
Start by mapping the existing wires inside the switch box. Plan where the new outlet will go and how to connect it safely. Check power flow to avoid overload and ensure proper grounding.
Locate Existing Switch Box
Start by finding the light switch box you want to work with. This box holds the wiring that powers your light. Turn off the power at the breaker to stay safe. Remove the switch cover and check the wires inside. Identify the hot wire, neutral wire, and ground wire. These wires will connect to your new outlet. Make sure the box is big enough to fit an outlet. If it is too small, you may need a bigger box for safe wiring.
Choose Outlet Position
Decide where you want the new outlet to be. The outlet should be easy to reach and useful for your needs. Measure the height from the floor to match other outlets in the room. Avoid placing the outlet too close to water sources. Check for any studs or pipes inside the wall. Mark the spot clearly on the wall surface. This helps when cutting the hole for the outlet box. Proper planning keeps the wiring neat and safe.
Turn Off The Power
Turning off the power is the first step before adding an outlet from a light switch. It keeps you safe from electric shocks. Always make sure no electricity flows to the wires you will work on.
Electricity can be dangerous. Handling live wires may cause serious injury. Take time to switch off the correct circuit. Double-checking is better than risking harm.
Use Circuit Breaker
Find the main electrical panel in your home. Open the panel door carefully. Look for the breaker that controls the light switch circuit. Flip the breaker switch to the OFF position. This cuts power to the switch and wires.
Label the breaker if needed. This helps avoid turning it on by mistake. Keep the panel closed after switching off. Do not work near the panel with wet hands.
Test For Live Wires
Use a voltage tester or a non-contact tester. Touch the tester to the wires near the light switch. If the tester lights up or beeps, wires are still live. Do not start work until the tester shows no power.
Test all wires in the box to be sure. Sometimes power can come from another circuit. Safety first. Double-check before handling any wiring.
Remove The Switch Cover
Removing the switch cover is the first step to add an outlet from a light switch. This step gives you access to the wiring behind the switch. It is important to do this carefully to avoid damage or injury.
Always turn off the power at the breaker before touching any wiring. Safety is the top priority in this process.
Unscrew Faceplate
Locate the screws holding the switch faceplate. Use a screwdriver to remove them. Keep the screws in a safe place for later use. Gently pull the faceplate away from the wall. This exposes the switch and wiring inside.
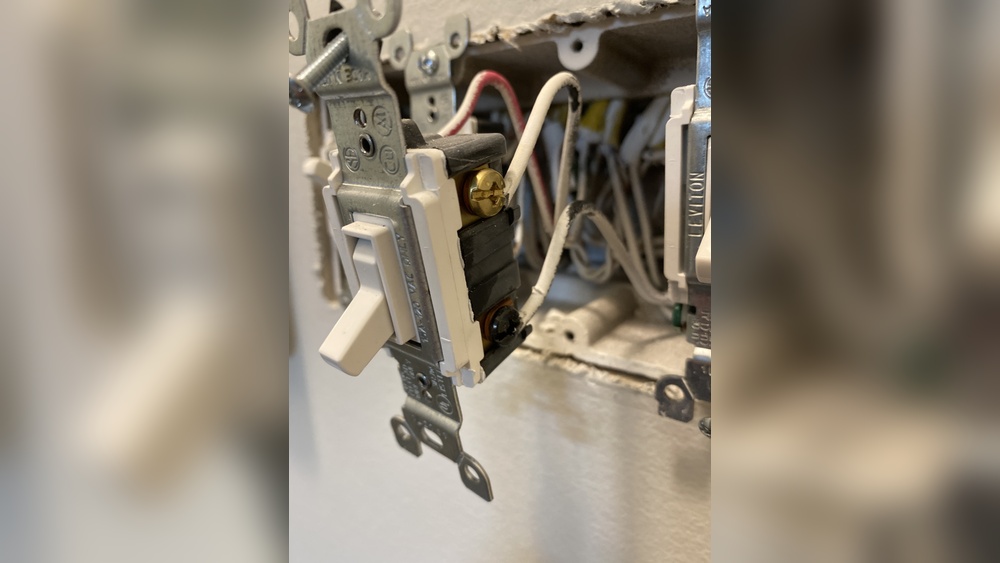
Access Switch Wiring
With the faceplate off, you can see the switch wiring clearly. Carefully pull the switch out from the electrical box. Do not yank or force it. Check the wires connected to the switch. Make sure the wires are not damaged or loose.

Credit: www.do-it-yourself-help.com
Run Cable To New Outlet
Running cable to a new outlet is a key step in this electrical project. It connects power from the light switch to the new outlet. This process needs care and planning to keep everything safe and functional.
Start by measuring the distance between the switch box and the new outlet location. This helps you get the right length of cable. Next, you will route the cable through walls or ceilings. Follow safety rules to avoid hazards and damage.
Measure And Cut Wire
Measure the path for the cable carefully. Add a few extra inches for connections and bends. Use a tape measure for accuracy. Cut the wire with wire cutters. Make sure the cut is clean and straight. Avoid cutting too short, as this can cause problems later.
Route Cable Safely
Route the cable through wall studs or ceiling joists. Use a drill to create holes if needed. Keep the cable away from heat sources and sharp edges. Secure the cable with staples or clips every few feet. Avoid tight bends or kinks in the wire. This prevents damage and ensures good power flow.
Wire The Outlet
Wiring the outlet is a key step in adding a new power source from a light switch. It involves connecting the right wires carefully to ensure the outlet works safely and correctly. This process requires attention to detail and proper handling of electrical components.
Follow the steps below to wire the outlet properly. Each connection must be precise to avoid problems or hazards later.
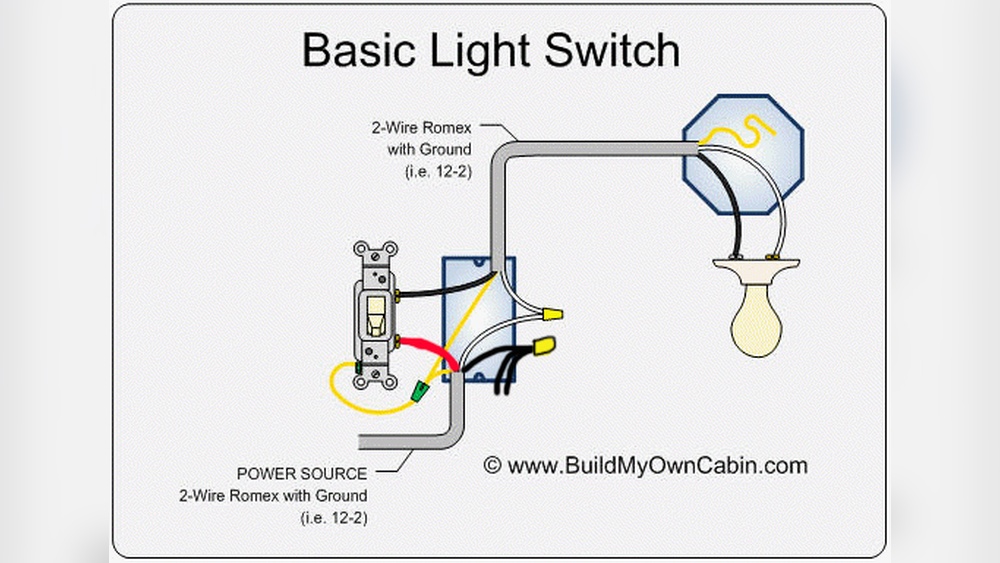
Connect Hot, Neutral, And Ground
Start by identifying the hot, neutral, and ground wires. The hot wire is usually black or red. The neutral wire is white. The ground wire is green or bare copper.
Attach the hot wire to the brass-colored screw on the outlet. Connect the neutral wire to the silver-colored screw. Finally, fasten the ground wire to the green screw. Make sure each wire is wrapped tightly around its screw.
Secure Connections
Check that no wire strands are loose or touching other screws. Tighten each screw firmly but avoid over-tightening. Loose connections can cause sparks or power loss.
Push the wires gently back into the outlet box. The outlet should sit flush and secure. Use the mounting screws to hold the outlet in place firmly. Properly secured connections keep the outlet safe and functional.

Credit: diy.stackexchange.com
Modify The Switch Wiring
Modifying the switch wiring is a key step to add an outlet from a light switch. It involves changing the current wiring to power both the switch and the new outlet safely. Proper wiring ensures the outlet works without affecting the switch’s function.
Careful attention is needed during this process to avoid electrical hazards. Understanding your existing wiring setup helps to make the right changes. Follow each step to keep your project safe and effective.
Identify Wiring Type
First, open the switch box and look at the wires. Most switches have two or three wires: black (hot), white (neutral), and sometimes green or bare copper (ground). Check if the neutral wire is present. Some older homes may lack a neutral wire at the switch.
Use a voltage tester to confirm which wire carries power. Identify the line (power source) and load (to the light) wires. Knowing these will guide how to connect the new outlet properly.
Make Necessary Adjustments
Turn off the power at the breaker before touching wires. If a neutral wire is missing, you may need to run a new cable. Connect the black wire from the power source to the new outlet’s hot terminal. Link the white neutral wire from the source to the outlet’s neutral terminal.
Use wire nuts to join wires safely. Attach the ground wire to the outlet’s ground terminal and the switch box if metal. Arrange all wires neatly inside the box. Secure the outlet and switch back in place.
Install The Outlet Box
Installing the outlet box is an important step in adding an outlet from a light switch. This box holds the outlet securely in place. It also protects the wires and keeps everything organized inside the wall. Proper installation ensures safety and long-lasting performance.
Mount Box Properly
Choose the right spot for the outlet box on the wall. The box should align with the light switch box. Use a pencil to mark the outline on the drywall. Cut carefully along the marks with a drywall saw. Insert the box into the hole gently. Make sure it fits snugly without gaps.
Ensure Stability
Secure the outlet box firmly to the wall studs or drywall. Use screws designed for outlet boxes. Tighten them until the box does not move. Avoid over-tightening to prevent damage. A stable box prevents the outlet from becoming loose over time. Check the box’s position before finalizing the installation.
Attach The Outlet
Attaching the outlet is a key step in adding a new power source from a light switch. This part makes sure the outlet stays safely in place. Follow the steps carefully for a secure and neat finish.
Secure Outlet To Box
First, align the outlet with the electrical box. Push the outlet gently inside the box. Use screws to fix the outlet firmly to the box. Tighten the screws until the outlet does not move. Avoid over-tightening to prevent damage. The outlet should sit flush with the wall surface.
Replace Outlet Cover
Next, place the outlet cover over the secured outlet. Fit it carefully to avoid gaps or cracks. Screw the cover plate in place using a screwdriver. The cover protects wires and gives a clean look. Check that the cover is tight but not cracked. This step finishes the installation safely and neatly.
Restore Power And Test
After installing an outlet from a light switch, restoring power and testing is the final step. This step ensures the new outlet works safely and correctly. Follow the instructions carefully to avoid electrical issues.
Turn On Circuit Breaker
Locate the circuit breaker box in your home. Find the switch controlling the power to the new outlet. Flip the breaker switch back to the ON position. This action restores electricity to the outlet wiring. Be careful not to touch any exposed wires while turning on the breaker.
Check Outlet Functionality
Use a voltage tester or plug in a small device like a lamp. Confirm the outlet supplies power and works properly. Test all outlet slots to ensure full functionality. If the device turns on or the tester shows power, the outlet installation is successful. If not, turn off the breaker and double-check your wiring connections before trying again.
Troubleshooting Tips
Troubleshooting is key when adding an outlet from a light switch. Small mistakes can cause the outlet to fail or become unsafe. Knowing common problems helps you fix issues fast. It also keeps your work safe and reliable.
Common Wiring Issues
Incorrect wiring is the top cause of outlet problems. Mixing up hot, neutral, and ground wires can stop the outlet from working. Loose connections may cause flickering or power loss. Using wrong wire sizes can create a fire risk. Test all wires with a voltage tester before connecting. Double-check each wire matches the diagram. Tighten screws firmly but do not over-tighten. Make sure the outlet box has enough space for all wires.
When To Call A Professional
Call an electrician if you see sparks or burning smells. If the circuit breaker trips often, get expert help. Complex wiring setups or old homes need professional checks. Do not work if you feel unsure or unsafe. A licensed electrician ensures code compliance and safety. They can spot hidden problems and fix them fast. Investing in a professional can save time and prevent accidents.
Frequently Asked Questions
How Do I Add An Outlet From A Light Switch?
To add an outlet from a light switch, first turn off power. Then, connect the outlet’s hot wire to the switch’s load wire. Use proper wiring techniques and secure connections. Finally, test the outlet for power before closing the box.
Can I Control An Outlet With A Light Switch?
Yes, you can control an outlet with a light switch by wiring the outlet’s hot terminal to the switch’s load wire. This allows the outlet to turn on or off using the switch, ideal for lamps or appliances.
What Tools Are Needed To Add An Outlet From A Switch?
You’ll need a voltage tester, wire stripper, screwdriver, electrical tape, wire nuts, and a new outlet. Also, use a drill if running new wiring through walls. Safety gear like gloves and goggles is recommended.
Is It Safe To Add An Outlet From A Light Switch?
Yes, it is safe if you turn off power and follow electrical codes. Incorrect wiring can cause shocks or fires, so use caution or hire a professional if unsure.
Conclusion
Adding an outlet from a light switch can save space and add convenience. Always turn off power before starting any electrical work. Use the right tools and follow safety steps closely. Double-check your wiring to avoid mistakes. Taking your time helps prevent accidents and ensures a good result.
This simple upgrade can make your home more functional. Stay safe and enjoy your new outlet.