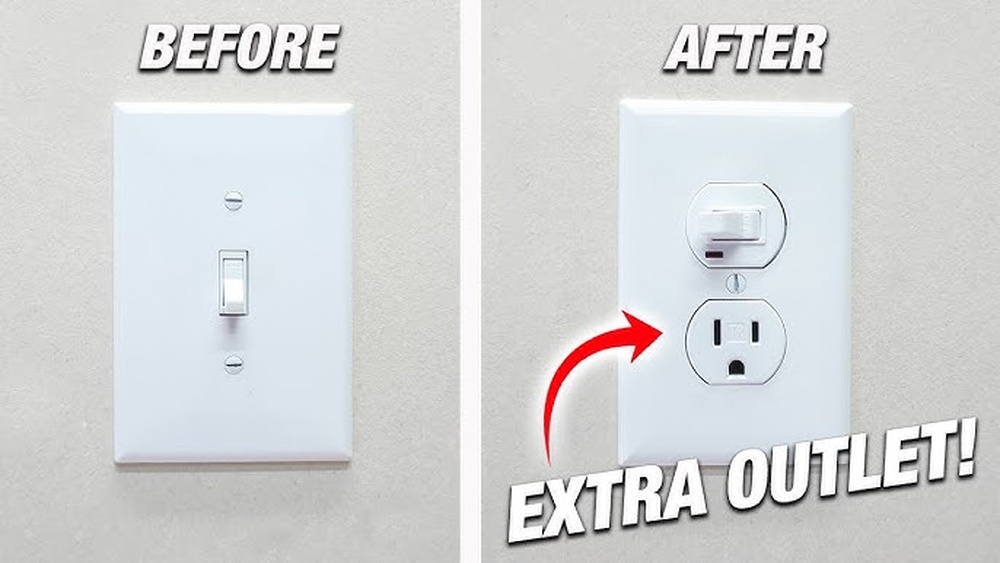
Are you tired of having a light switch where you really need an outlet? Maybe you want to charge your devices or plug in a lamp right where the switch is.
Replacing a light switch with an outlet might seem tricky, but it’s easier than you think. With just a few simple steps, you can add more power options to your room without calling an electrician. Keep reading, and you’ll learn exactly how to do it safely and quickly—giving you the convenience you’ve been missing.
Tools And Materials Needed
Replacing a light switch with an outlet requires the right tools and materials. Having everything ready makes the job smooth and safe. This section lists all the basics needed for the project.
Essential Tools
A screwdriver set is key. Both flathead and Phillips types work best. Wire strippers help remove insulation from wires safely. A voltage tester ensures no electricity flows during work. Needle-nose pliers assist in bending and holding wires. A utility knife can trim wires or insulation if needed. A flashlight or headlamp helps see inside dark electrical boxes.
Materials Required
Choose a grounded electrical outlet that fits your needs. Use a new outlet wall plate to cover the outlet. Electrical tape secures wire connections. Wire nuts connect wires safely without loose ends. Use electrical cables rated for your home’s voltage. Always pick materials that meet local electrical codes for safety.
Safety Precautions
Working with electricity can be dangerous. Taking safety precautions is very important. Before replacing a light switch with an outlet, follow these safety steps. They protect you from electric shock and other risks. Always respect electrical work rules for your safety and home safety.
Turn Off The Power
Start by turning off the power at the circuit breaker. Do not rely on the light switch to cut power. Use a tester to check if the wires are live. Make sure no electricity flows through the wires before touching them.
Use Proper Tools
Use tools with insulated handles. This reduces the chance of electric shock. Avoid using damaged or worn tools. Choose screwdrivers, wire strippers, and testers made for electrical work. Proper tools make the job safer and easier.
Wear Safety Gear
Wear rubber-soled shoes and safety glasses. Rubber shoes stop electricity from passing through your body. Safety glasses protect your eyes from sparks or debris. These simple items help keep you safe during work.
Work In A Dry Area
Never work with electricity in wet or damp places. Water conducts electricity and increases shock risk. Dry your hands and tools before starting. Ensure the area is dry to avoid accidents.
Follow Local Electrical Codes
Check local rules about electrical work. Some areas require a licensed electrician. Proper permits and inspections keep your work safe and legal. Following codes protects you and your home.
Turning Off Power
Turning off the power is the first and most important step before starting any electrical work. It keeps you safe from electric shocks and prevents damage to the wiring. Never skip this step, even if the switch looks off. Electricity can still flow inside the wires.
Always treat electrical work with caution. Safety should be your top priority. This section will guide you through the process of turning off power safely.
Locate The Circuit Breaker Panel
Find the main electrical panel in your home. It is usually in a basement, garage, or utility room. The panel contains switches called circuit breakers. Each breaker controls power to different parts of the house.
Identify The Correct Breaker
Look for the breaker that controls the room where the light switch is located. Labels on the panel may help. If labels are missing, turn off breakers one by one and check which area loses power.
Switch Off The Breaker
Flip the correct breaker to the off position. This stops electricity from flowing to the light switch. You may hear a click when the breaker switches off. Make sure the switch stays in the off position.
Test The Power Is Off
Use a voltage tester or a simple device like a lamp to check. Plug the device into an outlet nearby or use the tester on the wires. If the device does not work, the power is off and safe to work on.

Credit: www.youtube.com
Removing The Light Switch
Removing the light switch is the first step in replacing it with an outlet. This task requires care and attention to safety. Turning off the power is critical before touching any wires. Once the power is off, removing the switch becomes simple and safe.
Turn Off The Power
Locate the correct circuit breaker in your electrical panel. Switch it off to cut power to the light switch. Use a voltage tester to confirm no electricity flows to the switch. This prevents shocks during removal.
Remove The Switch Cover Plate
Use a screwdriver to take off the screws holding the cover plate. Gently pull the plate away from the wall. This exposes the light switch and wiring behind it.
Unscrew And Pull Out The Switch
Remove the screws holding the light switch to the electrical box. Carefully pull the switch out to see the wires. Keep the wires connected until ready to disconnect.
Note Wire Connections
Observe how wires connect to the switch terminals. Take a photo or write notes for reference. This helps when installing the new outlet.
Disconnect The Wires
Loosen the terminal screws to free the wires from the switch. Do not let wires touch each other or metal parts. Use electrical tape to cover wire ends if needed.
Checking The Wiring
Checking the wiring is a crucial step when replacing a light switch with an outlet. This ensures safety and proper function. You must understand the wiring setup before starting the replacement. Incorrect wiring can cause electrical problems or hazards. Take time to carefully inspect the wires in the switch box.
Turn Off Power At The Circuit Breaker
Always turn off power before touching any wires. Find the right breaker and switch it off. Use a tester to confirm no electricity flows to the switch. This step prevents shocks and accidents during wiring checks.
Identify The Wires Inside The Box
Look inside the switch box to see all wires clearly. Typically, you will find black (hot), white (neutral), and green or bare (ground) wires. Identify each wire by color and position. Take a picture if needed for reference.
Check For A Neutral Wire
An outlet needs a neutral wire to work properly. Some switch boxes may lack a neutral wire. Look for white wires bundled or connected in the box. No neutral means extra wiring or changes are necessary.
Inspect Wire Connections
Check if wires are tightly connected to the switch terminals. Loose or damaged wires can cause outlet failure or hazards. Remove old switch terminals carefully to avoid damage. Note how wires connect to reuse them correctly.
Installing The Outlet
Start by turning off the power to the switch. Remove the old switch and connect the outlet wires carefully. Secure the outlet in the box and attach the cover plate.
Preparing The Electrical Box
Turn off the power at the circuit breaker to stay safe. Use a voltage tester to confirm no power flows in the wires. Remove the existing switch carefully. Check the electrical box for any damage or loose wires. Clean the box to make space for the new outlet. Ensure the box is deep enough for the outlet to fit properly.
Connecting The Wires To The Outlet
Identify the hot, neutral, and ground wires by their colors. Connect the black (hot) wire to the brass terminal. Attach the white (neutral) wire to the silver terminal. Secure the green or bare copper (ground) wire to the green screw. Tighten all screws firmly to hold wires in place. Make sure no wire insulation is under the screws.
Mounting The Outlet And Finishing Up
Carefully fold the wires back into the electrical box. Align the outlet with the mounting holes in the box. Use screws to secure the outlet firmly to the box. Attach the outlet cover plate to finish the installation. Restore power at the breaker and test the outlet with a device. Confirm the outlet works safely before closing the project.
Connecting The Wires
Connecting the wires is the key step when replacing a light switch with an outlet. This task requires care and attention to safety. Correct wiring ensures the outlet works properly and prevents electrical hazards.
Before starting, identify each wire’s role. Usually, you will find a hot wire, a neutral wire, and a ground wire. Understanding these helps to connect the outlet correctly.
Identify The Hot Wire
The hot wire carries electricity from the power source. It is usually black or red. Use a voltage tester to confirm which wire is hot. Connect this wire to the outlet’s brass screw.
Connect The Neutral Wire
The neutral wire completes the electrical circuit. It is typically white. Attach this wire to the silver screw on the outlet. Make sure the connection is tight and secure.
Attach The Ground Wire
The ground wire protects against electrical shocks. It is usually green or bare copper. Fasten this wire to the green screw on the outlet. This step is important for safety.
Double-check All Connections
After connecting each wire, inspect all screws and wires. Ensure no wires are loose or touching each other. A secure connection prevents shorts and sparks.
Securing The Outlet And Cover Plate
Securing the outlet and cover plate is the final step in replacing a light switch with an outlet. This step keeps everything safe and neat. Proper installation prevents wires from moving and protects against shocks.
Take your time to ensure the outlet fits snugly into the box. A loose outlet can cause problems later. The cover plate finishes the job by covering the electrical box edges.
Positioning The Outlet Correctly
Align the outlet with the screw holes in the electrical box. Push it gently but firmly into place. Make sure no wires are pinched or pushed out of place. A well-positioned outlet sits flat against the wall.
Fastening The Outlet Securely
Use the screws provided with the outlet to attach it. Tighten them evenly to avoid tilting the outlet. Do not overtighten. This can crack the outlet or strip the screws.
Installing The Cover Plate
Choose the right cover plate for your outlet style. Place it over the outlet, aligning the screw holes. Insert the cover plate screws and tighten them gently. The cover plate should sit flush against the wall.
Checking Your Work
Look closely at the outlet and cover plate. Make sure everything is straight and secure. Wiggle the outlet lightly; it should not move. A stable outlet and cover plate ensure safety and a clean look.
Restoring Power And Testing
After replacing a light switch with an outlet, restoring power and testing are crucial steps. These steps confirm the outlet works safely and correctly. Safety checks prevent electrical hazards and ensure the device functions as expected.
Follow the instructions carefully to avoid damage or injury. This section guides you through turning the power back on and testing the new outlet.
Turning The Circuit Breaker Back On
Locate your home’s circuit breaker panel. Find the breaker that controls the circuit you worked on. Flip the breaker switch from OFF to ON. This restores electricity to the outlet and surrounding area.
Ensure the breaker stays in the ON position. If it trips again quickly, turn it off and check your wiring. Loose or incorrect connections cause breakers to trip.
Testing The Outlet For Power
Use a voltage tester or a simple device like a lamp to test the outlet. Plug the device into the new outlet. Switch the device on to check for power.
Confirm the device powers on without flickering or interruptions. This means the outlet has power and is wired correctly.
Checking The Outlet For Proper Wiring
A receptacle tester helps confirm correct wiring. It indicates if wires are reversed or missing. Follow the tester’s instructions for accurate results.
Correct wiring ensures safety and prevents electrical shocks. Fix any issues before finalizing the installation.

Credit: diy.stackexchange.com
Troubleshooting Common Issues
Replacing a light switch with an outlet may cause some common problems. Knowing how to fix these issues saves time and stress. This section covers simple troubleshooting tips.
Check For Power Supply Issues
First, ensure the power is off before starting any work. Use a voltage tester to confirm no electricity flows to the wires. If the outlet does not work, check the breaker panel. A tripped breaker can stop power to the outlet.
Verify Proper Wiring Connections
Incorrect wiring is a common cause of outlet failure. Match the wires by color: black or red to brass screws, white to silver screws. Tighten all screws firmly. Loose connections cause flickering or no power.
Inspect The Outlet For Damage
Look closely at the new outlet. Cracks, burn marks, or broken parts mean the outlet is faulty. Replace damaged outlets immediately. Using a damaged outlet risks electric shock or fire.
Test The Ground Wire
The ground wire improves safety by preventing shocks. Ensure it connects to the green screw on the outlet. Missing or loose ground wires can cause the outlet not to work or fail safety tests.
Confirm The Switch Box Size
Sometimes, the outlet does not fit well in the old switch box. A tight fit may cause wiring problems or shorts. Use a larger box if needed to hold the outlet and wires safely.
Tips For Safe Electrical Work
Working with electricity can be dangerous. Safety must be the top priority before replacing a light switch with an outlet. Taking simple safety steps reduces the risk of shocks and accidents. These tips guide you through safe electrical work.
Turn Off Power At The Circuit Breaker
Always shut off the power before starting any electrical task. Do not rely on the switch alone. Find the right breaker and switch it off. Use a voltage tester to check if the wires are dead.
Use Proper Tools And Equipment
Choose tools made for electrical work. Insulated screwdrivers and pliers protect you from shocks. Avoid using damaged or worn-out tools. Keep your workspace clean and organized.
Wear Safety Gear
Wear rubber-soled shoes to reduce shock risk. Use safety goggles to protect your eyes from sparks. Avoid loose clothing that may catch on wires. Gloves can help but must be rated for electrical work.
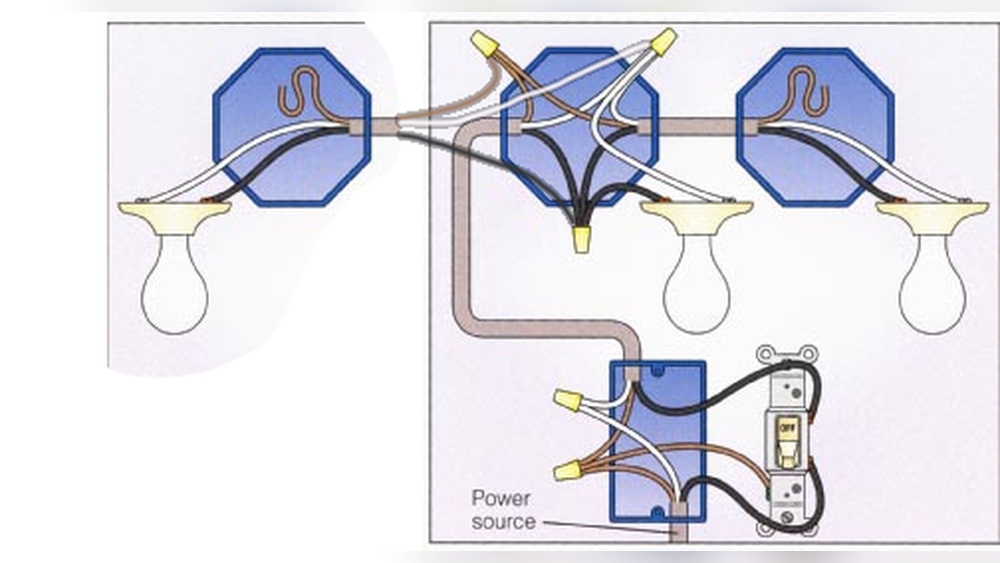
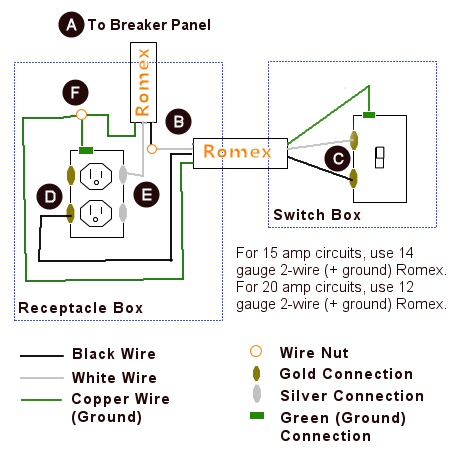
Follow Wiring Diagrams Carefully
Understand the wiring layout before you start. Use clear diagrams to connect wires correctly. Avoid guessing wire functions. Label wires if needed to keep track.
Test The Outlet After Installation
Use an outlet tester to confirm proper wiring. Check for correct voltage and grounding. Do not use the outlet if tests show problems. Fix any issues before restoring power.
Credit: www.oneprojectcloser.com
Frequently Asked Questions
Can I Replace A Light Switch With An Outlet Myself?
Yes, you can replace a light switch with an outlet if you follow safety precautions. Turn off the power at the breaker. Use a voltage tester to ensure no electricity flows. Properly connect wires to the outlet terminals, matching the switch wiring.
What Tools Are Needed To Replace A Light Switch?
You will need a screwdriver, wire stripper, voltage tester, electrical tape, and a new outlet. A flashlight can help in dim areas. These tools ensure safe and efficient replacement of your light switch with an outlet.
Is It Safe To Replace A Light Switch With An Outlet?
Yes, it is safe if you turn off the power and use proper tools. Ensure all connections are secure and wires are correctly attached. If unsure, consult a licensed electrician to avoid electrical hazards and code violations.
How Do I Identify Wires In The Switch Box?
Typically, black or red wires are hot, white is neutral, and green or bare is ground. Use a voltage tester to confirm which wire is live. Correct identification is crucial for safely installing the outlet and preventing short circuits.
Conclusion
Replacing a light switch with an outlet is a simple task. Follow the steps carefully for safety. Always turn off power before starting any work. Double-check your wiring connections to avoid problems. Take your time and work slowly. This small change can add convenience to your space.
With patience, anyone can do this project at home. Enjoy your new outlet and the extra power it provides.