Are you ready to take control of your home lighting? Knowing how to connect a light and switch is a simple skill that can save you time and money.
Imagine flipping a switch and instantly brightening up your room—without calling an electrician. In this guide, you’ll discover clear, step-by-step instructions that anyone can follow. Whether you’re fixing a broken switch or installing a new light, this article will give you the confidence to get the job done safely and efficiently.
Keep reading, and you’ll soon master a handy skill that makes your home more comfortable and functional.
Credit: futurehousestore.co.uk
Tools And Materials Needed
Connecting a light and switch requires the right tools and materials. Having everything prepared makes the job easier and safer. This section covers what you need before starting.
Basic Tools
You need a few basic tools to connect the light and switch. A screwdriver set is essential for screws. Wire strippers help remove insulation from wires. A voltage tester checks if wires have power. Pliers assist in bending and twisting wires. A drill may be needed for new holes.
Essential Materials
Materials include electrical wires, usually copper with plastic insulation. Use the correct gauge wire for your setup. A light switch and light fixture are necessary parts. Wire nuts help join wires safely. Electrical tape secures connections and prevents shorts. A switch box holds the switch in place.
Safety Gear
Safety gear protects you during the work. Wear insulated gloves to avoid shocks. Safety goggles shield your eyes from dust and debris. Use a face mask if working in dusty areas. Make sure your shoes have rubber soles to reduce risk. Always turn off power before starting any electrical work.
Types Of Light Switches
Preparing the work area is the first step in connecting a light and switch safely. This step protects you and helps the job go smoothly. Setting up the right space allows you to focus on the task without distractions or risks.
Clear and organized space makes it easier to find tools and parts. Safety checks reduce the chance of accidents and electrical shocks. Taking time here saves time later.
Turning Off Power
Turn off power at the main circuit breaker. This stops electricity from flowing to the wires you will work on. Use a clear label to mark the switch as off. Never work on electrical parts without cutting power first.
Clearing The Space
Remove all furniture and items near the work area. A clean space reduces tripping hazards and keeps tools handy. Lay down a cloth or plastic sheet to catch dust and debris. Good lighting helps you see wires and connections clearly.
Testing For Live Wires
Use a voltage tester to check wires before touching them. Test each wire one by one to confirm no current is present. This step is crucial even after turning off the breaker. It ensures your safety during installation.
Preparing The Work Area
Connecting a light and switch starts with understanding wiring basics. Proper wiring ensures safety and functionality. Knowing wire types, colors, and connectors is essential. This knowledge helps avoid mistakes and electrical hazards.
Identifying Wire Types
Different wires serve different purposes in electrical circuits. The main types include live, neutral, and ground wires. Live wires carry current to the switch or light. Neutral wires complete the circuit by carrying current back. Ground wires protect against electrical shocks by directing current safely. Recognizing these types keeps wiring clear and safe.
Understanding Wire Colors
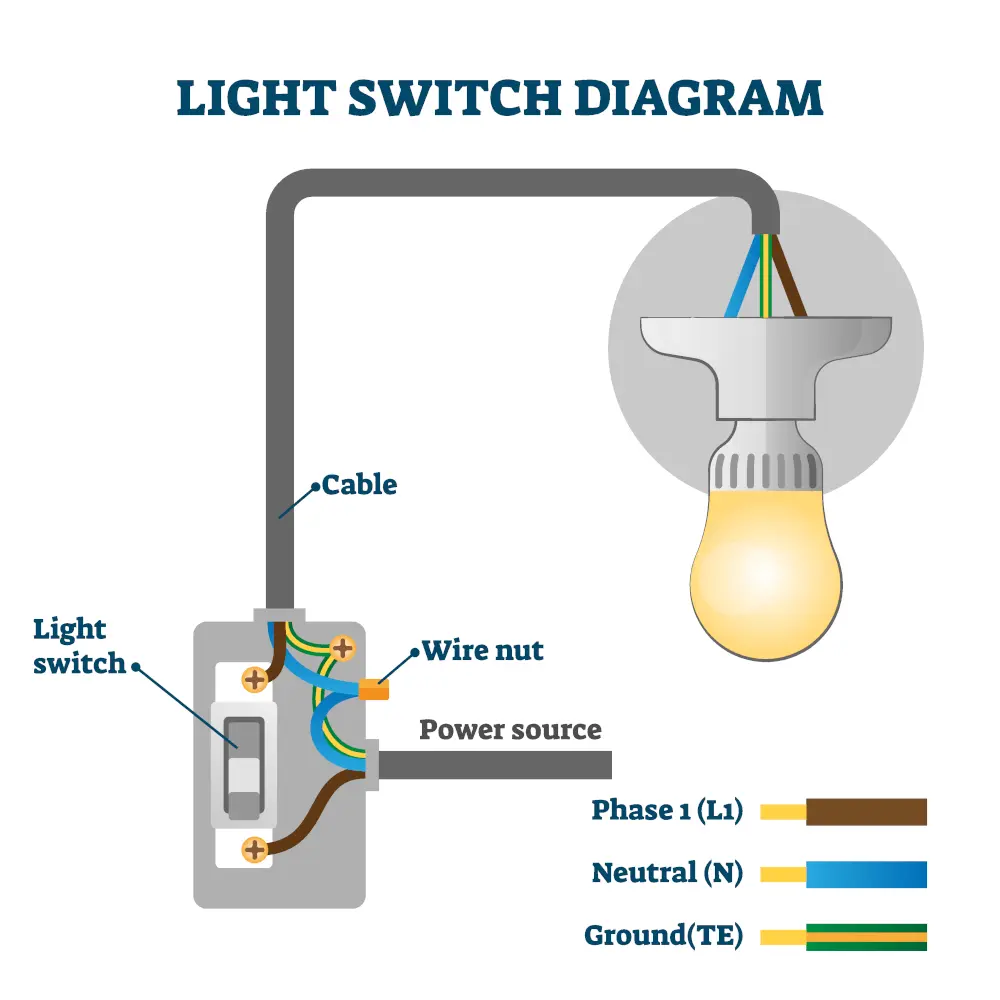
Wire colors help identify their role in the circuit. Usually, black or red wires are live. White wires are neutral and return current. Green or bare copper wires serve as ground. These colors may vary slightly by region but usually follow this pattern. Following color codes prevents wiring errors and enhances safety.
Using Wire Connectors
Wire connectors join wires securely and safely. They come in different sizes and types, like twist-on or push-in connectors. Always match connector size to wire gauge for a firm connection. Proper connectors prevent loose wires, which can cause shorts or fires. Using them correctly ensures a reliable electrical connection.
Wiring Basics
Connecting the light to the switch is a basic electrical task. It controls the power flow to the light fixture. Proper wiring ensures safety and functionality. This guide explains how to connect a light to a switch step-by-step.
Wiring A Single-pole Switch
A single-pole switch controls one light from one location. Turn off the power at the breaker before starting. Identify the black (hot) wire and the white (neutral) wire in the electrical box. Connect the black wire from the power source to one terminal on the switch. Then, connect the black wire leading to the light fixture to the other terminal. The white wires usually connect together with a wire nut and do not touch the switch. Ground wires connect to the green screw or grounding terminal.
Connecting The Light Fixture
Find the wires coming from the light fixture. Typically, these include a black (hot), white (neutral), and a ground wire. Connect the fixture’s black wire to the black wire from the switch. Connect the white fixture wire to the white neutral wires in the box. Attach the fixture’s ground wire to the grounding wires or screw. Make sure the fixture is mounted securely before wiring.
Securing Connections
Use wire nuts to cover all wire connections tightly. Tug gently on each wire to test the connection. Wrap electrical tape around wire nuts for extra security. Push wires neatly into the box to avoid pinching. Attach the switch and light fixture covers to finish the job. Turn the power back on and test the switch operation.
Connecting The Light To The Switch
Testing your work after connecting a light and switch is very important. It ensures everything works safely and correctly. Taking the time to test helps avoid future problems. This section guides you through simple steps to check your connections.
Restoring Power
Before testing, turn the power back on at the circuit breaker. Make sure the breaker is fully switched to the ON position. Check that no tools or wires touch live parts. Safety first. Always stand clear of the wiring while restoring power.
Checking The Switch Operation
Flip the switch up and down slowly. The light should turn on and off each time. If the light works smoothly, the connection is good. Watch for flickering or delayed response. These signs mean you need to recheck the wiring.
Troubleshooting Common Issues
If the light does not turn on, start by turning off the power. Double-check all wire connections are tight and correct. Look for any loose wires or damaged insulation. Use a voltage tester to confirm power at the switch and light. Replace the switch if it feels faulty or stuck. Sometimes, the bulb may be the problem—try a new one.

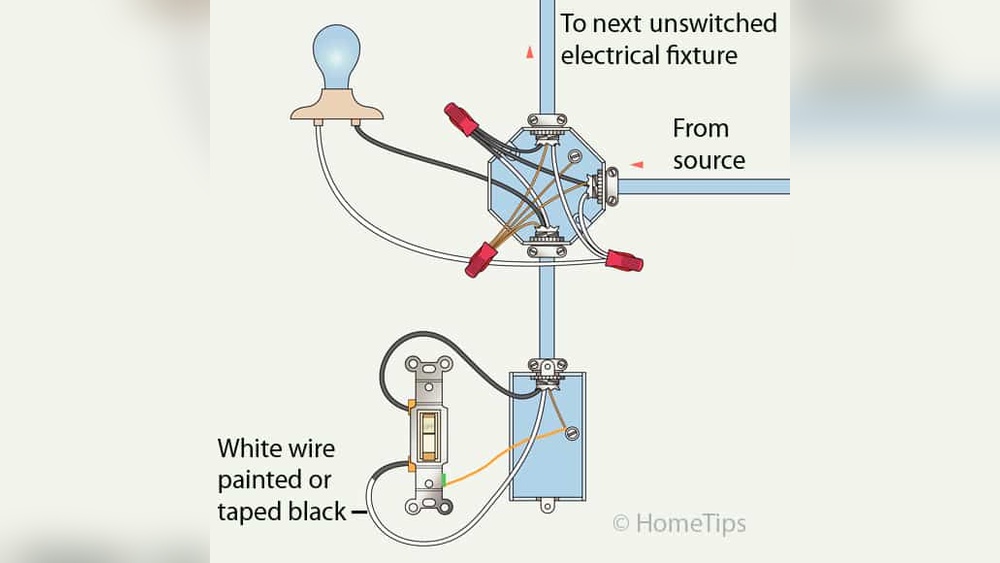
Credit: community.smartthings.com
Testing Your Work
Working with electrical wiring requires care. Safety is the top priority when connecting a light and switch. Following the right tips helps prevent accidents and damage. This section covers key safety practices for your project.
Avoiding Electrical Hazards
Turn off the power at the circuit breaker before starting. Use a voltage tester to confirm no electricity flows. Never touch wires with wet hands or tools. Keep your workspace dry and clean. Avoid using damaged or frayed wires. These steps reduce the risk of shocks and fires.
Proper Use Of Tools
Use insulated tools designed for electrical work. A screwdriver with a rubber handle protects against shocks. Wire strippers help remove insulation safely. Avoid using pliers or knives for stripping wires. Keep tools in good condition and clean after use. Proper tools make the job easier and safer.
When To Call A Professional
Complex wiring or old electrical systems need expert help. If unsure about connections or safety, stop and ask a professional. Faulty wiring can cause serious damage or injury. Hiring a licensed electrician ensures the job meets safety codes. Trust experts for peace of mind and safety.

Credit: diy.stackexchange.com
Frequently Asked Questions
How Do I Connect A Light To A Switch Safely?
Turn off power before starting. Use proper wiring: live, neutral, and ground. Connect switch to live wire only. Secure all connections with wire nuts. Test with a voltage tester before restoring power.
What Tools Are Needed To Connect Light And Switch?
You need a screwdriver, wire stripper, voltage tester, electrical tape, wire nuts, and a drill. These tools help ensure safe, secure, and efficient installation of the light and switch.
Can I Connect Multiple Lights To One Switch?
Yes, you can connect multiple lights to one switch. Connect all live wires from lights to switch’s live terminal. Ensure total wattage does not exceed switch rating for safety.
What Type Of Wire Is Best For Light And Switch?
Use 14-gauge wire for 15-amp circuits or 12-gauge for 20-amp circuits. Always use wire rated for lighting circuits to ensure safety and compliance with electrical codes.
Conclusion
Connecting a light and switch is simple with the right steps. Always turn off power before starting any work. Use clear wiring and follow safety rules. Test your connection to make sure it works well. With patience and care, anyone can do this task.
Practice makes the process easier and safer. Now, you can light up any room with confidence. Keep learning and stay safe with every project you try.