Your brake lights play a crucial role in keeping you and others safe on the road. If they’re not working properly, it can lead to dangerous situations or even a ticket.
The good news? Changing your brake light switch is something you can do yourself, even if you’re not a car expert. In this guide, you’ll learn simple, step-by-step instructions that make the process quick and stress-free. Keep reading—you’ll be surprised at how easy it is to fix this common issue and get back to driving with confidence.

Credit: www.youtube.com
Signs Of A Faulty Brake Light Switch
The brake light switch plays a vital role in your vehicle’s safety. It signals other drivers when you apply the brakes. A faulty switch can cause serious problems. Recognizing the signs early helps avoid accidents and costly repairs.
Watch for unusual behavior in your brake lights and car controls. These issues often point to a failing brake light switch. Acting quickly ensures your brake system works properly.
Brake Lights Not Illuminating
Brake lights that do not turn on are a clear warning. This issue can confuse drivers behind you. It increases the risk of rear-end collisions. The brake light switch may be broken or stuck. Check the brake lights regularly to stay safe.
Cruise Control Issues
Cruise control depends on the brake light switch to work correctly. A faulty switch can cause the cruise control to stop working. It may not turn off when you press the brake. This problem can make driving dangerous. Pay attention if your cruise control acts strangely.
Brake Pedal Problems
The brake light switch is connected to the brake pedal. Faulty switches may cause the brake pedal to feel odd. It might be hard to press or stay stuck. These signs affect your braking ability. Inspect your brake pedal if you notice unusual resistance or delay.
Tools And Materials Needed
Changing a brake light switch needs the right tools and materials. Preparing these helps the job go smoothly and safely. This section lists what you need before starting the work.
Basic Hand Tools
Gather simple hand tools first. A screwdriver set is often needed to remove panels. Wrenches or socket sets help loosen bolts. Needle-nose pliers assist with clips or connectors. A flashlight helps see in dark spaces under the dashboard.
Replacement Brake Light Switch
Buy a new brake light switch that fits your car model. Check the part number or ask at an auto parts store. Using the right switch ensures proper function. Avoid cheap or generic switches to prevent issues later.
Safety Gear
Wear gloves to protect your hands from sharp edges. Safety glasses keep dirt and debris out of your eyes. Use comfortable clothes that you don’t mind getting dirty. Always work in a well-lit area for better visibility.
Locating The Brake Light Switch
Finding the brake light switch is the first step to replace it correctly. This small part controls the brake lights that warn drivers behind you.
The switch is usually close to the brake pedal. Knowing its position helps save time and effort during repair.
Position Near The Brake Pedal
The brake light switch is mounted near the top of the brake pedal arm. It sits where the pedal moves and activates the switch.
Look under the dashboard on the driver’s side. The switch often attaches to a bracket or the pedal assembly itself.
Access Tips
Clear space around the brake pedal to see the switch clearly. Use a flashlight for better visibility.
Sometimes, you may need to remove a panel or cover under the dash. This provides better access to the switch and wiring.
Be careful with wires connected to the switch. Disconnect them gently to avoid damage.

Credit: www.youtube.com
Removing The Old Switch
Removing the old brake light switch is the first step in the replacement process. It needs care and attention to avoid damage. Follow these simple steps to remove the switch safely and correctly.
Disconnecting The Battery
Start by disconnecting the car battery. This stops any electrical flow and protects you from shocks. Use a wrench to loosen the negative terminal. Remove the cable and keep it away from the battery. This step is very important for safety.
Unplugging The Wiring Connector
Find the wiring connector attached to the brake light switch. Press the release tab gently and pull the connector out. Do not use force to avoid breaking the wires. Make sure the connector is fully unplugged before proceeding.
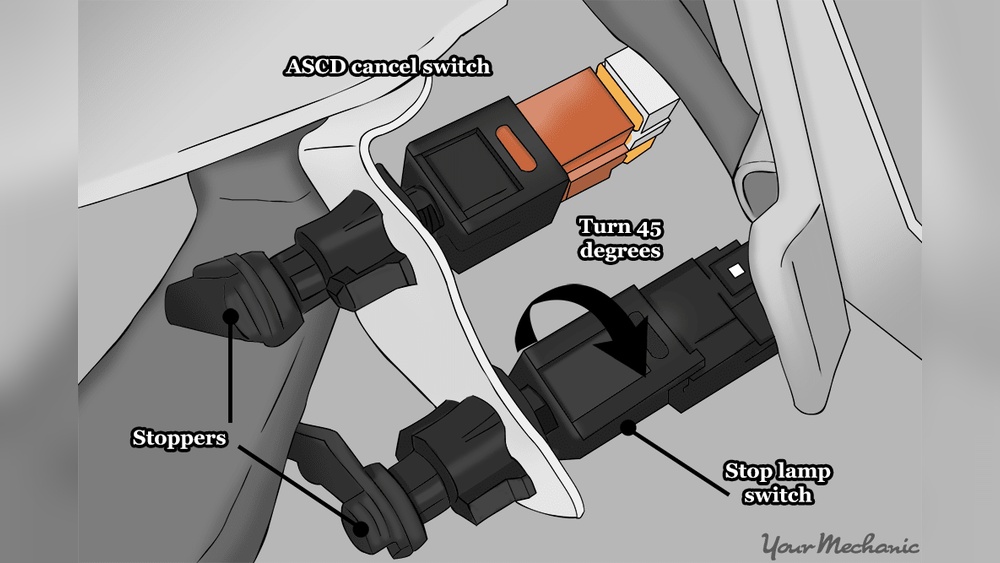
Detaching The Switch
Locate the brake light switch on the brake pedal bracket. Some switches twist out, others may have screws or clips. Turn the switch counterclockwise or remove the screws carefully. Pull the old switch out slowly to avoid damage to surrounding parts.
Installing The New Brake Light Switch
Installing the new brake light switch is a key step to ensure your brake lights work properly. The process is simple but needs care. Proper installation helps avoid electrical issues and keeps your car safe. Follow these steps for a smooth installation.
Positioning The Switch Correctly
Place the new switch in the same spot as the old one. It usually fits near the brake pedal arm. Make sure the switch button touches the pedal arm. This contact triggers the brake lights when you press the pedal. Check that the switch is straight and not tilted.
Securing The Switch
Use the mounting bracket or clip to hold the switch in place. Tighten any screws or nuts by hand first. Then, use a tool to secure them firmly but not too tight. The switch should not move or wiggle. A loose switch will cause brake light problems.
Reconnecting The Wiring
Attach the wiring connector to the new switch. Push it in until it clicks or feels secure. Check for any loose or damaged wires before connecting. Make sure the wires are not pinched or stretched. Proper wiring ensures the brake lights turn on correctly.

Credit: www.yourmechanic.com
Testing The New Switch
After installing the new brake light switch, testing it is crucial. This step ensures safety and proper vehicle function. Testing confirms the switch works as expected. It helps avoid issues on the road.
Checking Brake Light Functionality
Start by pressing the brake pedal gently. Have someone watch the rear brake lights. The lights should turn on immediately. Release the pedal and check if the lights go off. This simple test shows if the switch works well. If lights do not respond, the switch may need adjustment or replacement.
Verifying Cruise Control Operation
The brake light switch also affects cruise control. Turn on the cruise control system. Accelerate to a steady speed. Press the brake pedal lightly. The cruise control should turn off right away. If it stays on, the switch might be faulty. This test confirms the switch controls cruise functions correctly.
Common Troubleshooting Tips
Common issues with brake light switches can stop your brake lights from working. These problems make driving unsafe. Troubleshooting helps find the cause. It can save time and money before buying a new switch. Here are some common tips to fix brake light switch problems.
Switch Adjustment Issues
The brake light switch must be adjusted correctly. If it is too loose, the lights won’t turn on. If too tight, the lights stay on constantly. Check the switch position near the brake pedal. Press and release the pedal slowly. The switch should click softly. Adjust the switch until the brake lights work only when pressing the pedal.
Electrical Connection Problems
Loose or damaged wires cause brake lights to fail. Inspect the wiring connected to the switch. Look for broken wires or corrosion. Clean the connectors gently with contact cleaner. Reconnect all wires firmly. Use a multimeter to check for power at the switch. Fix any faulty wiring before testing the brake lights again.
Frequently Asked Questions
What Tools Are Needed To Change A Brake Light Switch?
You need basic tools like a screwdriver, pliers, and a replacement switch. A vehicle manual helps locate the switch precisely. Safety gloves and eye protection are also recommended during the process.
How Long Does It Take To Replace A Brake Light Switch?
Replacing a brake light switch typically takes 15 to 30 minutes. The process is straightforward for most vehicles. Time varies based on accessibility and your experience with car repairs.
How Do I Know If The Brake Light Switch Is Faulty?
Common signs include brake lights not working or staying on constantly. You may notice cruise control issues or difficulty shifting gears. Testing the switch with a multimeter confirms if it’s defective.
Can I Change The Brake Light Switch Myself Safely?
Yes, you can change it safely with basic knowledge and tools. Always disconnect the car battery before starting to avoid electrical hazards. Follow the vehicle manual instructions carefully for best results.
Conclusion
Changing a brake light switch is a simple task anyone can do. Follow the steps carefully and take your time. Double-check your work to make sure the lights work well. This small fix improves safety while driving. Save money by doing it yourself instead of going to a mechanic.
Keep your tools handy for future car care. Regular checks help avoid bigger problems later. Stay safe on the road with well-functioning brake lights.